Broccoli and Stilton Pastryless Pie

At long last the days are becoming brighter and the weather seems to be improving. Today at work I had the windows open as it was getting rather hot, sitting behind glass with the sun shining in. It’s time, I think, to start freshening up food…. making it lighter and more summery.

Time, in fact, to make something like a pastryless pie.

I often make this because it is perfect with a light, dressed green salad for supper and also because it is absolutely ideal to take to work for an easy packed lunch.

A pastryless pie is, in effect, a quiche without pastry. The quiche filling is baked inside strips of ham. What that means is that if you are baking it to share with friends then anyone with a wheat intolerance or coeliac disease doesn’t have to miss out.

If you are trying to cut carbs from your diet, well, it isn’t exactly Atkins because there’s plenty of vegetables in there but it does, at least, avoid pastry.

So then… what do you need?

I had some broccoli in the fridge and that, along with a lovely piece of Stilton cheese would make a lovely pie.

I had half a dozen free range eggs, a small pot of cream, a packet of sliced Serrano ham, 200g of Emmental cheese (which I love for its sweet nuttiness) a courgette, a handful of cherry tomatoes and few baby salad potatoes.

For those of you who don’t have access to Stilton or Serrano ham or, in fact, anything else I have listed, just remember I am putting those ingredients in because that’s what’s in my fridge.

As long as you have eggs, cream, some ham (some kind of air dried ham, sliced thinly) some cheese and some vegetables you can make this.

Now, because you are making what is really a quiche filling, it is going to be runny. And you don’t have a pastry shell to pour it into. I told you we were wrapping some air dried ham around it but that isn’t going to stop the filling from running out, so this is what to do

You can buy silicone paper cake liners from most places now – one of these popped inside a springform cake tin makes the ideal liner to keep all your lovely ingredients from seeping out when you bake it.

Open your packet of ham and drape the slices round the edge.

You don’t need to completely cover the sides and you don’t need to cover the base. What you are doing is making what will turn out to be a lovely, savoury, lightly crisped ham edging. It helps keep it in one piece when you cut it.

The bottom of the pie will be lined with a layer of steamed and sliced potatoes – it makes for a firmer base. Either slice them and steam them now, or use left  over cold salad potatoes. Because I am using broccoli, I steam that at the same time.

See? Just a thin layer of little slices of potato.

Followed by a lovely layer of broccoli florets

I found a courgette in the fridge and if you use a julienne cutter, you get a glorious tangle of shredded courgette. When this cooks it disappears into the gorgeousness of the creamy, cheesey, eggy filling so even for avowed courgette haters… this would slip right on past them. Another vegetable chalked up!

Scatter those shreds over the broccoli layer

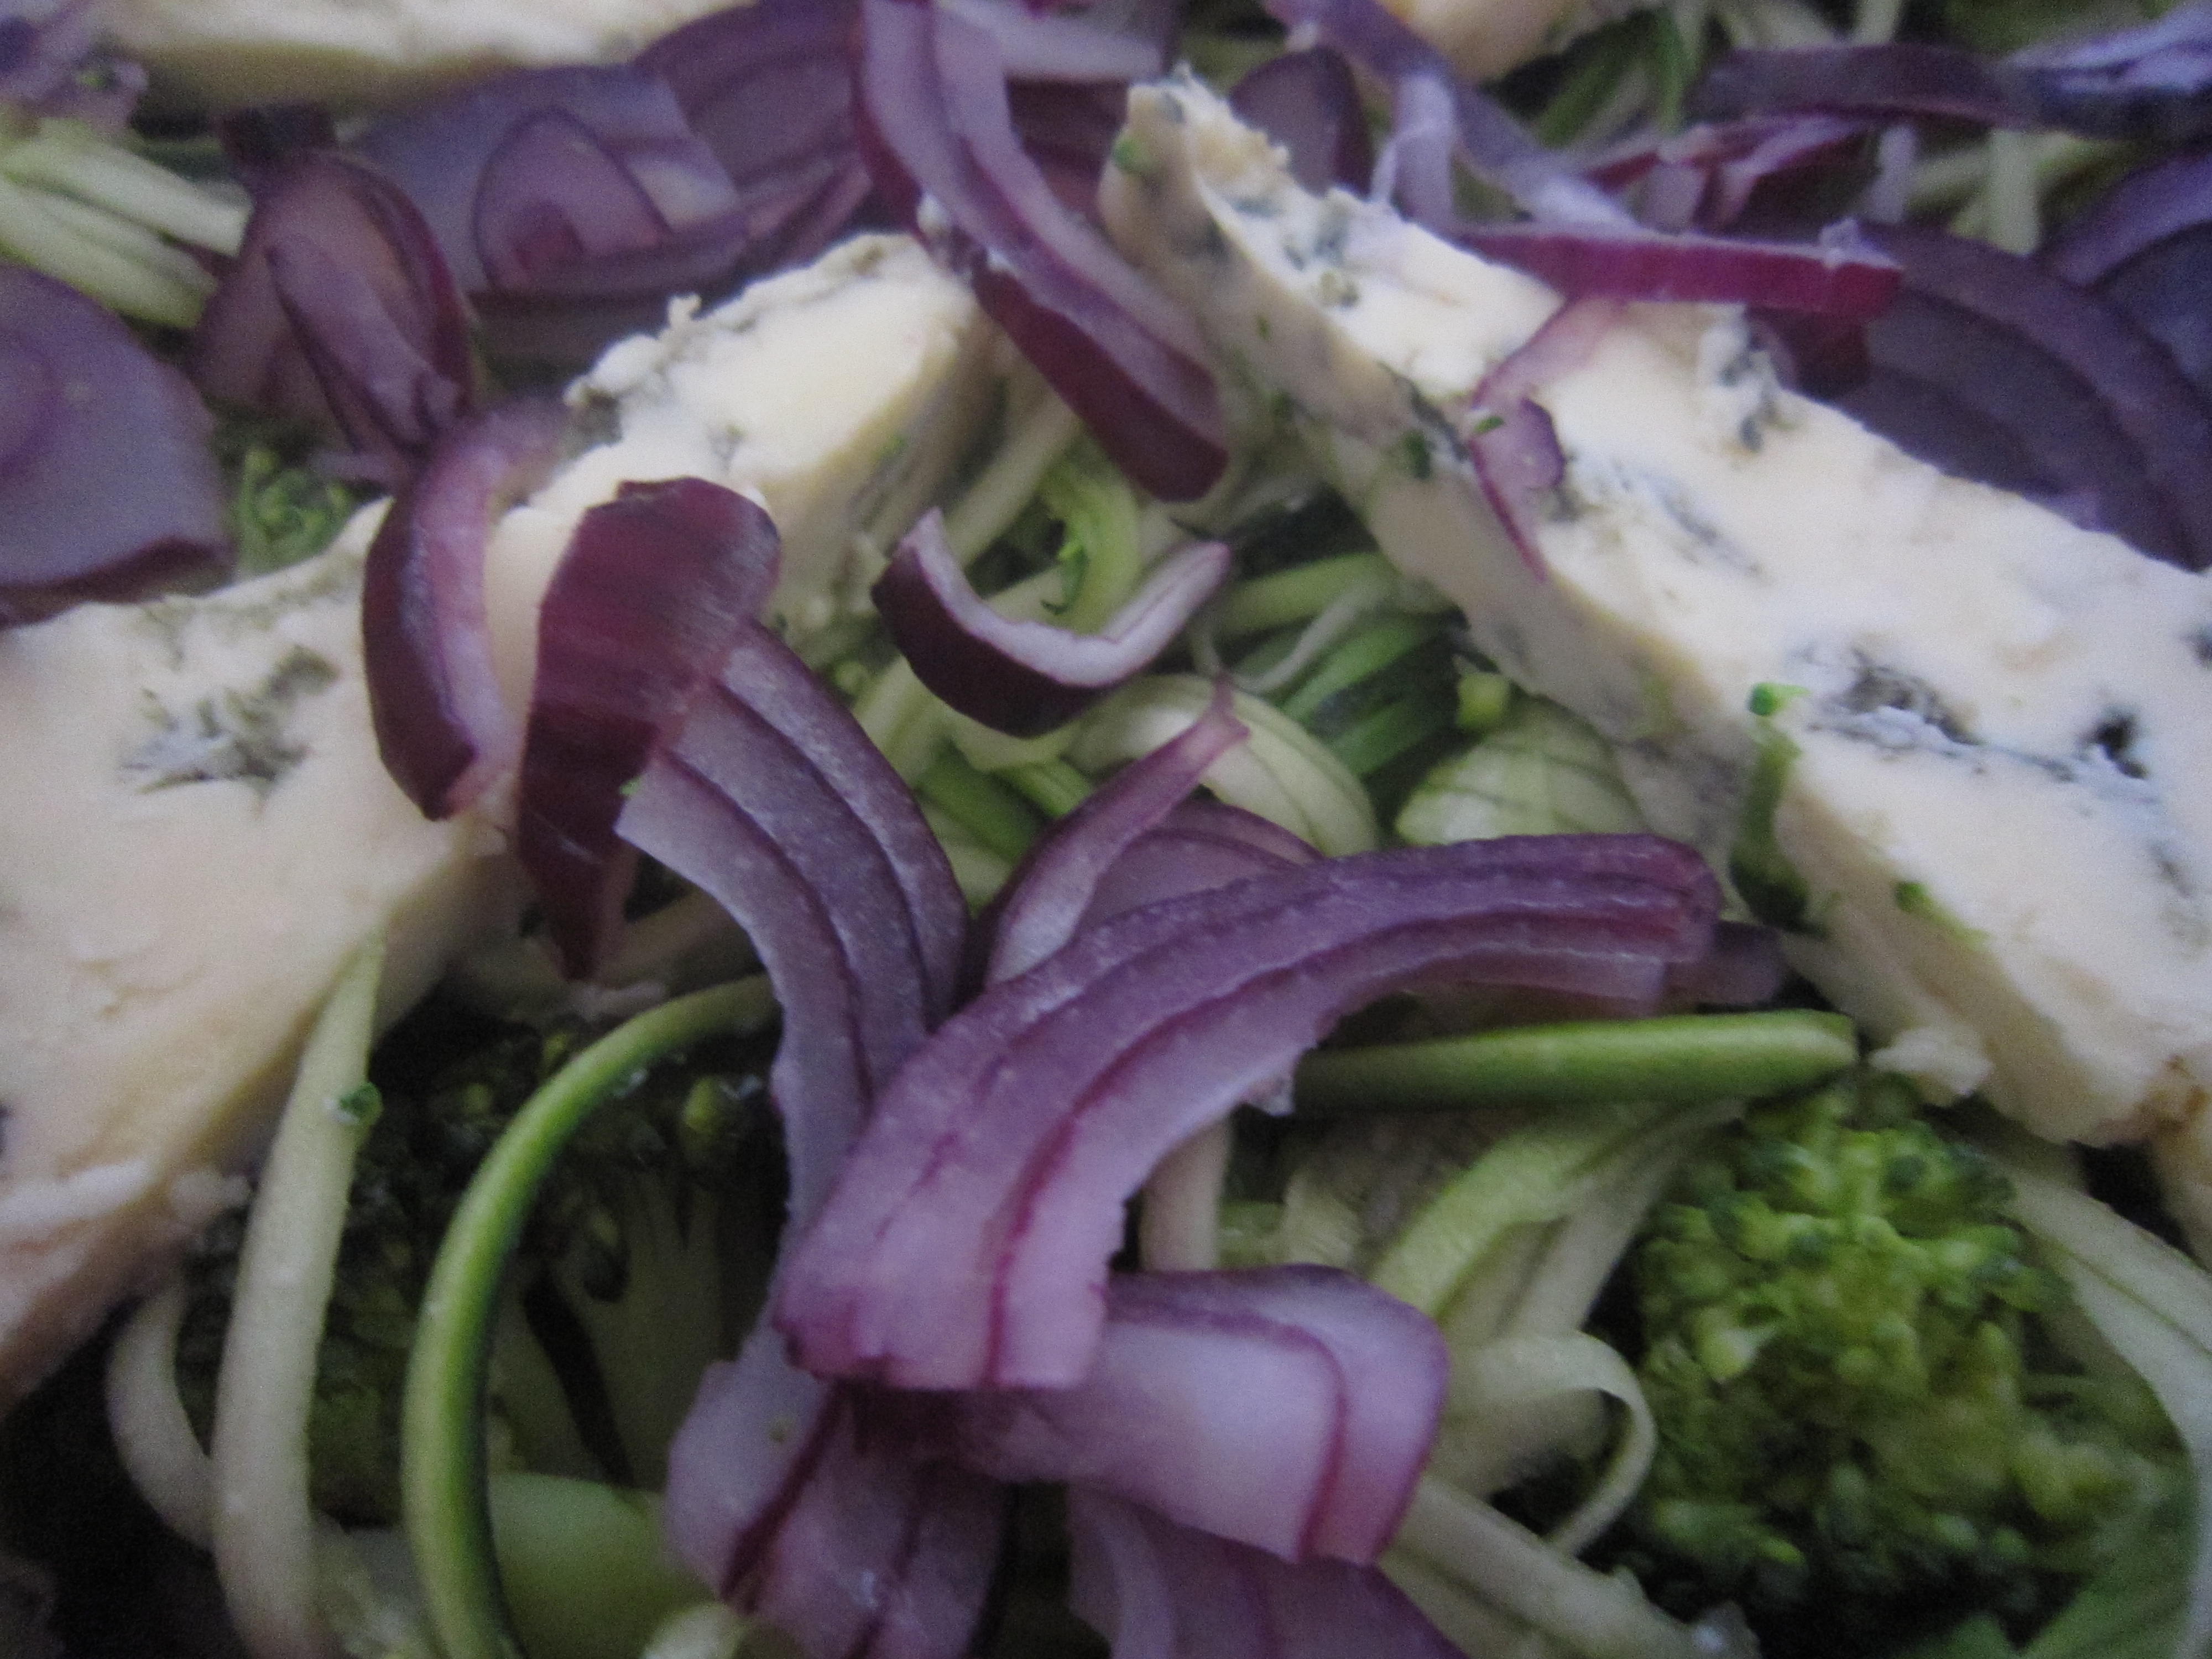
And as it is a broccoli and Stilton pie, now is the time to slice that piece of Stilton you saw earlier.  You could crumble it if you want to, and scatter it across but I thought how pretty and symmetrical it looked to arrange it in thin slivers.

I had half of a red onion left over from something else I’d made so I thought that, sliced finely so that it would cook through while the pie was baking, it would add an extra hint of savouriness.

 That was scattered on top of the cheese.

That’s the vegetables taken care of, the next thing is the delicious cheesey, eggy mix.

6 beautifully golden fresh free range eggs need breaking into a bowl and whisking round with a fork.

A small (150 ml) pot of cream gets poured in and whisked around again.

And pour it in……

Give the springform tin a gentle shake from side to side to make sure the eggy mix falls down around those lovely vegetable layers.

I had some sliced Emmental to use up as well, so that was shredded and scattered over the top.

Little cherry tomatoes (there were only 4 or 5 left) were quartered and added to the top layer before the ends of the ham were folded over.

You can see when you do this that the egg and cream mixture seeps between the slices of ham and then you realise just what an excellent idea it was to use the paper liners…

Into the oven with it at 160 or so degrees C for approximately 30 -40 minutes.

You can tell when it is done when the top looks golden and if you give it a gentle side to side shake the pie quivers just a little bit… and if you press it with your finger it feels soft but firm…

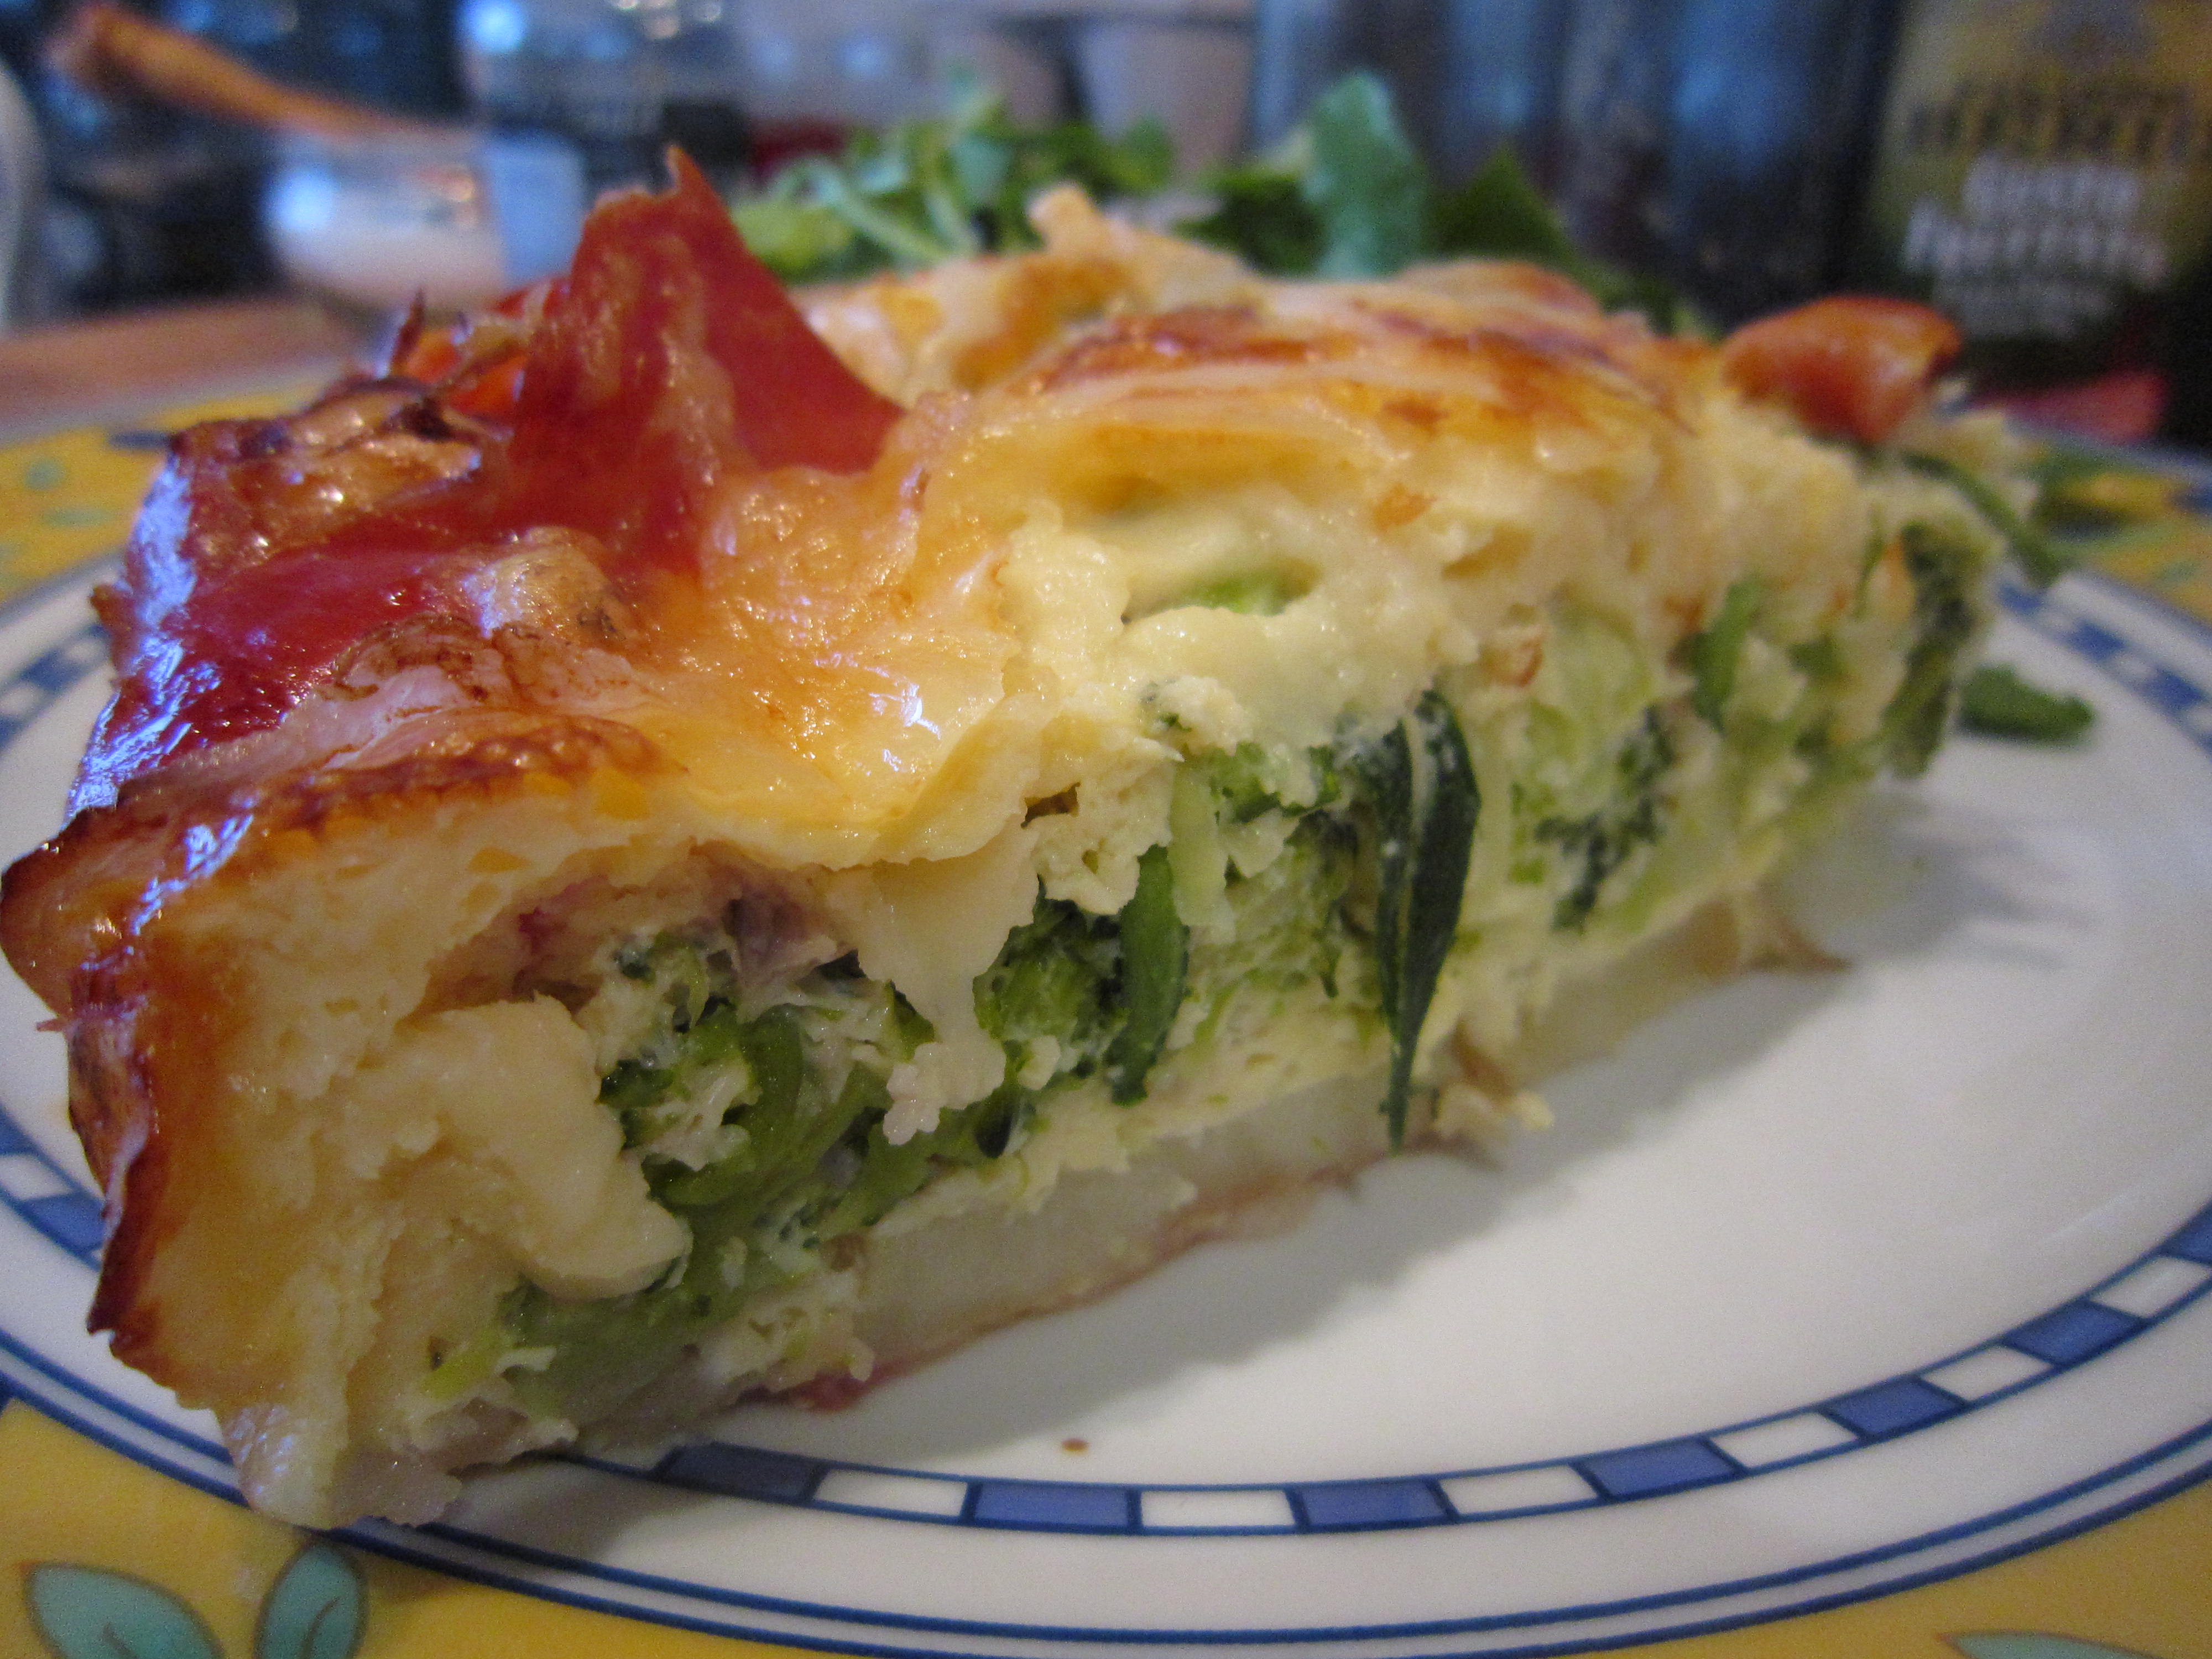
The only thing to do now is to free it from the springform tin, peel back the paper liner and slide it onto a serving plate

The hardest part is waiting for it to cool slightly so you can slice into it….

With a green salad it truly is the perfect lunch or supper.

Tasty, easy to make, easy to take for lunch… cunningly packed full of vegetables in the midst of that delicious filling… just the thing for the summer months!

Pheasant in cider

When I made the strange, but rather delicious, Tomatoey, from an old cookbook, it suggested serving it with roast meat.

I always have, in my freezer, some game. Usually despatched by my brother and given to me so I have something ready to roast quickly. On the morning of the day that I was going to make Tomatoey, I rummaged through the freezer and came up with a lovely little pheasant, which I could imagine would be truly delicious served with a rich and gorgeous tomato bread side dish.

Wild game is healthy and generally very low fat – there’s no idling around in a farm, eating processed feed pellets for a wild bird. They eat what is natural and they fly so there is no excess fat on them. That’s good for a full flavoured and low fat meat but it does mean you have to cook them carefully – and by that I mean a quick roast or braise so they don’t dry out… maybe covering their tender little breasts with bacon to protect them and serving them with something that enhances their rich meat.

Roasting a pheasant takes less than half an hour, if you sear the outsides,  so that would go well with the timings I was working on for Tomatoey. Things were coming together.

First of all, get your casserole dish hot and add a teaspoonful of oil or so then sear the outsides of the pheasant, turning it round so all of the bird browns.

If you are not using cast iron, then sear the bird in a frying pan… a ceramic casserole dish will break if you put it over a hot hob!

Take the bird out and start on the next step

First, some some lovely onion needs to be chopped and popped into the casserole dish to start cooking

Some dry cure bacon can be chopped into that to make a rich and delicious sauce – but save a couple of bits to cover the breast of the bird when it is in the oven…

And a small bottle of cider will make a lovely gravy… so add some now to help the onion and bacon start to cook.

You will see it makes a lovely golden gravy as everything bubbles away.

Pop the bronzed little pheasant on top of the onion and bacon and cider mix and pour in the rest of the cider.

The remaining bacon can be laid over the top of the bird and all you have to do now is pop it into the oven for half an hour – which was handy because that was where I had the Tomatoey!

You end up with a gloriously tender and fragrant little pheasant… just falling apart..

And the gravy that has been made is both sweet and savoury

Perfect to moisten the little pheasant and extremely delicious to go along with anything else you choose to serve with it.

It is a rather special dish considering it took less than an hour to start, prepare, cook and serve. And half an hour of that it was looking after itself in the oven.

Give it a go, eh?

Tomatoey

It was really hard trying to think what to call this post. The original recipe called it Tomato Pudding and I just didn’t think that really described it.

I’d bought the book, “First Ladies Cook Book – favourite recipes of all the Presidents of the United States” while we were on a weekend break in the north

One of the recipes in there was, apparently, a favourite of Dwight D. Eisenhower (34th President, from January 20, 1953 – January 20, 1961) and was called Tomato Pudding. Doesn’t sound attractive does it?

The recipe, as it was written didn’t sound that interesting either:

Tomato Pudding.

1  10-ounce can of tomato puree, 1/4 teaspoon of salt, 1 cup of white bread, cut into 1 inch cubes, 1/4 cup boiling water, 1/4 cup of melted butter and 6 tablespoons of light brown sugar.

Add sugar and salt to the tomato puree and water and boil for 5 minutes. Place bread cubes in a casserole. Pour melted butter over them Add the tomato mixture. bake uncovered for 30 minutes at 375 degrees F. Serve with quail or roasted meats.

So, a President of the United States of America, thought this was the bees-knees? And served it as a delicacy at State Dinners?  Bread and tomato?

But I could see that there was potential here… I thought at the time that the recipe was overheavy on sugar and just using puree would make the bread a rather solid block, so something was needed to lighten things up. I would, perhaps, use chopped tomatoes so there would be a difference of texture within the dish and then I needed to think what would be best served with it.

My brother makes sure that my freezer always has some game in it and I often roast a little pheasant or other bit of game, so a dish that would work alongside a roast morsel of something or other would be good.

You often find pheasant served with croutons or fried bread and I was thinking of this tomato pudding as working along those lines.

And this is what I came up with.

I had some crusty bread… I sliced about half a loaf and then cubed it. This filled a large square baking dish.

The original recipe asked for melted butter to be poured over the bread cubes but I thought if I replaced that with a drizzle of oil that would lighten it and make it a healthier option. If I used chilli oil then that would add a subtle bite to the whole dish. Chilli oil doesn’t overwhelm you with the taste of chilli, but rather comes in as a subtle afterburn, a tingle really, just enough to give things a bit of bite and interest. Even if you don’t like chillies, you should try it at least once. You will probably be very pleasantly surprised.

The original recipe used tomato puree and diluted it with water and added a huge amount of sugar.  But in the interests of dragging this dish into the 21st century and making it slightly more healthy for us….

 …I thought that chopped plum tomatoes would lighten the texture, giving it a bit of interest, so that it wasn’t just solid tomato paste covered bread.

And not sugar to sweeten things, but port. 

If the original recipe used tomato puree, that seems to me to be a rather solid substance so the water would be necessary. Using chopped tomatoes means there’s more liquid there so you wouldn’t need to add too much port.

 That would add another level of flavour (and don’t worry, any alcohol would evaporate in the cooking, so any children eating it won’t end up rolling drunk)

Port is sweet and I had a bottle that needed using up. If you don’t have any, use water and add some sugar… but I don’t think you need to add the original 6 tablespoons.

Stir it round and cook it down a bit.

Just boil it down gently until it reduces a bit.

Then, pour it over the bread cubes.

And just because I have been cutting back on  all sorts of things to make this a healthier, tastier dish, I thought a few knobs of butter on the top would help it cook and get a lovely crispy top.

I put it into the oven, alongside some pheasant to serve with it, at 175 degrees C  for 30 minutes.

And what was it like?

Really rather good. A crunchy, savoury top and a meltingly tomatoey middle. The contrasts of textures was appealling and the taste was excellent.

I think there’s room for improvement – maybe add some garlic to the tomatoes? – but served with a little pheasant leg and breast it really was rather delicious. I shall make it again to serve with roast pork and maybe add some chopped apples to it to break up the texture even more. There’s all sorts of tweaks I can think of with this.

Using half a loaf of bread (the staler the better, I think) a tin of chopped tomatoes, a dash of oil and a slurp or so of port (if you want to add it) you have a very quick and easy side dish that costs coppers.

So, Dwight D. Eisenhower, thanks for the idea. If it was good enough to be served in the White House in the 1950’s, then with a bit of tweaking it is good enough to be served in our house today.

An Accidental Soup…..Chickpea and Chorizo

It’s so unfair… this is the lovely, long  Easter weekend and we were planning to go North for a family get-together and I have a rotten cold. I can’t think straight, my tonsils are swollen, my chest is rattling and I feel like death warmed up. We can’t go home and inflict this on everyone so we are staying put.

I haven’t got much in to cook with because we were going to be away and, besides, I don’t really want to cook anything long and involved. I want quick and easy.  The weather is awful and we need to be warmed through.

When I go to the larder to see what there is, I have soup in mind. That would be easy to swallow and it would be good for me. Soup is always good for you when you have a cold or are under the weather… the steaming goodness opens everything up and makes you feel like you are in the land of the living again.

I find some tinned chickpeas on the shelf and in the fridge, I know there’s some chorizo. I can make soup with that, I think…..

I can picture it in my mind.. almost taste it…. hot and soothing, creamy smooth chickpeas with lovely chorizo slices to spike it up a bit….

So, I chop the onion and start to cook it

Next, I open the can and rinse the chickpeas…. that’s essential as I hate that gloopy stuff that collects round them in the tin. I know it is just the chickpea starch but it needs rinsing off. That and the briney stuff the chickpeas are in. If there’s flavour to be added, it will be me doing it, not the tin.

So, stir the chickpeas round to get them coated in the oniony juices and bits of onion (this is going to be the quickest soup ever as the chickpeas are cooked – all you have to cook, really, is the onion)

I want some smokey heat  in the soup, so a good heaped teaspoon of sweet smoked paprika will give a certain depth to it.

Stir it in and watch the colour change to a cheering golden glow

Add a pint or so of water and some stock granules

And then… well, this is when cooking while marginally delerious takes you down an unexpected culinary road……

I was thinking, in my slightly befuddled way, that chickpeas were lovely but if I added , say, ground almonds it would give a lovely rich dimension….thickening things. and adding flavour.

So I reached for one of my storage jars (which the eagle eyed amongst you may recognise as coffee jars… waste not want not, I say, and they are excellent to put dried goods in. Thing is, I never label them because I can see what’s in them. I wash them and peel the label off and then use them again. It keeps my larder looking neat and as all the jars are the same size they can be stacked on top of one another. Good thinking, eh?)

See? Looks like ground almonds.

Except it was fine polenta! I realised after I had poured some in that I had used the last of the ground almonds a couple of weeks ago….

Well, there was nothing for it but to carry on. I added some more water and stirred it round to cook it.

A good old whizz with the blender turned it all into a golden, silky soup. I tasted it to see if the seasoning needed any adjustment. I had to get the Bear to check as I couldn’t really be trusted because of my cold. A pinch of Maldon salt and it was judged to be pretty good.

The chorizo needed slicing

and adding to the soup – a few minutes to cook through was all they needed… and that was it.

From start to finish (including the three or four minutes where I stared at the polenta jar in puzzlement) that took about twenty minutes.

All I had to do was swirl some chilli oil over the top and add an extra few wafer thin slices of chorizo and there it was.

The prettiest bowl of soup. Golden yellow and glowing. Tasting absolutely delicious!

Sometimes you discover things by accident and you are really glad you did.

That soup was rich and tasty and my poor, sore throat felt soothed by it. I felt happier than I did when I started to make it.. .. and all that golden goodness filled me and relaxed me so I went back to bed and snoozed through the afternoon.

 And, do you know what? I will make it again and the next time I will deliberately add polenta.

Kidneys and rice… offally good!

You might have noticed, if you have read anything here before, that I am very fond of cooking the cheaper and often forgotten cuts of meat because they can, if treated well, turn into the most delicious meals. The same with offal.

When I was a schoolgirl I was forced to eat dry, rubbery liver and bouncingly hard kidneys and I swore that when I grew up I would NEVER be made to eat them again… until I cooked them myself and realised that offal wasn’t awful at all.

Now, one of my favourite quick suppers (only when the Bear is away….. he’s still rather stubborn when it comes to kidneys, but I have no doubt with training he’ll get there) is kidneys in a cream sauce on basmati rice.

Kidneys are so cheap – I think that pile of beauties cost me less than a £1 – and all you need otherwise is some basmati rice (a cup full) a few spring onions, some butter, cream and a dash of something alcoholic and either some flour to thicken the cream sauce, or, like I did tonight, some thickening granules. Now, I would normally avoid produced goods and shortcuts like this, but they really are rather good. They USED to say they were gluten free, which made them a great option if I was doing something for my brother…now I think they have to say that the product is made in a factory that also produces products containing gluten. Anyway… that’s why I started using them and I still use them today. The granules are just stirred in to whatever you are cooking and they thicken… It’s an option, isn’t it?

So, let’s start.

You need to remove the centre core and the tubules from the middle of the kidney. It’s easy enough to do – just slice them in half and then snip out the white core and tubes with scissors.

Chop the spring onions into pieces and add them to a pan with a spoonful of butter and a dash of oil (this stops the butter burning too quickly)

I used my favourite chilli infused oil just to give the dish a hint of a bite.

Cooking takes just a few minutes – you’ll be able to tell because the kidneys go from fresh. bright red to a rich brown.

In the meantime, I put a cup of basmati rice in a pan, add a cup and just under a half cup  of water, a pinch of salt and set it away to boil. Basmati only takes a few minutes to cook and doing it this way means there’s no need to drain it. If you cover it with a teatowel and put the lid on after the water has been absorbed, then the excess moisture is absorbed and you are left with fluffy, dry rice.

When the kidneys have just cooked, I like to add a dash of something alcoholic to perk up the final dish. If you are cooking this for children then you don’t have to add it… though I have to say, any alcohol will be cooked off, so it shouldn’t affect them.  Tonight, I am using port.

Why port? Well, there’s a bottle open and also I think the sweetness will combine well with the musky tang of the kidneys. Sometimes I use brandy, or whisky. I’m tired tonight and i think I might fancy a touch of sweetness in there, so port it is.

Then, a sprinkle of thickening granules, stirred in

And, because I have some in the fridge and it needs finishing off, I add a spoonful or so of cream

And that’s it.

Just stir the cream round, taste for seasoning – maybe a pinch of salt or a grating of pepper and then pour it over your lovely, fluffy rice.

Supper in less than 20 minutes.

Comforting, rich and smooth. Gently cooked kidneys (no rubbery, bitter bounce here!) in a delicious, creamy sauce on fluffy rice.  Just what you need to brighten a lonely evening.

Creamed Horseradish Sauce

I always believe that something you can make yourself is probably going to be better than something you buy – well, apart from fancy sugarcraft things. I am far too ham fisted and clumsy to turn out beautifully sculpted flowers, say.  Actually, anything dainty is probably beyond me, now I think about it.

But I can do all sorts of other things…and horseradish sauce is one of those things. You can buy it of course, but then you are at the mercy of the makers… the heat will be determined by them, as will the level of sharpness. Making it yourself means you can tweak it until you get the perfect sauce for you. I like mine creamy and not too hot, so that’s how I make it.

That’s a horseradish root.

My mother has it growing outside the kitchen door, in a brick edged raised bed. You need to keep the plant confined, otherwise it will be romping happily through your garden (and probably your neighbour’s) without so much as a by-your-leave.  Delicious though horseradish sauce is, I don’t think anyone will be eating pints of it everyday, so keep the plant in a decent pot or a raised bed.

Anyway… how about this for simple?

Now, one thing you should be aware of, that grating horseradish can make you eyes water.. it is so strong the fumes can waft up and before you know it, you have tears streaming down your face.

Bute here’s a trick to help avoid it… freeze it!

I clean the root and pop it in the freezer and grate it frozen. That stops the volatile fumes getting in your eyes.

When I am ready to use it, I get it out and peel the outer skin from maybe an inch or so of the end.

Just grate away.

(You might need to wrap the root in a tea towel because it IS frozen solid and I don’t know about you but my fingers get so very cold) Once you have grated an inch or so, wrap the remainder of the root in cling film and put it back in the freezer ready for the next time.

You’ll need to add at least a teaspoon or so of sugar to the grated root – I use golden caster sugar, as it dissolves quickly.

For sharpness, the juice of half a lemon is just perfect.

And to make it perfectly creamy, a tablespoon of double cream is just the thing

And now?  Just stir it round, mixing it all together.

It’s a good idea to do it an hour or so before hand so all the flavours can blend in and settle down to make….

… a beautifully textured sauce.

Just the thing to serve with beautifully roasted rib of beef…..

Parsley mayonnaise

When I made Ham Hock Terrine I thought there was something missing.

In the end, I decided that I needed just a little something to go with it… something both sharp and savoury, something to moisten the bread… that was what I wanted.

And what better than some delicious mayonnaise, made specifically to go with the lovely terrine?

It’s easy enough to do and I often make a bowlful and flavour it to a specific dish. This time I thought I would make it with parsley and add a few chopped gherkins to liven it up a bit and tie in with the ham hock terrine.

All you need are a couple of eggs, some dijon mustard, some salt, some oil (olive oil is very strong so plain vegetable oil should make up the majority of the oil used) You’ll need vinegar – either white wine or cider vinegar would be good in this – some parsley and some gherkins.

First of all, then separate two eggs and put the yolks into a reasonably sized bowl. Add a pinch of salt and a quarter of a teaspoon of mustard… stir them together and then start whisking

Whisk it good and hard (an electric whisk is a godsend if you have one… otherwise, think of it as replacing a work out in the gym).. this is the hardest  bit of the job and to be frank, it isn’t that hard!  After this it is all plain sailing.

When everything is smooth and whisked well, add a drop or two of oil and start again, whisking

And it suddenly starts to come together – look, you can see it thickening.

Now you can add the oil in greater quantities

And it’s off and away… just keep adding more oil until you get the amount you need. Those two egg yolks are all you need to make pints of mayonnaise – if that is what you want. Just add more oil… it all thickens up as you whisk.

It’s not enough just to use oil though – the flavour needs a touch of sharpness to bring the flavours together. Sometimes I use lemon juice but this time I wanted cider vinegar.

Add a teaspoon or so of vinegar – taste it and see if has sharpened everything up. Whisk it round to a smooth and glorious sauciness.

Once you have enough, all you have to do is flavour it the way you want it.

Start chopping the parsley and some gherkins and add them to the mayo

Taste again… the parsley adds a sort of rich, slightly bitter flavour and those little bits of gherkin run through it adding a lovely sweet and sharp bite.

Really, for maybe ten minutes work (and not hard work, either) you can have a delicious, fresh and tasty mayonnaise that goes exactly with whatever you are cooking. 

You’ve got a couple of eggs, haven’t you?  There’s some oil in the cupboard….. go on….

You know you’ll love it.

Dal. Delicious dal.

It’s obviously the weather for comfort food…the cold and damp and gloom affects everyone’s mood and general levels of happiness.  I am still working as a temp and that is not helping matters either. It’s good that I have work, but how I long for a real job with some sense of security because working week by week means I can’t plan anything. The uncertainty just nags away at me.

Ho hum.

I seem to have been working my way through my favourite comfort food recipes…recipes that can be relied upon to make me feel safe and happy. I was reading one of my friend’s blogs, Anne’s Kitchen, and her take on dal reminded me just how much I love it… and how long it had been since I served dal for supper.

One of my favourite things to eat (and, now, a favourite of The Bear’s, too) is dal. Beautifully soft and fragrant lentils, or split peas, chickpeas or beans, spiced with chillies and assorted spices and served with steamed basmati rice.

 There are hundreds of recipes for dal but this one is one I have developed over time and one that we love.

I travelled round the south of India (surely one of the most beautiful places on earth?) before I met him and ate dal all the time…

and what follows is  an amalgam of all the lovely dals I ate on trains, in cafes,  in railway stations….at  beachside huts

I saw some brilliantly fresh coriander in my local Asian supermarket. It was a sign, I felt, that I had to buy it and go home straightaway and start on dal.

Before you do anything else, you need to get the spice mix right. I love the slight popping effect of the mustard seeds in the finished dish. I start by heating the frying pan with a splash of chilli oil and adding chopped onion to soften slightly before adding heaped teaspoons of kalonji (black onion seeds, or nigella), brown mustard seeds and fenugreek seeds.

They pop slightly as they heat and add a delicious fragrance and flavour to the finished dish.

A teaspoonful each of tumeric and cumin powder add a deep rich smell and taste… and a pinch of asfoetida gives it a pungent, almost garlicky hit

Just put them in and stir them round mixing everything so the ground spices cover everything

I adore coriander and I have that lovely big bunch, so I like to chop the stems and add them at this stage too – layer upon layer of delicious herbs and spices transform a simple dish of lentils into something truly marvellous

I do need to add heat, of course, and I have some fantastic dried chillies

That can bubble away in the dal as it cooks…..

So, to the mix, add a cup full of yellow split peas

And a cup full of lentils.

Two different sizes, you’ll notice, which adds a delicious variation in the finished dal…

Add two cups of water and stir it round….

and add a tin of coconut milk

Look at that lovely rich cream…. stir it round…

and just leave it so simmer away…..it will take about an hour.

While that is chugging away gently, I make the rice, the way I was shown by an Indian friend

I heat some the indispensible chilli oil and throw in 6 cloves. Count them, don’t just thrown in a handful, because at the end, it is a good idea to know how many you are looking for. Cloves are marvellous but biting on one, unexpectedly, suddenly makes you think of the dentists, not of comfort and happiness.

Throw in a cup full of rice and stir it round so it gets a coating of chilli oil and the slight scent of cloves, then add a scant cup and a half of water a decent pinch of salt  and bring it to the boil.

Turn down the heat and let it cook until the water is absorbed.

Now, all you do is take it off the heat and lay a clean teatowel over the top of the pan and put the lid back on

What this does is absorb any extra steam and moisture and your rice turns out beautifully fluffy, with each grain separate and perfect.

Perfect!

All you need now is to serve up the dal….with fresh coriander

Look at those little mustard seeds… the split peas and the lentils…but to make it absolutely perfect and in homage to my love of the south of India, some shavings of raw coconut add the finishing touch

Utter, absolute luxury from the most basic of ingredients.  Utter and absolute comfort food, costing pennies.

What more could I want?  (Well, apart from a job!)

Lamb Henry

Remember the crushed potatoes? That lovely perfect mix of crunchy and soft… savoury, yet almost sweet from the proper cooking of the carbohydrates? Now I think they can stand alone as a dish, and in an emergency, when you need something quickly then that is a great option.

I made them last week in under half an hour, but what I didn’t go through at the time was what I served them with. I made roast lamb.

Now you know that time was of the essence that night, so what I had to do was to cook something really quickly. I think my favourite meat is lamb, so when I found the perfect quick-cook lamb roast I was in seventh heaven.

Lamb Henry is  a cut, like a shank but cut from the shoulder instead. You can cook it slowly, which is what all the recipes I have found suggest, or, do it like we do – cook it hot and fast!

That piece there is more than enough for the two of us – it could easily stretch to three, I think, if I made more vegetables or just increased the potato – and guess what? It cost £2.96.

Now, imagine the pleasure of having a fresh, hot-roasted piece of lamb, mid week, cooked with the minimum of fuss and bother, costing less than a burger from a fast food joint, and ready in less than an hour. You’d be pleased, wouldn’t you?

So, first things first, get the oven on to preheat – 180 degrees – and while that is getting up to temperature start on your potatoes and rub the skin of the little lamb henry with salt.

Straight into the oven with it, where it will stay, undisturbed for 45 – 50 minutes.

(You can pop the potatoes in if you are doing them, but they will need only 20 or so minutes)

That’s it after 45 minutes…..

… and a nice thing to do is to put a spoonful of mint jelly on the top, maybe 5 minutes before the end. Or maybe redcurrant jelly?

It melts over and bastes that little henry…..

Let it rest for five minutes or so and then cut delicious slices of lamb.

Perfect with crushed and roasted potatoes……

Supper cooked from scratch in just under the hour. Each delicious portion costing less than £2. What more can you ask for mid week?

Crushed potatoes

Working full time is, as most of you will know, a pretty tiring business.

Working as a temp in an office is actually not that lucrative, so there’s always a fine line to be drawn between saving money and making things taste good.

This cold, dark winter seems longer than usual and it affects everyone’s mood. We get up in the dark, go to work in the dark and come home in the dark. If it’s not snowing then it’s raining or just bone-chillingly cold. The street lights come on mid afternoon and the freezing fog just hangs about.

I feel permanently exhausted and everything seems so much effort. Even cooking – my great joy – seems to be suffering. I want to come home and do the minimum…. the minimum, that is, until I have to eat it. I want something to cheer me up and make me feel marginally more special than a cold, dark and miserable Thursday warrants.

The answer is, of course, make something that takes the least effort imaginable, in the shortest time, with the loveliest taste.

When your mood is low then the thing to do is to get some potatoes… life always seems better when spuds are involved

The answer, therefore, is….. crushed and roasted (sort of) potatoes.

You’d be happy, I take it, with something that takes less than half an hour to make and serve? Some of those packet meal things take 40 minutes.. so something fresh and easy would be better? Surely?

So, you get some potatoes, peel them and cut them into manageable pieces… put them in a microwavable bowl with a sprinkle of salt and some water.

Put the oven on at 180 degrees.

Cover it with a plate and cook on high power for 6 or 7  minutes. (I say cover it with a plate because that is quicker and more economical than covering it with cling film and then throwing it out. Besides, that’s what I always do)

That’s just enough to mainly cook them but them still to keep their shape. Jab them with a knife to check there’s give in them.

Drain the spuds and put them on an oven tray… and get out your potato masher.

(Funnily enough, when I make mashed potato I won’t use the masher, I always use a potato ricer to make sure the mash is as smooth as can be. The masher is, however, perfect for part crushing the potatoes)

Now, don’t go mad. You aren’t mashing… you are bashing.

The potatoes need to be broken down around the edges… not flat, just bashed about.

Drizzle oil over it… garlic oil is good… as is chilli oil if you want your potatoes to have a bit of a bite … then shove them in the oven on a top shelf for ten minutes or so.

See how the littler bits have gone golden and crispy?

And the bigger bits have crisped up round the outside?

And there you have it… perfect to serve with (as I did) some roast lamb…. or maybe left over sausages, heated through, or maybe some roast chicken.

Sometimes, it is just enough to have a bowl of potatoes.

That really did take just about 30 minutes to make. 

And it really did take the edge off a bad day.