Baked polenta pie

Remember the polenta? How I said I had an idea for it? Because I’d made a big pan full of it?

Well I also had some broccoli…. and this was Saturday. The Bear was still away and, therefore, unable to kick up a fuss about me making something with broccoli in again. You can just hear the sigh in his words…. “oh not again…”

I’m sure I read somewhere that if you eat something you dislike ten times then you will learn to like it. Perhaps he is just a very slow learner? I don’t know. I keep feeding him broccoli. It has to have been more than ten times now, surely?

Admittedly he has stopped clenching his mouth shut and turning his head away in disgust as I try and make him eat it, but he just WON’T give in gracefully. Still, he wasn’t there and I could do what I liked!

When I made the polenta, I poured the majority of it into in silicone paper cake liner, in a springform tin

(Whoever invented these deserves a medal… the hours they have saved people cutting and snipping at baking parchment

I needed it to set… which it did, overnight.

All I had to do was prepare some broccoli…

I only used the florets this time – the stalks can be used elsewhere  (I’m fancying Broccoli Slaw later this week) – and put them in to steam, with some chilli oil. A quick way of doing this is to rinse the broccoli, shake off most of the water and put it in a bowl. I drizzle it with chilli oil and then cover the bowl and put in in the microwave for a minute or so on high. This is just enough to soften it and give it a gentle chilli bite.

While that is going on, I slice the polenta “cake” in two with the bread knife

And then (actually, this bit was quite tricky, but I did manage) get the base back in the tin (I put extra tin foil in because I thought the etxra fillings might run out…..)

I laid the bright green semi cooked pieces of broccoli on the base

Just because you can… and because you know it is going to make this taste more delicious than anything else….. add a few bits of Tallegio cheese.

I had some roasted peppers in a jar, leftover from when I made pork and pepper goulash, so I layered them between the broccoli florets

And then added tomato – I thought some quartered little Pomodorinos (tiny little plum tomatoes) would lighten up what is , essentially, a large wodge of polenta and cheese.

Flip the top over and on to… it might crack or break but don’t worry… it will all come together in the heat of the oven

And bake it at 175 degrees for maybe half an hour

Just look at it!

Doesn’t that make you feel like smiling? That gorgeous colour? The smell of delicious melted cheese and vegetables?

Absolutely perfect with some green leaves.

Major plus points – it is gluten free, quick and easy to make, and doesn’t cost a lot at all.

In my eyes, though? Best of all? It’s got broccoli in it!

Breakfast egg and polenta and a new camera

When I made cheesy polenta  I made sure I had made enough for more delicious meals. My greediness makes sure I always make extra of everything. There’s something about leftovers that is so appealing….

I had plans for a small portion of it –  breakfast! I had a lot to do and I wanted a quick, really quick breakfast.

Apart from racing round the apartment to get everything looking lovely for the Bear’s return, I also wanted to play with my new camera, which arrived this week.

My lovely friend, L, suggested it for me and, on the grounds she has known me long enough to recognise just HOW inept I am at technical things and how much I need things to work properly and not torment me with wicked technical tricks, I bow to her superior wisdom and all round good taste.

She has had to put up with so much from me over the years, times  when I’d ring her wailing that the computer hated me and was deliberately ignoring me, me claiming that I was jinxed and that all computers and technical gadgets were only built to make my life a misery. There was one time she listened to me run over a particularly evil mobile phone…. I had been talking to her and was just enraged at what a rotten piece of equipment it was. It would cut out and refuse to do things, oh it was maddening. It wasn’t just me, mind you. These phones were notorious for being useless. Everyone who was unfortunate enough to have one hated them.

Because it was on a contract I had to keep it – unless it was broken beyond repair. I’d tried “dropping it” but it was always fine. It just carried on cutting in and out of conversations, driving me to distraction. That day it was particularly bad. In the end I pulled into a layby, jumped out of the car, put the phone under the wheel and drove back and forth over it. L was still on the other end…..I was certain this would kill the vile phone and then I could get another one…. but what happened? I got back out of the car, picked up the phone and heard L laughing.

Say what you like about that now-departed mobile phone manufacturer – the phones were rubbish, but by golly they were sturdy.

So, L knows I need something that will be kind to me and take pictures easily. She doesn’t want to have to go through the saga of me shrieking in temper as something goes wrong. She knows I need foolproof. It has to take close ups of food and it also has to take horizon shots. L said the Canon IXUS 200 would be the one for me and there are all sorts of options – even (and this is a real plus point) even an option for fireworks!  If you have read this blog in the past you will know that our wedding anniversary is on Bonfire Night and we like to toast each other with champagne as we watch the fireworks going off from the city below us. Try as I might I hadn’t been able to take pictures successfully.

So, I now have a super-duper camera that even I, with my fumble fingers and low tolerance level for fiddling about,  can operate with some degree of success – all I have to do is learn how to use it.

That’s why I am up so early. I need to get everything ready for the Bear, I need to have breakfast …. but first, I just had to try the sunset setting. OK, so it’s dawn but it’ll be all right, won’t it? Same sort of thing?


 Isn’t that pretty?

Now, I really must get on. I like a savoury brekkie, rather than a cold one and I didn’t have time to make breadbuns so I could have a fried egg sandwich. I always feel that a weekend breakfast should include eggs somewhere along the line. I like them boiled, scrambled, poached, baked and best of all, I like them fried. I love the way the yolk dribbles out when you cut into it, all deep gold and glistening.

So……

All I had to do was heat, quickly, in the microwave, a few decent sized spoonfuls of the lovely cheesy polenta…. maybe a minute, if that. While that’s spinning round, I got out the frying pan and fried an egg.

The fastest cooked breakfast imaginable!

All it needed was a grinding of black pepper over it and a cup of strong black coffee to wash it down and I was in breakfast heaven.

Simple? Check.

Tasty? Oh yes.. oh very, very yes. Check.

Fast? Two minutes, so a definite check.

Economical? Oh, very much of a check.

Try it. It was delicious.

Cheesy Polenta

At the end of a long and tiring week, when it gets to Friday night, I really don’t have the energy to go gallivanting around town. I must be getting old, I suppose, or maybe it is that I really like my home… my sofas, the peace and quiet, the comfort…

I want to come home, sit down and pour a glass of wine, safe in the knowledge my alarm is NOT going to go off at 5.50 am.

And of course, any glass of wine that I pour will be much better than some extraordinarily priced glass bought in a bar, so the pleasure of that  is heightened as I sit there, relaxing. Of course, it is better when the Bear is at home because then we can sit together and talk about the week… but it is pretty darn good when it is just me!

I don’t just sit and drink wine though, I need to eat, too. I need something nice and easy… I need something that will restore me after a full week’s work …. the best option?  Something savoury and delicious… it could, occasionally, be a takeaway from our local Chinese, but tonight I fancy something  carb laden and heavy on the cheese.

Cheesy polenta, in fact!

I’ve been thinking of perfecting more gluten-free dishes – my brother is badly affected (though not coeliac) and one of my dearest friends was diagnosed relatively late in life (in her thirties!) as coeliac. As I adore both of them there’s every chance that they will come and stay, so I need to be up to the mark should they arrive. The fact that A, my friend, recently moved to the USA, means she is less likely to turn up on the doorstep  but you never know.

So, tonight is not just about sheer self-indulgence – it is about making sure I can make something for my darling brother and my dear friend. The fact that sheer indulgence and a full tummy are the results… well, that is just a bonus!

First, look through the fridge for any cheese that you have – I have some parmesan that could do with being used, some cheddar that needs some surgery (just cut off the mouldy bits, that’s fine) and a lovely bit of Italian Tallegio (all soft and rich and creamy)

Get  your polenta out, and a large pan.

I always have polenta in the house because apart from using it in a polenta recipe (obviously) it is also brilliant for using to dust the outside of the fabulous No-Knead Bread 

When you make polenta to eat, you will need one measure of polenta and four measures of liquid.

I’m just using a mug here – that’s going to make one big, gorgeous portion of polenta for me tonight… some for breakfast (don’t grimace like that, it doesn’t suit you!)  and enough to make a huge polenta flan. All of that will be revealed in posts to come. If you just want to make enough cheesy polenta for, say, four people, you will only need half a mug. (And, therefore, 2 mugs of liquid.)

Pour it into a large pan (this will need a large pan) and then add 4 cups of liquid… I am using half milk, half water. You can use plain water… but I am going all out for luscious comfort tonight.

Stir it round so it mixes smoothly and start heating it.

Polenta is rather lovely to make… I  stand there, quite calmly, stirring. It is almost a meditative experience.

Do be careful though – it is so thick that when it gets up to the boil it has a nasty habit of spitting violently at you, if you aren’t stirring it.

Grate your odds and ends of cheese. I dare say an Italian person might have ideas about what sort of cheese, but I am being very economical and using up all the bits and bobs in the fridge. There’s that cheddar I told you about and some parmesan…. you are looking for a huge mound of cheesy goodness.

By now, the polenta will have thickened beautifully and be glugging away – when you lift the spoon and drag it, it will leave trails behind it.

Now add handfuls of cheese

Stir it in… all of it

.. and watch it melt into the polenta.. becoming part of the polenta….

And, as I believe I may as well be hung for a sheep as a lamb, I drop in a chunk of butter and watch that melt into swirls…

Remember I said I had some Tallegio? It’s a beautifully soft cheese with a rind

I don’t want to stir that in but I do want it in there… so what I do is cut a slice

and after putting some hot and steaming polenta into a bowl… lay the slice on top and then cover it with more polenta.

Imagine that – a beautiful, creamy, extra cheesy surprise, melting secretly in your bowl….

Now, polenta by itself is a delicious supper, but I happen to have some roast pork with crackling left over… so a slice of that on the top will be perfect. Those that don’t eat meat will still be ecstatic at a bowl of polenta

Well!

And that Tallegio? Look how it has melted perfectly.

All you have to do now is return to the sofa, bowl in hand, and tuck in.

Friday nights, eh? Who needs to be rocketing about town, spending lots of money when you can be at home eating polenta?

Broccoli Bliss

Sometimes, the way to brighten a dull day is to imagine a treat. Something to look forward to when you get in from work. Something that probably you can only get away with when your significant other is away.

Well, the Bear is away…and that means I can indulge myself. I can go wild and he won’t look at me with a slightly anxious expression, worried that I will force him into joining me in my chosen delights.

It’s not drink…. or illicit substances… or even some strange practice… it’s…..

Broccoli.

Beautiful, bold brassica.. the bright green and slightly bitter broccoli. I love it.

And when I can, I come home to a huge bowlful of it. One of my favourite ways to eat it is with a pseudo-Thai green curry sort of sauce, except it is not a sauce, it is a fragrant and sweetly spiced cooking liquid.

It’s quick to make and incredibly low calorie and oh-so-good for you.

I always have the ingredients for the Thai green curry sort of sauce in my cupboards because you never know when you may be able to get away with making broccoli, just broccoli, for supper. They also come in handy for when I want to make Thai Green Curry soup.

Onion, ginger and garlic. Some coriander.

Some green Thai curry paste

Thai basil, if you can get it

and kaffir lime leaves.

You will also need coconut milk – either a tin of it, or coconut milk powder that you can make up – and some stock granules.

Start by chopping some onion into  decent sized pieces and start to saute them in a large pan.

Chop your broccoli  stem into pieces and separate the florets.

Add the stem to the pan with half a cup, say, or water so it doesn’t burn and and a quarter inch of peeled and finely chopped ginger, and a clove of garlic, also finely chopped.

Add a heaped teaspoon of Thai green curry paste, the same of kaffir lime leaves and Thai basil. Stir it round and smell that gorgeous, aromatic spicy steam billowing up.

Let the stem and the onion soften slightly then add the florets.

Give them all a stir and let them steam for a couple of minutes

Mix three heaped dessertspoonsful of coconut milk powder (or a can of reduced fat coconut milk) and add a teaspoonful of vegetable stock granules, mixing it round well

Pour that delicious mix over the broccoli and let it steam through for another couple of minutes….

And then?

Dish it up, my darlings!

A beautiful bowl of broccoli… think of it as thai green broccoli soup… without much soup.

Packed full of goodness…. and that, well, that is one of my secret delights.

Pasta

Last week, bored with the usual choices and needing inspiration, we played Cookery Lotto, a game guaranteed to introduce an element of randomness into the proceedings. Anything could have been chosen but the rules are that once chosen, it had to be cooked.

We ended up with a pasta dish from the Australian Gourmet Traveller Cookbook of 2008.

But this wasn’t going to be pasta from a packet – this was start from the beginning and make it from scratch pasta.

And I was glad because I knew how easy it was to do and this was my chance to show you.

The Bear and I have a pasta machine  and we love making pasta. It wasn’t expensive at all (under £10 in a famous designer clothes, shoes and houseware clearance shop…it had been £29,99 . Look there in the kitchen section – I’ve seen them lots of times. Failing that you can get them for under £20 on Amazon)

The first time we did it we were carried away with the idea that we could produce perfect pasta. The pasta was fine…. it was the ravioli we attempted to make that were an utter disaster. Perhaps more skill was required for that. Perhaps we should have read a recipe properly. Anyway, the ravioli burst open and the fillings weren’t so great.

Straight forward pasta was fine though. Good, even. We have made tagliatelle and lasagne sheets and today we are making papardelle.  When I say we, it is not me and my partner in life and crime, the Bear. He’s off travelling again and is on the other side of the world so he won’t be here to help.

We, today, are me, my friend M and her daughters. OK so the nearly-two year old won’t be much good, but I have high hopes of  training the ten year old to be a willing kitchen slave.

I have looked at the recipe and it says 4 eggs and 560g of flour…. seems a lot I thought, and then I realised it was to make enough pasta for 8. Time to scale down. My amazing mathematical skills come to the fore as I rapidly divide everything by two… then thought I’d better divide again.

How much pasta do I need? I’m not intending to feed everyone I know. We shall use one egg and 140g of flour. That will be enough for us.

You do your own maths to work out how  much you will need.

And…. off we go.

Weigh 140g of “00” Italian flour and lightly whisk one egg.

Put that in a bowl and add 3 teaspoons of extra virgin olive oil, a pinch of salt  and 15 ml of water.

Then start to mix it. I’m using my KitchenAid mixer because I can. (And every use of it makes the overall cost per use drop. Use that argument when you are plea bargaining for one of your own) If you haven’t got an electric mixer, then you will have to stir it all by hand.

This is no bad thing – after all people were making pasta by hand for centuries before electric mixers were developed.

It will all come together quite easily and form a coherent dough. Now because eggs come in different sizes, you may need to add more flour to the mix if it looks too wet. We had to because we used an extra large egg.

You will need to knead it now – just put it on a floured board and stretch and pull and roll and knead until you feel it becoming smooth and springy. L, who is ten, really took to stretching and pulling the dough.

The girls had a great time helping to knead it. That’s the two of them, sharing the job. The nearly-two year old loved getting her hands on to the dough because she saw her big sister doing it. That’s the best way to get children to enjoy cooking… letting them get their hands in to it. It’s not the best way to keep the kitchen clean and tidy but it is the best way to have fun.

Now you just cover it with a damp tea towel and leave it to rest for a while. Ten minutes or so if you are wanting to get a move on, and hour or thereabouts if you have the time to wait.

Time for a nice cup of tea and teach young kitchen slaves how easy it is to wipe down the benches.

Now for the fun bit – cut the dough into two or three pieces and, having made sure your pasta machine is firmly screwed onto the bench, start feeding the first bit through. Give each piece a light sprinkling of flour so it doesn’t stick.

(If you haven’t got a pasta machine, don’t worry, just get ready to start rolling it out with a rolling pin. Make sure you have divided it out, though, before you start rolling it. Just dust it lightly and get cracking.)

You start off on the widest setting, and fold the first piece over on itself so it gets a really good pressing. Think Grandma’s mangle… you just turn the handle and the pasta goes through.

Got to the next notch sprinkle lightly, very lightly with flour and put the pasta through again. The girls loved this and took turns winding the handle.

Keep going until you have gone through all the settings and are down the last one.

Now my machine has setting for cutting pasta so I can either use them, feeding the thin sheets of pasta through the cutting attachments to make tagliatelle or cut the sheets free hand.

If you are cutting free hand, dust the surface lightly and roll the flattened sheets of pasta up like a giant swiss roll. Then simply cut down through the roll to get your pasta strips. Easy, huh? 

Now, if I were going to be making pasta all the time, and I wanted to make it in advance of cooking it,  then I would buy one of those pasta drying racks, but I’m not, so I haven’t. You can dangle it from clothes racks to let it air off or you can simply dust lightly with flour again or maybe fine polenta and start getting the pan ready to cook it in.

See? Within ten minutes we had a huge mound of tagliatelle for the girls to take home to their brothers to have for their supper

.. and some hand cut, broader strips of pappardelle for me.

We all sat around, gazing with pride at our beautiful  pasta – a few minutes work and a huge amount of fun and laughter.

It was a wonderful afternoon’s work and at the end of it we had made food for everyone. It wasn’t difficult and it cost pennies to make. Some flour, an egg, a pinch of salt and some oil all came together to make delicious home made pasta. And two little girls now think they want to cook again… and again… and again!

My cunning plan will work – give them a few years and I can spend my time lolling on the sofa while my willing kitchen slaves toil for me.

Another success chalked up to the random selection of Cookery Lotto.

Haggis and Black Pudding on apple mash

Robert Burns, the Scottish poet, is known throughout all of the UK but it is in Scotland and the far north that his life and works have been celebrated on  Burns Night  for well over 200 years. That means haggis.

If you don’t know what is in haggis and you look it up, you might, perhaps, feel just tad nervous about eating it…..if you just eat it first then you may well be pleasantly surprised. There’s a lovely deep meatiness there, balanced with a richness from the oatmeal and suet and spices that, well, you wouldn’t believe came from a mixture of sheep’s innards.

Maybe it is best that I leave the description at innards. Click on the link if you want to know exactly WHAT innards.

I was given haggis from an early age, served with the traditional accompaniments of mashed potato and turnip or swede, so I was never fazed by it. That is probably how it ought to be done.

If you are an adult coming to haggis for the first time, do try it.

At a Burns Supper you will be served haggis with neeps and tatties (that’s the mashed turnip and mashed potatoes)  and a dram of whisky. Now, that resonates with me…. any meal where whisky is served as an integral part of the menu gets my vote.

Thing is, there are other ways to serve haggis and the other ways tend to be more friendly, say, to those who have never eaten it before. The Bear for example, being a Cockney,  probably thought that haggis was foreign food, beloved of savage Northerners and Scots and wasn’t something a boy from London should eat.  Mind you, I think much the same of jellied eels, which is a favourite, apparently, of those from the East End of London.

A good way to introduce haggis to innocents is to serve it with something to perhaps soften the effect…… and I thought that sweetening things up might help. I had some delicious black pudding and adding apples to that is always good… so I came up with haggis with black pudding and apple mash… and  a creamy, sweetly sharp sauce to go over it.

Haggis is easy enough to cook… you can poach it gently for an hour or so, or roast it in the oven, if you wrap it in tin foil to protect it, or, if you are pushed for time, you can cut it open and slice it, then put it in the microwave for 8 or so minutes, maybe breaking it up with a fork to make sure it is evenly cooked.

I like roasting it – there’s always the danger that you might burst the haggis if it boils… and then you will have ruined it beyond any chance of saving. The whole point of a haggis is that all those spices and meat and oats are bound together tightly – it’s already cooked, of course, you are just heating it up properly – and if it bursts open then unwanted water gets in and it turns into a dissolving mush.

I started roasting my haggis and while that was in the oven (175 degrees, wrapped in tin foil and placed in a casserole dish with some water to keep it moist) and got on with the other stuff… that was going to be in the oven for an hour and a quarter, or thereabouts, so that gave me plenty of time.

I had a lovely sharp Braeburn apple which needed peeling, coring and cubing.

I wanted it to keep its shape and sharpness but not to be too raw… so quickly tossing it through  butter and a pinch of sugar would do that. I scooped out the apple from the pan, leaving the appley, buttery juices behind – I was going to use them in the whisky cream sauce later.

I chose red skinned potatoes as they always make a great, fluffy mash, and used a potato ricer  to make sure there were no lumps. I know it seems more effort than using a masher, but the result? Ohhh… the difference is incredible… beautifully light and fluffy potato that you can beat your butter into…

That’s not a great photograph, I know, but you can get the gist of it. I was trying to get a shot with one hand as I squeezed the ricer with the other. The potato is forced out of the little holes and there are no lumps. Not one. Just oodles of beautifully riced potato.

Use a wooden spoon to beat in a big knob of butter, you’re looking for a gorgeous creamy mash.

Add those slightly softened cubes of apple – they make a lovely contrast to the smooth and creamy mash.

The black pudding needs to be gently fried. You’ll need a slice per person.

You’ll see the change from that dark red colour, to a glassy black – just keep the heat gentle so it cooks slowly.

Oh and remember that covering needs to be peeled off….

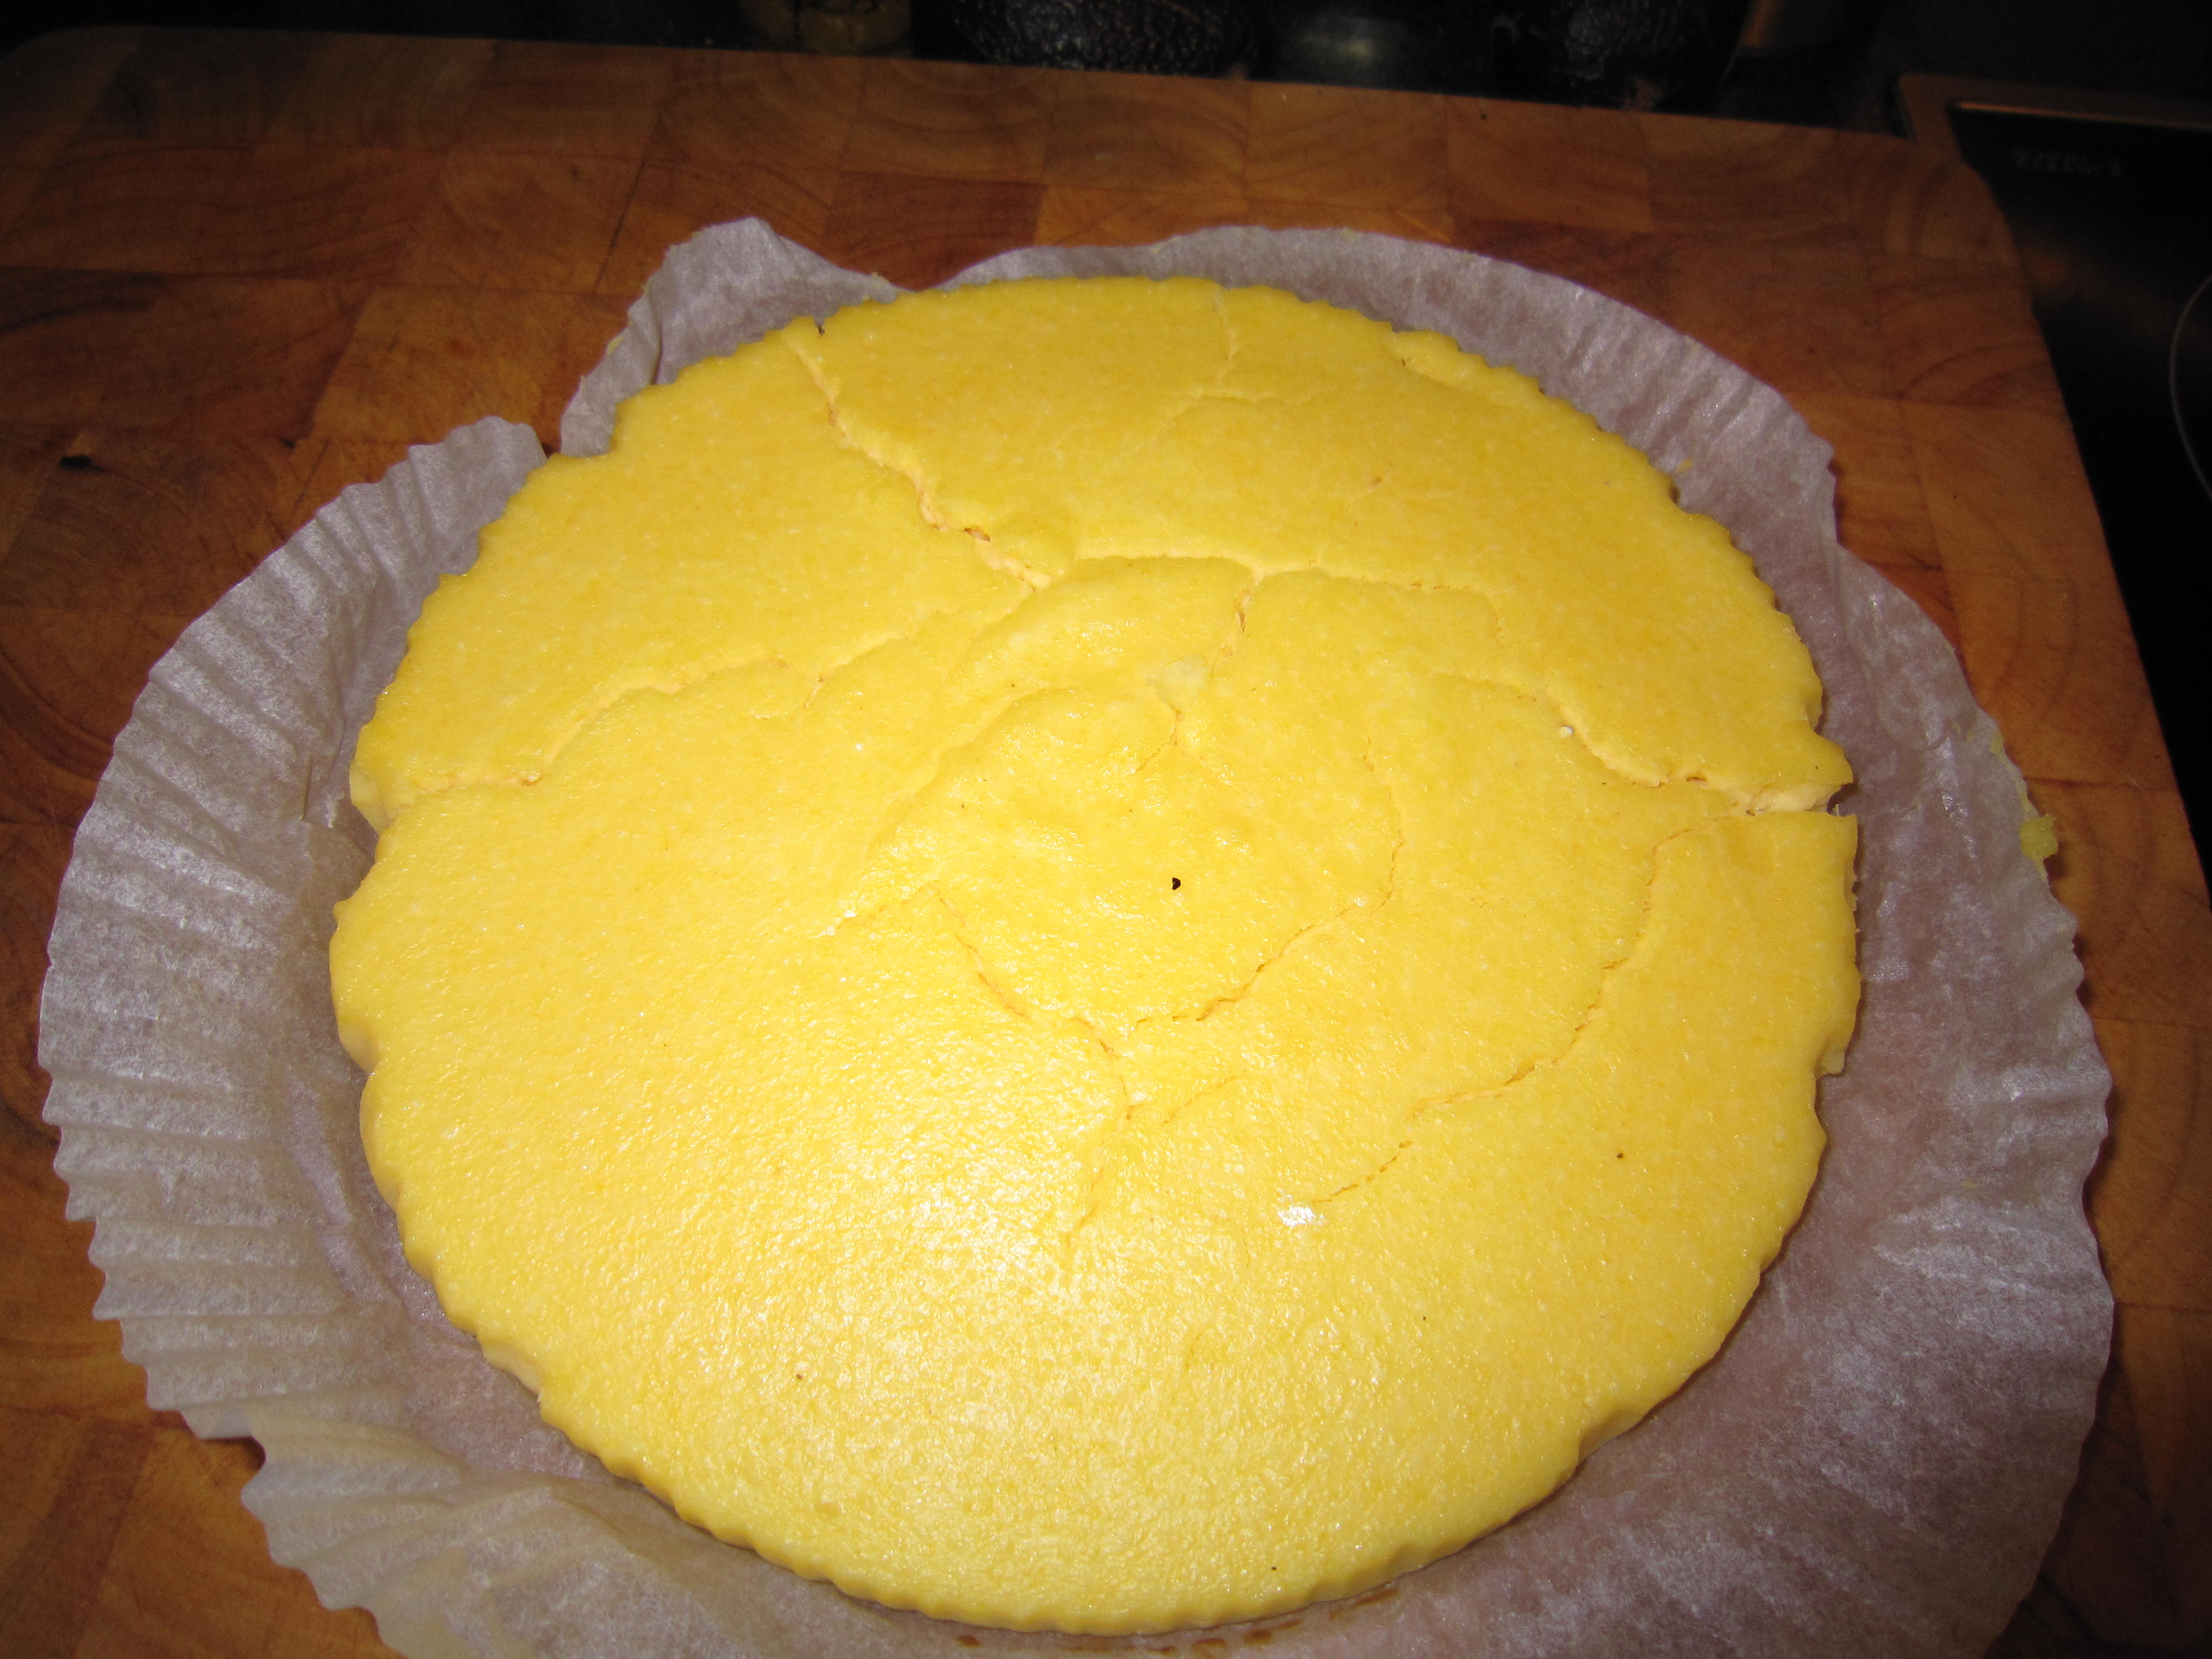
The haggis should be coming along nicely – that darkens down .

If you have decided to poach it, be careful when you cut into it – it is going to be very hot when that outer skin is cut.

I made a little whisky cream sauce… but forgot to take photographs. 

What I did was make a cream sauce (a couple of teaspoons of butter, a couple of teaspoons of flour, a pinch of salt, mixed and cooked through, then single cream stirred in until all the lumps disappear and it becomes a glossy smooth sauce… ) then thinned slightly with the apple juices and some whisky and heated through until the alcohol has cooked off. This is not an overtly sweet sauce but a savoury , fruity fresh one – you have sweetness with the nuggets of apple in the mash.

I wanted to make this look, if not glamorous, then at least vaguely presentable.  I was thinking of the round slice of black pudding and I wanted to get away from the normal haggis, neeps and tatties look of just everything spooned on the plate.

So I made a stack. Black pudding on the bottom. Then apple mash.

Then I pulled up the ring and spooned haggis in.

A spoonful of the whisky cream over the top and then served it.

I have to say this is probably not the best way of doing it, but it was what I did.

I won’t do it like this again because at the end of it, it didn’t look so great. Far too monochrome.

Tasted fantastic though, so I am not upset.

Still, as my mother always consoled me, looks aren’t everything.

Spicy Oxtail and the bump on the head

Yesterday was a work day and I was up before 6 as usual. I got up, showered, dried my hair and got ready for work and was out of the door by 7.25. I didn’t go to work though.

Instead, I spent the day here

stretched out on the sofa, wrapped in a blanket, with an ice pack on my head.

Why? Well, I got out of the main doors of our apartments and slid along the black ice to my car. The pavements were like a skating rink and I thought things were bad, but at least it wasn’t snowing heavily.

I scraped the ice from the windows and waited till the car  was warmed up before setting off. The car (a huge and heavy old diesel, but excellent in bad weather) was slipping a bit… but at least I was moving. I got to the corner where we turn to go down the hill and saw cars sliding down sideways in the ice. Our grit ran out days ago and despite the best efforts of us all to keep the hill clear, there’s only so much we can do.

This was getting ridiculous and I thought that the best thing to do would be to put the car back and get the bus into work.

Turned out that the buses were cancelled. Our neighbours were all standing around and we watched the more foolish young ones try to drive up the hill to get out … the snow was whirling round and their cars were sliding backwards. One of the neighbours said the road had been closed to stop accidents and that the cars were being turned round.

So, being a good neighbour I went to see if they needed help pushing – the Bear and I had been out over the weekend to help and with just a couple of people helping, the cars can get moving again. Once it was clear maybe the roads would be better and we could all get out. Great idea, eh?

Except I stepped on black ice.  My feet soared upwards and I fell backwards cracking down on my head on the pavement. I lay there completely stunned until a really lovely neighbour picked his way across the ice to haul me up. That was it for me. I made it back home to show the Bear what a stupid thing I’d done.

I have a huge egg sized bump on the back of my head and all I wanted to do was to sit still with a bag of ice on the back of my head. I just lay there feeling very sorry for myself while the weather got worse outside. The snow had been thawing and the grass clearing  but now it was back with a vengeance.

Just as well, then, that I had started making the oxtail I had planned for tonight and the last thing I did before setting off was to turn on the slow cooker.

I’d been thinking about cooking the oxtail I had in the freezer and I wanted to do something different with it. I was thinking of a sharper taste to it than the normal beefy gravy and vegetables …… so at 11pm the night before,I started getting things ready.

That beautiful oxtail was only £1.98.

As with any slow cooked meat, you need to sear it, browning the outsides before you put it in the  pot. This is not just for cosmetic reasons, because the brown outside is so much more appealing, but because the slightly caramelised burt brown bits add to the flavour of the gravy.

While that was searing, I chopped an onion and put half of that in the base of the slow cooker pot.

A few cloves of garlic would be great with the flavours I was planning…….

The oxtail pieces went in on top of the onion, then the rest of the onion went on top

Then three dessertspoonfuls of hoisin sauce, with some ginger .. I was using a tube because, with all the bad weather, I hadn’t gone shopping much and I was running low on fresh ingredients.

I put in some Lea and Perrins to sharpen it slightly – a good shake of it, all over the top

and one of those lovely chillies from the chilli oil jar.

Some water and some stock granules to make sure there was enough liquid in there and that, as they say, was that.

OK so it was a bit late to be searing meat but I knew that all I had to do in the morning was turn it on.  I would get the Bear (who was to be working at home) to put in some cubed sweet potato at some point in the afternoon.

Still, it had only taken me ten minutes to get that ready so I couldn’t complain.

And how glad I was that I did it. I really couldn’t have managed to sort anything out after that bang on the head. I just lay there, listening to the occasional gloop and bubble sound from the slow cooker and breathin in  the spicy, meaty smell as it cooked.

I did manage to peel a sweet potato

and cube it, before putting it in on top of the half cooked oxtails, before going back to lie on the sofa.

And that was delicious. A jacket potato on the side was perfect to soak up the gravy.

We ate it at about 7 pm and it was a lovely mix of sweetness, sharpness and meatiness. You wouldn’t have particularly known that it was a mixture of hoisin and Worcestershire sauce but it did make a really lovely gravy.

All that from one oxtail, one sweet potato and one onion. Bargain!

Tomato Rice Soup

I remember when I was younger, before I learnt how to cook, I used to think it was perfectly sensible to open a can of soup. I really had no idea how easy it was to make soup, nor how much tastier it could be.

I grew up in the decades that considered the launching on the market of a frozen, crispy pancake for frying at home to be a pretty exciting development. When I was  young, most families didn’t think it strange  to have cans of soup and there was nothing finer in our young eyes than having cream of tomato soup.

On Sunday nights my brother and sister and I would get things ready for school the next day and, as a treat, we could have supper while we watched television… now that WAS a treat. For every other meal, we ate in the dining room, at the table and television was banned.

Because we had had the traditional Sunday lunch – either at home, or at our grandparents, a two hour drive away across the North Yorkshire Moors – we would have a light, later supper than normal.

Imagine how exciting it was for the three of us to sit down to watch “Planet of the Apes” while Ma heated the tomato soup and spread Ritz Crackers with Philadelphia Cream Cheese and topped them with thin slices of hard boiled egg……. remember those egg slicers?  Sophisticated, huh?

Of course in those days, I was a skinny kid, with knock knees…….. anything was sophisticated.

But how we loved those Sunday night suppers.

I was thinking about the tomato soup and how deliciously rich and tasty it was and how sometimes, as a variation,  we would have tomato rice soup and I thought that maybe I could try making my own version. If I made it myself I would know exactly what went into it and I’d be able to keep an eye on it for the calorie count… with a bit of imaginative taste tweaking I could keep it low calorie….

Tomato soup needs tomatoes

A couple of onions, 200g of  long grain rice, some stock… oh and remember the chilli oil I made? Those chillies have really powered up the oil they are loitering in and have softened beautifully – I shall have a chilli or two from there……… and to soften it all and make it rich and creamy?

Some coconut milk powder – now this is a brilliant store cupboard ingredient. A spoonful added to spicy food gives a lovely smooth richness… and if chillies are involved, it calms down the heat and adds another dimension to the taste.

Get a large pan – this will make maybe 4 litres – and heat a spoonful of oil. I used the chilli oil and I put in two of the soft chillies.

Putting the chillies in at the start means they don’t frighten you with ferocious burning tastes.. the cooking softens their fire. If you are giving this to children, miss out the chillies and just use ordinary oil.

Peel and roughly chop the onion and add it to the oil to soften – don’t have the heat too high, you want the onions to soften gently until they are translucent, not sizzle till they are golden and crispy.

Put in two cans of Italian plum tomatoes – I really like the Napolina ones (and not just because they were on offer in the supermarket)

Rinse out the cans with water and add two litres of water with a couple of stock cubes, stir it round and let it bubble gently.

See how it gets thicker and a richer red?

You’ll know if it is ready for blitzing smooth because those onions that you chopped will be tender if you take a bit out to check.

I have a stick blender and it truly is one of the greatest kitchen gadgets you can get. If you haven’t got one, make sure it is next on your list of things to get – it really does make life so simple. Use whatever you have to whizz that soup base into a smooth and lucious pan of scarlet goodness.

Then, pour in 200g of long grain rice and stir round.

And remember the coconut milk powder? Mix a tablespoon or so in a jug with some cold water, little by little, mixing it smooth so you have maybe a quarter of a pint, and then pour it in.

Stir everything round and let it come back to a gentle boil.

The rice will cook in the tomato soup and thicken it brilliantly.

You might want to add some more water if you think it is too thick. I put in another pint jug full.

(Yes, I know I have been talking about litres but it was the old glass Pyrex jug that was nearest. And we all do it… I don’t think we Brits have quite grasped metric. Ingredients have to be sold in metric measurements but babies come in pounds and ounces. Make of that what you will)

Check the taste and see if it is what you want. You might want to add a pinch of salt or maybe a pinch of stock granules.

Now for the good news. I sat with a pen and some paper and tried to add up all the calories – 700 or so for the rice. 145 for the coconut milk, 190 for two cans of tomatoes, 120 for the oil… a 120 or so for the onions..and then I looked at the huge pan, full of soup…. there was well over 5 litres there.  Less than 300 calories a litre!

How simple was that? Low in fat, high in taste. Quick to do.

Enough for us to take flasks to work for the next couple of days. And have some to share with friends.

If you were to have a really big mug full of it you would still be under 300 calories…

So, there I was at work… with a hot mug full of tomato rice soup… thick and tasty, rich and tomatoey. Still on my diet.

And still, just as I was all those years ago, staring at a screen in front of me. Except this time I wasn’t watching “Planet of the Apes”

😉

Bacon and apple risotto with black pudding

This afternoon the Bear and I went out to help clear the road into our estate


The gritters don’t come up the hill to us because they are too busy trying to keep the main roads clear.  There’s no grit or salt left that we can scatter ourselves and what was ordered has been taken by Birmingham City Council as their need is greater than ours. Apparently.

Oh, and we don’t live in Birmingham.

Nothing for it then, than to rally to the cause and help.

If we don’t do it, we won’t get in or out…. not bad if it is before we set off to work, but not so great if we happen to be at work when more snow comes down.

We went out and helped clear the road and some paths so cars could get up the hill without sliding backwards which is always a good thing if you are driving up hill.

After a couple of hours we got back in and felt we deserved something really good for supper and I had my eyes on some black pudding.

When I met the Bear he said did not like black pudding…. when what he really meant was that he had not had black pudding cooked in a way that he liked.  Now? After three years of marriage? He really is becoming omnivorous.

I have plans for most of the black pudding for tomorrow, but there will be enough left for something I have been thinking about… we love risotto and I have a fancy for black pudding  risotto. I kept thinking about what would work well with it and realised that bacon and apple would be just the ticket.  One thing to remember is that cooking apples wouldn’t be any good in this as I didn’t want the apple to dissolve into a mush, so I chose a bright, sweetly sharp Pink Lady. It was beginning to look like a pink theme was developing so I got some red onions out as well.

Let’s get everything ready –

 – to feed four people well, you will need maybe 250g of risotto rice. I am using Fior di Riso, a vialone nano risotto rice which tends to be used more in the north of Italy. Other rices to look out for are carnoroli or arborio – just as long as you do get risotto rice.

2 red onions, 2 big slices of black pudding and 25o g of bacon bits , or lardons , some stock, some butter, a Pink Lady apple and some Parmesan cheese to shave over at the end.

To start with… get two pans out – in one you are going to have stock bubbling away ( you can make your own or use cubes or granules – just make sure they are good quality. I often use Knorr stock granules)

and in the other, melt a knob of butter…. while that is melting, quickly peel and chop the red onion and then add that to the pan with a pinch of salt

After softening the onion, add the rice and stir it round in the buttery juices. This forces flavour into the rice grains – or so I was told…. and then add half a glass of vermouth. You will hear a fantastic sizzle and a really aromatic smell will whoosh out of the pan.

All the alcohol evaporates and you are just left with an enigmatic hint … it’s quite safe, even for children to eat. If you haven’t got vermouth then a dry white wine or maybe some sherry would be good. Just stir it round until the liquid is absorbed by those greedy rice grains.

Once the vermouth, or wine, or whatever has been absorbed, add a ladleful of hot stock and stir it gently round so that can also be absorbed.

Oh and this IS important – I was taught to make risotto by a real Italian cook and it was stressed that when you stir the risotto, you stir in ONE direction only. This isn’t some mad superstition, there is a valid reason for doing it – if you just keep going in the same direction, the rice grains swirl around in the beautifully flavoured stock, absorbing as they whirl. If you go bashing them back and forth with a wooden spoon, they start to break and starch comes out into the stock, making it gloopy. The aim is just to get each rice grain swelling separately.

I love making risotto because I particularly love just standing there, quietly, ladelling in stock, stirring gently and relaxing. It doesn’t take long, you know – maybe twelve minutes or so, just until the rice has absorbed enough of the stock to be plump and delicious with just a hint of a bite to it. 

Trust me – doing it this way makes the risotto really good.

While this is all going on,

put the lardons of bacon into a frying pan and cook gently – you need to get the pieces tender before you add them to the risotto. Once they are ready, add them and any of the juices to the rice, stirring gently as you go.

Start to cook the black pudding now – keep the heat gentle and cook both sides so it changes into  rich and shiny, slightly crusted slices of spicy black pudding.

Roughly peel and cube the Pink Lady apple and then add that in – you aren’t wanting to cook it through, but it does want to be in there for a few minutes, so all the flavours can blend

The final thing to do is to add a knob of butter to the risotto… this enriches the stock, giving it a lovely rounded flavour…. stir it round gently…

Then, put your risotto into your bowls and  break up the black pudding over the top….

A few shavings of Parmesan over the top finish it off

The result? Really good.

Each spoonful  has the perfect combination of  bacon bits giving a lovely savouriness and a gorgeous chewiness amongst the savoury rice… the little nuggets of Pink Lady apple gives a sweet and juicy almost-crunch, while the black pudding provides a deep and earthy richness, bringing it all together.

It didn’t take long at all and it certainly doesn’t involve costly ingredients but it added up to a truly delicious and warming supper – perfect for a freezing night, after an afternoon’s labour shovelling snow.

Beans…. for beans on toast

When I want to cheer the Bear up, or give him a special treat,  I tend to make him beans. It’s probably his favourite meal.

When he’s been travelling, he will phone from some far-flung corner of the world and ask me if I will make him beans on toast when he gets in.

This isn’t the ordinary, open a can, heat through and serve on white sliced sort of beans on toast… this is something that has developed in the time we have been together.

It all started when he asked me to marry him and I accepted (but you guessed that bit, right?) and then I went to Florence with my best friend for a little holiday. I have to point out, though, that this had been arranged for ages.. it wasn’t a reaction to being engaged. Anyway, D and I had a marvellous time, visiting her son and while we were there, often had cannellini beans with tomato and sage and pancetta, served with good Italian bread…. a traditional Tuscan dish. It is truly delicious – very simple but beautifully tasty.

I asked the chef at one restaurant, La Giostra how it was done. Now, I said these weren’t just any beans, nor was this just any chef…he is Prince Dimitri Kunz d’Asburgo Lorena.

It’s just beans he said…… cannellini beans in stock from vegetables, with some sage, olive oil, garlic, tomatoes and pancetta. But it’s slow…. you take your time. The flavours reflect the care you put into it.

When I came back I was telling the Bear about this wonderful restaurant, in a 16th Century building in the heart of Florence and how one of my favourite things had probably been this incredibly simple dish. He asked me to try and make it for him. And I did. I remembered what Prince Dimitri had said and I produced beans Tuscan style and it became a favourite of ours …. but as with all cooking, things change over time. I replaced, at one point, the pancetta with streaky bacon and chorizo, giving it a deeper, richer flavour and, after going out one day and leaving the beans bubbling down in the tomatoes until it became a thicker, more concentrated tomatoey bean dish, realised I liked it more with a thicker sauce. Maybe that’s because I’m not eating it in Florence….

I serve it with toasted No Knead Bread and we call it beans on toast.

First, get a bag of cannellini beans  – you will need about 250g for maybe 4 or so healthy sized portions. Dried beans need to be soaked overnight to get them ready for their proper cooking.

I once had dried beans that no matter what I did with them, they just refused to soften. Maybe they were a rogue batch, so after that I always made sure I had some cans of cannellini beans in as well. They are just as good and means that you can make beans that day, if you want them rather than waiting for the following day after they have soaked overnight.

So… either soak your beans and start the recipe the next day.. or open 3 cans of beans….

Give the beans a good rinse and then put them in a pot with some fresh water, some sprigs of sage and a carrot to add flavour to the stock.

Peel and chop 3 or 4 cloves of garlic (I cut it to roughly the size of the beans) and put them in the pot with a good slug of olive oil.

And then set the beans away – bring the pan to the boil, gently and then let them bubble softly away at a simmer until they soften. When I had that batch of beans that refused to soften I started adding a sheet of kombu to the pan (remembering to fish it out later) This is Japanese seaweed and it is supposed to help beans soften… it also adds a savour to the stock – more of the umami hit that makes everything taste so rich and full. Not seaweedy at all, so don’t worry.  It’s not hard to get hold of if you want to give it a go – it will be in the health food/world food sections in supermarkets.

Let everything bubble away until you know the beans are softening. Or, if you are using cans of beans, just get them heated through for a few minutes in water, with the garlic and sage.

Now add two tins of chopped plum tomatoes

Stir it round – see how the beans are still distinctly white against the tomato? You want to get them to the stage where they are infused with tomatoey colour and flavour.

If you have some spare red wine, add a sloosh of that – maybe half a glass or so.

Turn the heat down so that you get the pan to bubble softly – the effect you are aiming for is for the occasional lazy bubble to pop to the surface. You can leave it doing that for an hour or so. You might need to add some more water – just keep half an eye on it and watch how it goes.

Now, get your chorizo and slice it

Don’t forget to pull off the covering around it… you don’t want to eat that.

Then dry fry it gently – see how the oil comes out?

You need to colour both sides and then take it out of the pan to cool before cubing it. Don’t throw that oil out… you pour that into the beans.

If you have streaky bacon, slowly fry that too and then cut that into pieces, before adding that and the chorizo to the beans.

Stir it all round and add another glug or two of olive oil.

Give it time to relax together – taste the sauce.. is it to your liking? Does it need some salt? It’s really only at this stage you add salt – if you do it as the beans are boiling you will toughen the skins.

Chop some sage leaves finely to scatter into the pot

It should be a rich tomato sauce with hints of the paprika from the chorizo, a slight muskiness from the sage, aromatic from the garlic and olive oil….

Slice and toast some good bread – and by that I mean sourdough or the lovely No Knead Bread, or maybe good Italian bread… just as long as it isn’t white sliced, which would just dissolve into nothingness.

And serve proudly, knowing you have made a meal from simple ingredients, that cost pennies and makes people smile.