Hello! Nice to see you…all 1010 of you!

One of the lovely things about writing all this was discovering that it was read by more than just me, the Bear and those friends who specifically wanted to know what I was doing.

It was a surprise really. When I look back at the early posts, there were comments from my friends and I really thought that would be it. I hadn’t really even thought of the layout of the blog – I’d just chosen a theme that looked like scraps of paper because that’s what my recipe book looked like. There was no need, or so I thought, for anything other than that.

I’d chosen WordPress because when I’d Googled “best blog software” that was what came up. All I can say is that (as I haven’t used any other software) WordPress is quick and easy and has been perfect for me. You can add what they call “widgets” or “plug ins” which put extra information on the blog.

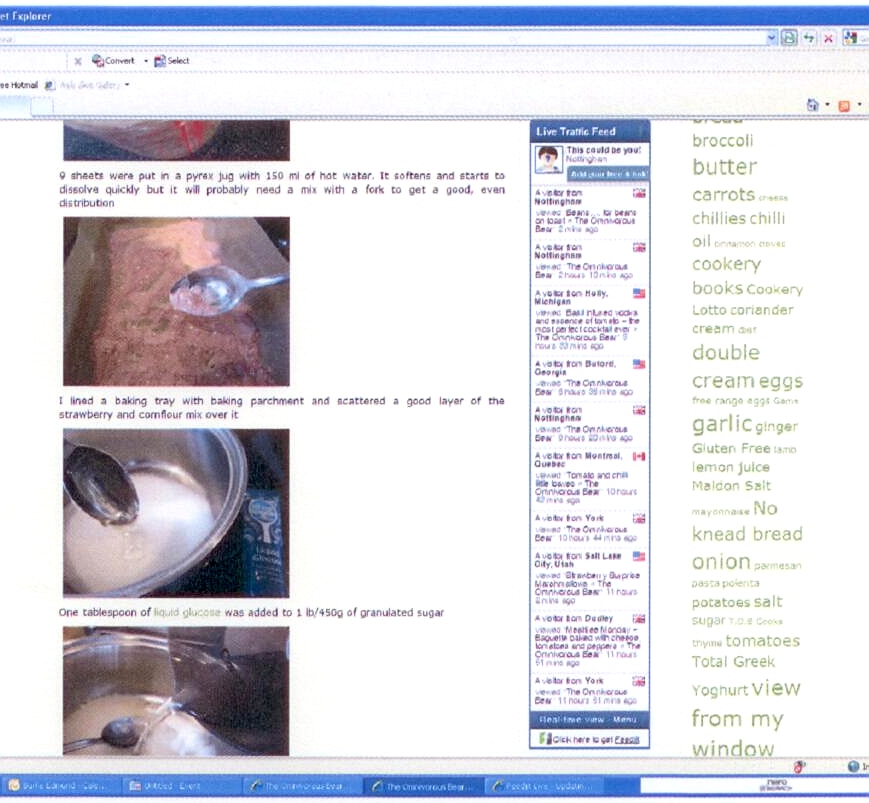
I started by putting on a Tag Cloud – you can see that on the far right – the more often a word is tagged, the bigger the word gets in the cloud. From that you’ll get some kind of idea what kind of cooking goes on in here… butter and double cream seem to be featured quite a lot….

No real plan, you see.

Yet it evolved. Nearly eleven months later there’s been quite a change.

More and more people started reading the blog and I got more and more interested in seeing the growth. I discovered that if you added Feedjit to the blog, you could see where people were coming from.

See that central column, with Live Feed at the head of it? That’s Feedjit. It tells me roughly where people are coming from and what they are reading… don’t worry, it doesn’t identify you, it just says roughly where your internet provider is. I can see when my brother or his wife check in as their home town shows up. Sometimes I recognise the locations of my friends and that is such a great feeling.  My friend Angela moved to the USA well over a year ago and whenever I see Kennesaw, Georgia pop up, I know it is likely to be her. She doesn’t live in Kennesaw by the way, which is what I mean when I say it doesn’t show exact locations.

I can sometimes work out who is looking (or has looked in the time window that Feedjit is showing me) by the locations and the comments posted. My blogging friends turn up regularly and there’s always that little jump of excitement. Sometimes I see the same location pop up and I have no idea who is there. San Antonio, for instance… hello, San Antonio! I’ve seen your location popping up for months but I don’t think you have ever commented.

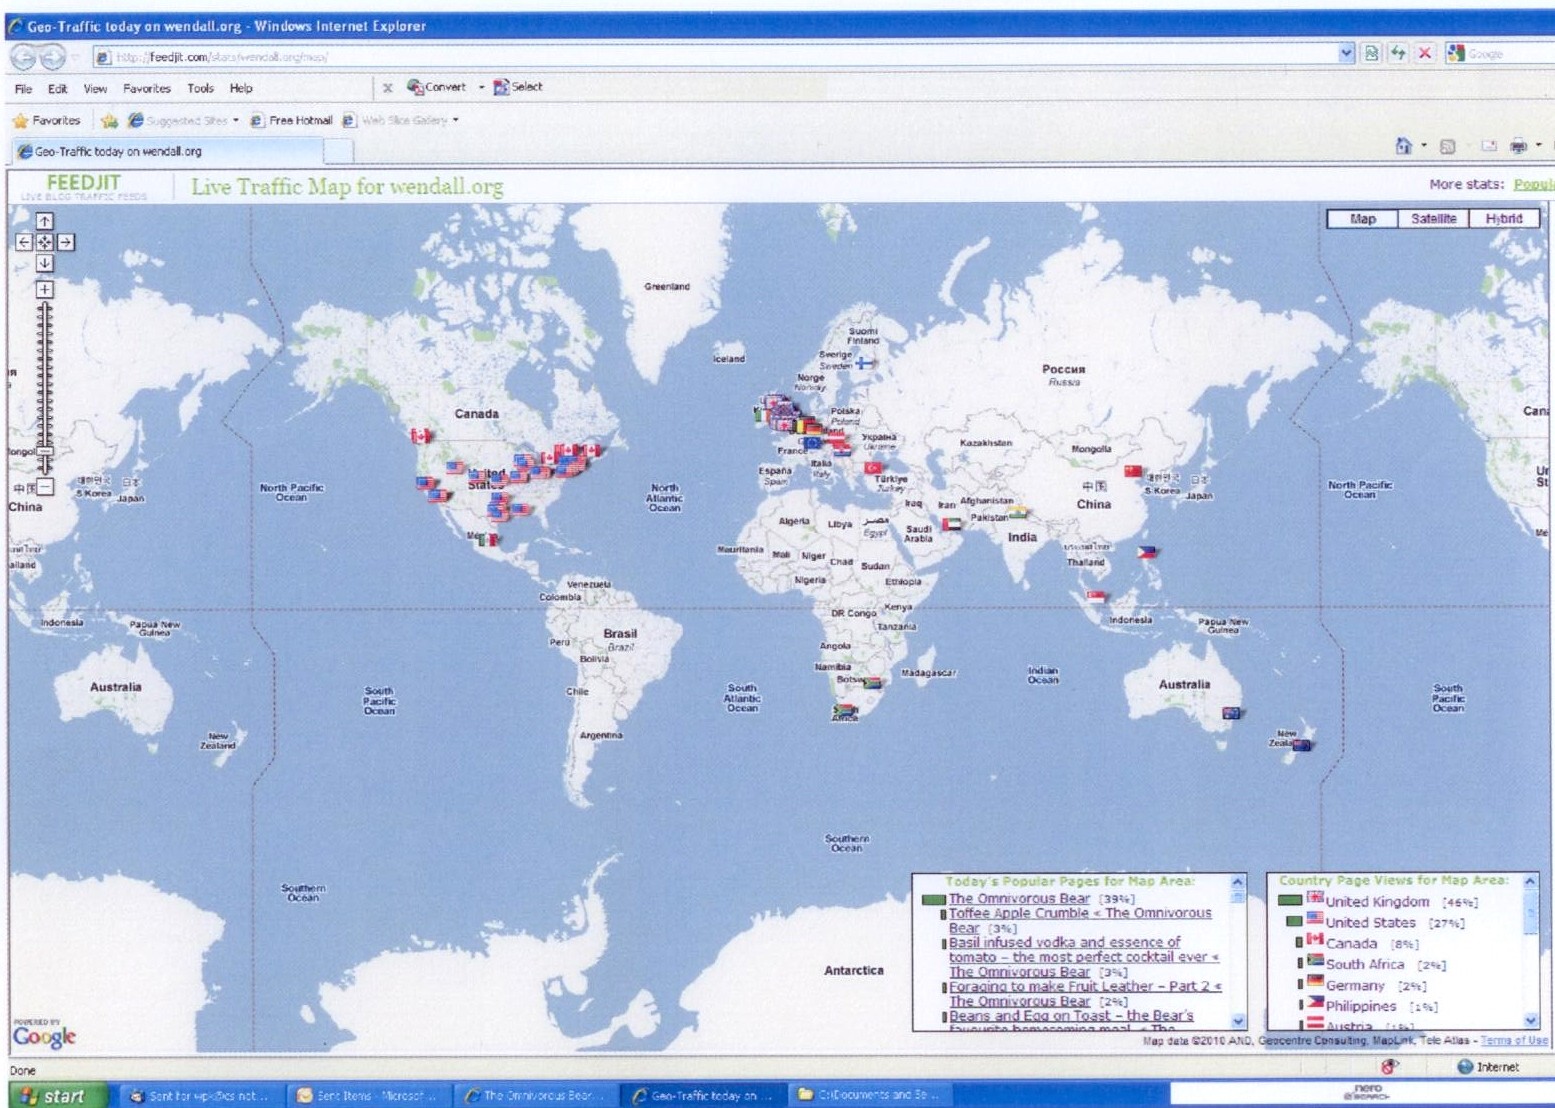
You can look at it on a map, too… oh the sheer excitement when I saw little flags popping up, first in the UK where my immediate friends were, then the USA and Canada… and then the rest of the world.

If you look at the bottom of the Feedjit column, you can see there’s a menu option.

Go on, go to that and pick Live Traffic Map – you can look at the information, too!

It shows you the daily traffic across the world.

That’s you lot, that is. Well, that’s you lot as I write this. It will change of course.

You can zoom in and see more clearly where people are and if you hover over a flag you can see what people are reading there. Isn’t that fantastic?  I look at the map every day and I’m permanently amazed that people from all over the world call in.  I hope you all like it.

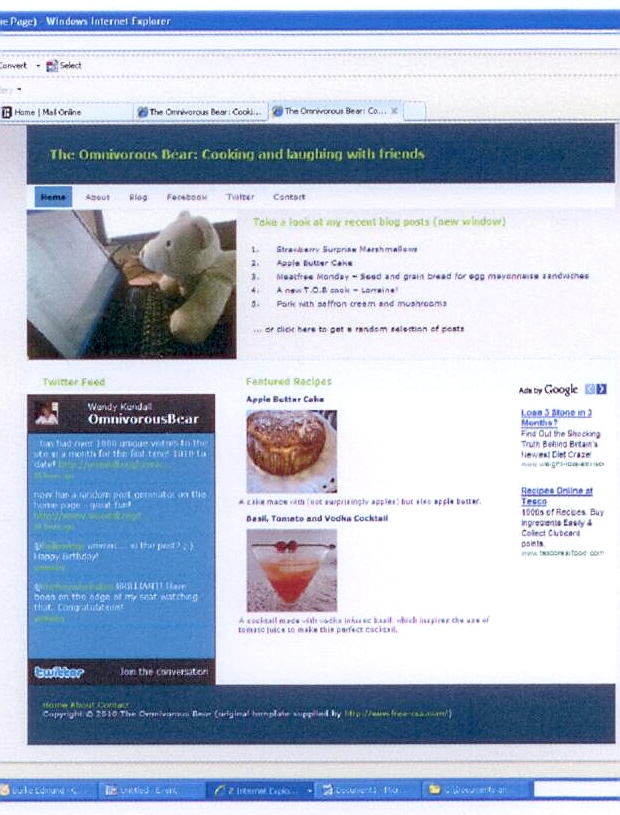
I added a little heart button as a widget so people could click if they liked what I’d written and that changes the Most Liked Posts. If you want to see what they are, look in the far right column. At the moment it is Plate of Beef, the delicious slow roasted hunk of meat that I love to cook for friends. If you read a post you like, click the heart and change the ratings!

Next, I added a Blogroll – a list of links to my favourite blogs. If you get bored reading my blog, look at the list and see if there’s anything there that takes your fancy. I can while away many a happy hour just reading what my friends (and yes, I feel like they are my friends now) have been writing. I’ve had some great ideas from them and maybe you’ll find some there, too.

When I started this, the Bear set up a website to host the blog on and for the past eleven months that’s all it did. There was nothing on the page, it just took you here.

But now, if you go to www.wendall.org  you get to the home page and that gives you links to the blog, to Facebook, to Twitter and even methods of contacting me, if you want to do that. You can save that as a web page and use that to navigate to various sections.

Twitter feed shows up there too as well as the last five posts I’ve written.

The Bear, being a computer genius, even managed to put a random post picker on there… you just click and a random selection of posts, that have been written since the blog started, pop up. If you haven’t been reading since the beginning (or even if you have) give that a go.

I’m really very pleased with it all.

Yesterday, though, was perhaps the best day of all.

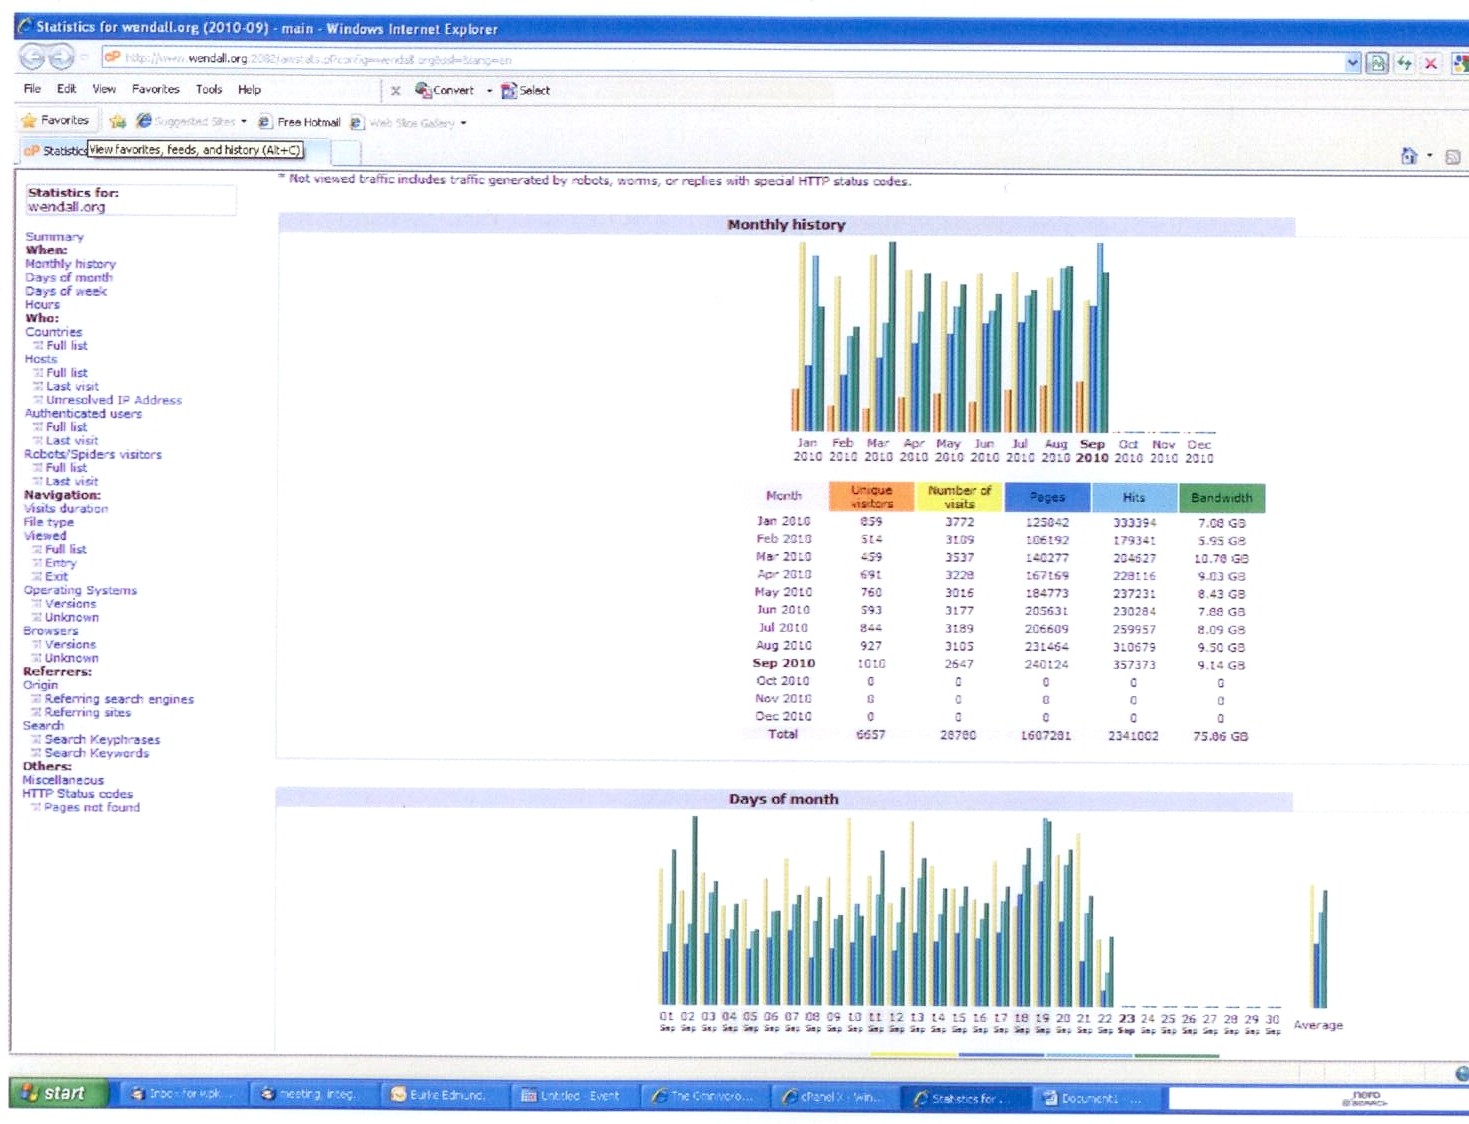
There’s another section that covers the statistics. The bit that interested me the most was the amount of unique visitors.

What that means is that it monitors not how many times the pages are looked at but how many separate people come here in each month.

On my first month I was amazed to find there were 200 or so. The numbers crept up slowly and yesterday? Well yesterday, when I looked at Awstats, this is what I saw.

Yesterday, I broke the 1000 barrier! And it’s not even the end of the month yet.

Apparently my squeal of excitement was heard in the next office.

So, thank you. Thank you ALL 1010 of you.

Come and say hello, even if it is just to say where you are from. Explore the pages and share the excitement with me. I wonder how things will have changed by the time I get to the first anniversary?

I hope you’ll all still be here.

Strawberry Surprise Marshmallows

Some time back, I was at work and I had a fancy for something sweet. That’s odd, for me as I generally tend to prefer savoury things.

All I could find was some Turkish Delight that a Turkish colleague had brought back from a visit home. Normally I don’t like Turkish Delight because it is too sweet and over scented for me but this was delicious – it was stuffed with pistachios and the contrast between the soft delight and the crunchy pistachio was unbelievable.  It really did make me a convert. Our friend, Ender, explained there is a world of difference between the mass produced cheap stuff we get over here and the high quality Turkish Delight produced in Turkey. People make it at home, he said, and that’s even better. All sorts of flavours are made, all sorts of additions to the delight.

It made me think about what I could do…..

I remember the excitement I felt when I first read about freeze dried food. It was what the astronauts ate, apparently, and it seemed so exciting. I was a child at this point, mind you, so it’s understandable. Fancy being able to eat something like that….. and then I found you could actually buy freeze dried fruit. I spotted freeze dried strawberries. I had to buy some. And when I saw the freeze dried strawberry powder as well, my mind really started ticking over.

Maybe I could make Turkish delight and use the strawberries instead of pistachios? Perhaps use the strawberry powder in cakes as a swirl? Or in meringues to make them all pretty and pink? Macaroons…whipped cream…oh the  ideas were just pouring out. But I didn’t do anything because I was too busy dealing with the huge apple harvest. I made cakes and apple butter and apple mash and apple crumble until, at last, even I was fed up of apples.

A month or so later, as I sat down at home one night, I started to read Good Food magazine and spotted a recipe for bramble stuffed marshmallows. Well, I thought, why not make marshmallows instead of Turkish delight and put the freeze dried strawberries in there?

It seemed meant to be. I was on trend!

I would have to do something with the strawberries because I had opened the packet….

It seemed pretty easy.

First of all, some cornflour and icing sugar needed to be mixed together as this would be the dusting that the mallow is poured upon. If you don’t do that it will stick.  Now, although I wanted something sweet, I didn’t want too sweet. If I used the strawberry powder that would have the same sort of effect and add a touch of sharpness, stopping everything becoming too sickly.

I made a 100g/ 4 oz mix of  cornflour and freeze dried strawberry powder, using slightly more strawberry powder. This was going to be the dusting that stops the mallow sticking together.

In order to get the bouncy texture of the mallow you need gelatine.

9 sheets were put in a pyrex jug with 150 ml of hot water. It softens and starts to dissolve quickly but it will probably need a mix with a fork to get a good, even distribution

I lined a baking tray with baking parchment and scattered a good layer of the strawberry and cornflour mix over it

One tablespoon of liquid glucose was added to 1 lb/450g of granulated sugar

200 ml of cold water was added and the pan was put over a medium heat to start the sugar dissolving.

Now, I have a sugar thermometerand I placed that in the pan too. Once the sugar was dissolved I turned the heat up to start to get the sugar solution boiling. I had to get it to 125 degrees.

if you haven’t got a thermometer, don’t worry, just time it, for a start. To get to the right temperature takes about 10 to 15 minutes of boiling. You can check how well it is doing after 10 or more minutes by dropping a little bit into cold water. If it sets into a soft ball you know you are at the right temperature.

The bubbles start to look different – thicker and perhaps more glossy.

While it is getting to that stage, start whisking the egg whites untill they become stiff and white. Once you have them at that stage there’s no harm in leaving them in the bowl, ready for the next bit.

And there you have it – I timed it – it was just over 13 minutes to get to this stage.

Now, carefully, in two stages, pour half the sugar syrup into the dissolved gelatine. Give it a little stir and then add the rest of the sugar solution.

While the whisk is going, start pouring in the gelatine sugar mix into the already whisked egg whites.

Add  a teaspoon of vanilla extract as the whisk goes on

And carry on whisking for ten minutes or so – you will see the mix become shiny and somewhat stiff.

Pour half of the mix onto the strawberry dusted baking parchment

Then put freeze dried strawberries all over the mallow

And start pouring the rest of the mallow over the strawberries

And then leave to set.

This will take a couple of hours at least. (I put mine in the fridge later on as I had been doing the washing and there was a lot of moisture in the air. A fridge is a very dry environment so that helped everything set. Bear that in mind if the weather is funny and humid)

The rest of the strawberry powder mix was poured onto another sheet of baking parchment

…and the cooled and set mallow was upended onto the powder

The bottom layer of paper was now on the top and was easy to pull away (the Bear did that bit as I needed to take pictures and it is a bit sticky….)

There it was.. white and bouncy mallow with a pink dusting and an occasional strawberry poking through

We cut it all into squares – there were over 60 pieces!

They were fabulous. The sharpness of the strawberry powder stopped them being too sweet and the surprising soft crunch of the freeze dried strawberry in the middle really enhanced the softness of the mallow.

The Bear and I ate a piece. Then another piece or two ….and we realised that, delicious though they were, we would have to stop.

I put the marshmallows in an airtight box, lined with baking parchment and decided to take the rest to work. After all, it had been thanks to Ender’s generosity with his Turkish Delight that started this whole experiment off.

They were eaten! And people who normally find marshmallows too sweet had some… and then had some more!

The only downside? Ender, who inspired the whole thing, wasn’t in the office that day!

Should you make this? Yes, I think you should. I know it involves boiling sugar but that’s fine. Just time things if you don’t have a thermometer and it really is rather easy.

And to make it easier for you – here’s the recipe.

Strawberry Surprise Marshmallows

30g cornflour; 70g freeze dried strawberry powder; 9 sheets of gelatine; 450 g /1lb granulated sugar; 1 tablespoon of liquid glucose; 2 large egg whites; 1 teaspoon vanilla extract; freeze dried strawberries.

* Mix the strawberry powder with the cornflour

* Dissolve the gelatine sheets in a pyrex jug with 150ml of hot water. You will need to stir it round

* Line a tin (I used my normal baking tray for flapjacks) with baking parchment and put down a layer with the pretty pink strawberry and cornflour mix. The gooey mallow mix will go on this so make sure the paper is covered

*Put the granulated sugar and the liquid glucose in a heavy bottomed pan  and add 200 ml of water. Stir over a medium heat untiol the sugar has dissolved completely  and boil until a sugar thermometer reads 125 degrees. This takes between ten and fifteen minutes. With no thermomemter, drop a little of the sugar mix into a glass of cold water after twelve minutes –  if it sets as a soft ball then it is ready.

*While the sugar is boiling, start whisking the egg whites until they are stiff

*When the sugar is at the right stage pour it carefully into the pyrex jug that has the dissolved gelatine.

*Keep on whisking the egg and add the gelatine and sugar syrup in a steady stream.

* Add the vanilla essence.

* Keep whisking until the mix is shiny and stiff.

*Pour half into the lined tray

* Add the freeze dried strawberries then pour the rest of the mallow mix over and leave it to cool for at least a couple of hours

* Put more baking parchment on the bench and scatter the rest of the cornflour/strawberry powder mix over and then turn the set marshmallow onto that. Take off the top layer of paper.

* Using a sharp knife, cut into squares.

Apple Butter Cake

I do love autumn. As a season it suits  me better than any other. I love the cooking I do then… I like the cooler weather.. I absolutely adore the darker nights and getting home to our warm and cosy apartment and putting the lights on so the place glows. I love the colours of the trees and the crispness of the air. When I get up in the morning the skies are just starting to lighten and the view is magnificent.

In autumn I start to bake again.

I decided that as it was getting cooler it would be fine to have a nice cake to have with coffee. I wanted something  that could be classed as a plain cake… but not too plain. If you having a cup of tea or coffee you want a cake that will enhance the experience, not fight against it.

One of my great favourites is the Blueberry Yoghurt cake but right at this time? I had no blueberries  but I did have a lot of apples. All that foraging we did meant that there are still lots of apples left.

I thought I could adapt the recipe and add in apples… and as I have a lot of Apple Butter I could use that as well.

In my reading about apple butter, before I made it, there were mentions of it being used in baking as a fat substitute. The apple keeps moisture in the cake just as fat does. Now I wasn’t going to go all the way along that route as I’d never cooked with it before and I was using a recipe for another cake entirely, but I was going to give it a go.

Plenty of apples to work with, anyway.

First of all, the oven was put on at 180 degrees C/350 degrees F and I lined a springform cake tin with a siliconed paper liner.

I peeled, cored and diced 6 smallish apples and put them in a bowl with the juice of half a lemon to stop the apple pieces turning brown.

250ml of yoghurt was measured out and put in the mixing bowl’

with 200g of sugar and 60ml of vegetable oil.

Two eggs and a teaspoon of  vanilla extract went in next.

I would have liked to have added Calvados  to the mix as a good apple brandy will enhance the flavours… thing is, we had had Calvados and as it was good, so good that we no longer had any….well, we’d drunk it. Ordinary brandy would have to do instead. I poured a good sloosh…maybe a couple of tablespoons.

All of these wet ingredients were gently mixed together. Gently, you note, not thrashed to death in a high speed mixing frenzy.

Next, the dry ingredients had to be mixed

300 g  of plain flour and 1 ½ teaspoon baking powder and  ½ teaspoon bicarbonate of soda have to be mixed together properly to make sure everything is evenly distributed because then you have to add that to the cake mix.

Before that went in though, I got my jar of Apple Butter 

and added two heaped dessertspoonfuls of apple butter to the mix.

Now this, I thought, would add a beautiful spiced apple flavour and, if the theory was right about reducing the fat content, still keep the cake moist. The recipe I was tinkering with had specified 80ml of vegetable oil so I had effectively reduced the oil by 25% when I only put 60ml in.

I mixed that through, gently then added the flour, bicarb and baking powder mix

Again, another gentle mix

And then the apple

Once in the springform tin, I gave it a little shake, from side to side to even out the mix and then put it in the oven on the middle shelf.

I had a feeling that this was going to be a good cake because when I was clearing up, I just happened to run my finger over the mixer blade… and tasted the mix…..it was delicious.

I felt like a little kid again, scraping out the bowl and eating the mix.

Now, my original recipe had said that 35 minutes would do the cake to perfection but I HAD added what would be extra moisture with the apple butter… and apples do make cakes very moist whereas the original recipe specified blueberries. I was prepared for extra cooking time.

Which was just as well because I kept checking and the skewer kept coming out sticky and the top started to brown. I decided the thing to do would be to turn the oven down slightly  to 160 degrees C/320 degrees F and keep going.

Eventually, a good fifty minutes after I put it in the oven, the skewer emerged clean.

It looked pretty good and smelled even better

I sprinkled just the faintest dusting of golden caster (superfine) sugar over the top

And cut a slice.

It was excellent. Not too sweet and with little nuggets of apple and the hints of aromatic spiceness from the apple butter it was more than just a plain cake for tea or coffee. I wanted to eat more of it but I couldn’t. I had promised to take it round to my friend’s house to let the children try.

These are the children who came round to learn how to make Bear Bars and helped to make pasta and they are developing a keen interest in cooking. They were waiting to try the apple butter as well as the cake.

Their verdict? They want more. This cake is perfect with a cup of tea or coffee but they had it as a pudding with an extra spoonful of apple butter and a spoonful of cream.

And you know what? They were right. It makes a pretty good dessert.

And as that was done in a haphazard fashion and I want you to try baking this cake I shall set out the recipe:

Apple Butter Cake

Wet ingredients: 6 small apples/3 medium apples, peeled, cored and diced;  juice of half a lemon; 250ml natural Greek yoghurt; 200g golden caster sugar; 60ml vegetable oil; 2 free range eggs; 1 teaspon of pure vanilla extract, 2 tablespoons of brandy; 2 heaped dessertspoons of apple butter (if you have it. Otherwise increase oil to 80ml)

Dry ingredients: 300 g  of plain flour; 1 ½ teaspoon baking powder and  ½ teaspoon bicarbonate of soda.

Heat the oven to 180 degrees C /350 degrees F and line a medium sized springform tin with a cake liner.

Mix all of the wet ingredients first, bar the diced apple which goes in after the flour mix has been added. Only mix it gently.

Mix the dry ingredients together to ensure an even mix then add that to the cake batter, again only mix gently.

Now add the diced apple . The apple will sink in the mixture so don’t bother to stir it through – it will settle of its own accord.

Pour the cake mix into the lined tin and shake slightly to let it setlle and place it in the middle of the preheated oven.

After 40 minutes turn the oven down to 150 degrees C/ 320 degrees F and check with a skewer to see how the cake is doing.

After 50 minutes check again and leave in until the skewer emerges clean.

Take out and let cool.

And that’s it.

Put the kettle on, will you? Make a cup of tea and have a perfect slice of cake!

Meatfree Monday – Seed and grain bread for egg mayonnaise sandwiches

The Bear was about to set off on his travels again and would be getting up at some ridiculous time in the morning so he could get to the airport. What that means is that he doesn’t really feel like eating too early in the morning and would rather have something to eat at a more normal time.

What THAT means is that he is loitering around an airport and picking at stuff. Now I’m sure that what is served at outlets or in the Business Lounge will meet with all Food Health guidelines… it just doesn’t meet with mine. Obviously, food produced on an industrial scale, for sale at some point in the future is going to be packed with preservatives or dodgy fats that we don’t want and would never have in freshly made food. He knows not to risk my wrath by buying a plastic wrapped muffin or going to a fast food outlet for a burger and he does try to get something looking vaguely healthy but the fact remains, he has to eat at some point while he’s travelling. He could try looking a sandwiches but, even there, there are problems.

A simple egg sandwich, for example, will be made with bread that has preservatives, the eggs will probably not be free range (as I’m sure they would be plastering that fact all over their packaging), they are likely to be using margarine instead of butter and goodness knows just when they boiled the eggs.

So I decided to make sure he could have something to eat that he could carry easily, would taste nice and be good for him.

His favourite sandwich is an egg mayonnaise one so I decided to do that.

First I needed to make good bread and as he is particularly fond of seeded or granary loaves, I decided that would be just the thing to bake.

I got a packet of Allinson’s Seed and Grain Bread Flour, which is white flour with wheat and barley flakes, kibbled rye, sunflower seeds, millet and linseed. Healthy, tasty, nutritious and perfect to make into a lovely sandwich.

There was a recipe on the back that looked good and I thought I would follow that as I had never used that flour blend before. It looked quick enough, too.

First thing was to preheat the oven to 230 degrees C/450 degrees F, whilst measuring out 650g/1lb 7 oz of the flour, 10 g/2 tsp of salt, 5g/1 tsp sugar and a 7g sachet of yeast.

That was mixed together first to get an even distribution of all the dry ingredients, then 15g/ ½ tsp of soft butter or 15 ml/1 tbsp of vegetable oil was rubbed through.

400ml/ 14 fl oz of warm water was added and mix to make a soft dough.

The recipe says to knead it for ten minutes on a floured surface – I did it in the mixer with a dough hook and added extra flour to get it to come together.

Well I did give it a knead myself…just to show willing and besides I like to feel the dough and by feeling you can judge when it is properly ready.

Look at how the dough looks now… smooth and bouncy. If you’ve ever patted a baby’s bottom.. well that’s what it should feel like!

It had to be put in a greased tin (they suggested two 1lb loaf tins but as I wanted it for sandwiches I put it in a long 2lb tin

and covered it with a tea towel for 30 minutes until it doubled in size.

Into the hot oven it went for half an hour or so

Perfect. When I knocked the bottom it sounded hollow which means it had cooked properly.

It looked and smelled delicious. We might have shared the end crust with some butter on…. just for checking purposes you understand.

The next thing was the filling. I always use free-range eggs and buy these from our local farm shop so I know exactly where they come from and just how fresh they are.

Boil them for four minutes then immediately tip away the boiling water and start filling the pan with cold water because otherwise you get that horrid black ring round the eggs and that terrible sulpherous smell.

I like the eggs to look like this – mainly cooked but with just a hint of soft yolk.

The eggs were  chopped then two slender spring onions are also chopped and added. I wish we still had some chives left but with Autumn rapidly approaching they are all gone now.

A tablespoon of Hellmann’s Mayonnaise and a pinch of salt go in next (Hellmann’s switched their production to free range eggs so that’s good, otherwise I would have had to make my own, which I have to say is really easy…. but this was easier!)

White pepper enhances the egg mayonnaise mix really well,  so a shake or two was added to taste.

And that was it for the afternoon. I was going to get up early the next morning and make the sandwiches. The egg mix went into a lidded box in the fridge and the bread was put to one side.

Next morning, at around 5.30 am, I got up to sort things out. The bread cut well and is ideal for sandwiches. It was a good even texture and the seeds and grains made it slightly dense, which is a good thing for a sandwich. You need the bread to hold together and not collapse, spilling your filling everywhere. Especially when the person about to eat it is in a business suit… This might have happened on another occasion.  not this time, though. That bread looked like a winner in the samdwich stakes.

It’s important to spread the bread with butter as this makes a waterproof layer and stops the filling seeping through. And butter is important because, well, it just is. I believe in butter and I do not believe that some weird kind of vegetable fat with emulsifiers added to it could possible make anyone believe it wasn’t butter.

Butter is cream shaken up until it turns to butter. A pinch of salt can be added but that’s all. No chemicals, no E numbers. Nothing but creamy milk and salt. Healthy, that is, I’m sure of it. Anyway, we don’t have any margarine or spread or whatever it is called. Butter it is and that’s an end to it.

Delicious. And I always make sure I spread to the edges. I hate it when you get a sandwich and there’s just a tiny dot of the filling in the middle.

Sliced in two so it’s easy to eat

And wrapped in a sandwich bag so he can throw it away afterwards.

So, the Bear left for some other country and I went back to bed, happy knowing that he would have something to eat without having to buy an overpriced, low quality sandwich.

Was it worth it? Yes, it was.

Making the bread took quarter of an hour mixing and kneading. The bag of flour cost less than £1 and there’s still a well over a quarter left. What I used made a 2lb loaf so there’s plenty left for sandwiches for me for work. I suppose the two slices I cut for him would work out at maybe 15 or 20p. The eggs cost £1.65 for a half dozen, but what I used on his sandwich was probably less than one egg so there’s another 28p. Maybe adding in 10p for the other ingredients and you have a perfect additive free sandwich for 58p or thereabouts. Even if you add in 20p for using the oven it is still incredibly cheap when you consider that in an airport the average cost of a sandwich is £2.80. And if you wanted decent bread and free range eggs? That would be another £1 or so added onto it.

For all of you who are wary of making bread (and you know who you are) this was a simple, quick and very tasty loaf. It saves an incredible amount of money for what is really very little work.

Go on – get baking!

A new T.O.B cook – Lorraine!

One of the really, really great things that come from blogging is the fact that you make friends with people you wouldn’t have have met if it hadn’t been for the blog. When those friends start cooking things they have seen on the blog it makes me really happy.

Those who did cook sent me pictures to show me what they had done and I was so pleased I posted the pictures here – anything to encourage people to cook. Now what we do is make that into a page for the person who’s cooking… they become a T.O.B. Cook. Look in the drop down category box for T.O.B Cooks and you’ll see what the others have done so far.

And here’s the latest T.O.B. Cook –  it’s your turn to meet Lorraine! 

Actually, I may well have met Lorraine in reality at some point… she is the best friend of the Bear’s cousin. Thing is,  they both happen to live in Quebec so  we would have had to gone over there, but, you know, we may well have met up.

As it happened, I “met” Lorraine because she read the blog and we became friends on Facebook. Lorraine started to read the blog and we started to talk about cooking. Then we became real friends.

The first thing Lorraine cooked was the Lemon Drizzle Cake that my aunt taught me. She managed to work out what I meant when I talked about caster sugar (in Canada they call it super-fine)  and took it with her when she visited the Bear’s cousin.

We message each other a lot now and one day when we were talking  about the huge amounts of basil we had and what we could do with it, I mentioned  that I had made Sweet Basil Biscuits but that I was intrigued been reading  what Katie from Cozy, delicious did with her basil. She made Basil and Watermelon Martinis – Lorraine needed no further encouragement. 

Lorraine used the sweet yellow watermelon they can get in Quebec

And made the most delicious Basil  and  Sweet Yellow Watermelon Martinis for herself and Sonny, her husband. Cheers!

(And because I couldn’t get lovely watermelons, I made Basil vodka with tomato essence cocktails)

Lorraine’s next challenge was No Knead Bread as she’s never done much yeast cookery. She said she’s never had any success with it…

Well, that looks like a success to me!

Lorraine made lovely Roasted Red Peppers 

And with the No Knead Bread and some lovely Stilton, made the perfect lunch!

I’m so glad Lorraine started joining in and even more glad she has become my friend.

Lorraine will, no doubt, tell you more about her cooking and will have more pictures to post in the future but until then, look at at what she’s done so far and welcome her as the latest T.O.B. Cook!

And this is what she says…

What can I say, just love the blog. After many years of cooking for just two of us, it became a routine, chops one day, always pasta on Friday, steak on Saturday, etc. If entertaining, I would plan for weeks and weeks but some things were always bought like Bread. Had never had any success and gave up. I began reading the blog religously and realized I was not alone so I gave bread a try once again. First time – did not quite work out but from Wendall’s help and encouragement I did it and continue to do so on a weekly basis. Have even managed to have a local shop import some Allinsons flour so I can try the other breads.

Am looking forward to trying many more of the receipes, especially Dahl and chicken receipes and will try to remember to take pictures to ecourage others. It is never too late to try new things. Thanks Wendy and The Bear – keep blogging.

Lorraine’s Update – 21 September, 2010 – EASY APPLE BUTTER!

This morning when I opened my computer I found a message from Lorraine. She had made the apple butter and what’s interesting is that she had a far easier way of doing it than the method I used! As a Canadian, Lorraine has more experience than me with apple butter so perhaps we should go with her on this.

Lorraine peeled, sliced and cored her apples (whereas I just quarter them and cook them, skin, pips and all)

She says “I ended up with 14 cups of apples before the stirring and added, cinnamon, ground gloves and 5 1/5 cups sugar. That’s it. My receipe did say I could use 2 cups of sweet apple cider to replace two cups of the sugar but I did not have cider.”

Simple, eh?

She blended them in a food processor

Returned to the pan and cooked again for about 2 hours until the natural apple sugars caramelised and went brown

Filled her jars

Boiled them in a water bath to sterilise everything

And ended up with 10 jars holding 250 ml each. Good work, Lorraine!

Now that, my friends, is a faster way of doing it than I have been doing it… and bearing in mind the immense apple glut we have, well, I think I will have to try her method!

I shall ask her to write down what she added to the apples and then I shall add it to her post!

Pork with saffron cream and mushrooms

I do like a bit of a challenge. Nothing too strenuous, you understand and nothing too difficult.

I like to call in at a supermarket on the way home from work and see what is in the reduced-for-a-quick-sale-as-it-has-to-be-used-today section. It means I am approaching cooking the evening meal with no preconceptions. I start with what’s there and then decide what I am going to cook and what else I need. See what I mean? It’s a bit of a challenge at the end of the working day, but it’s a fun one. And I end up with a surprise while I save money.

When I called in one night, I found lovely pork steaks from outdoor farmed, happy, well-looked after pigs (though I do wonder how on earth you could keep a pig indoors?) Still, this was premium pork and it was half price.

There were also some baby button mushrooms.

That would do I thought. I could make something from that. As I drove back home I was thinking about what else I had in the kitchen….. and remembered that friends of ours had brought home some lovely saffron from their holidays. Pork and saffron…. pork in a cream and saffron sauce… with mushrooms. Bet that would be good, I thought.

Within five minutes of getting into the apartment I had chopped some onion and started to soften it, while I cubed the pork.

A few stamens of saffron were put into a ramekin

And some hot water added to release the flavour and glorious colour.

Little mushrooms were sliced while the pork cooked through and then were added to the pan.

The saffron was added… actually it looked far more golden that this, but hey… I’m not a photographer so I have no idea why it DOESN’T look more golden. Just use your imagination.

Then just over a quarter of a pot of cream was poured in to make the sauce….. I always seem to have cream in the house. Cream and butter – if you have them then you can always make even the meanest of ingredients taste delicious.

While I’d been doing that I put some basmati rice on to cook. That only takes a few minutes to cook and if you measuer the rice to water ratio correctly (just a bit over one and a half times the water to the rice) you can cook it through without having to drain it. A tea towel on the top once the pan is off the oven absorbs any extra moisture and leaves you with tender, fragrant, perfectly separated rice grains.

And there you have it. In less than twenty minutes I had supper ready.

The pork was tender and the mushrooms cooked through… the saffron cream added a lovely savoury hit and the rice mopped up the sauce.

Can’t do better than that, I think. It was quick, easy, tasty, inexpensive and best of all… it was a surprise.

I might just pop into a store on the way home tonight to see what other surprises I can get!

Basil infused vodka and essence of tomato – the most perfect cocktail ever

If you look at the far right hand column on this page you will see a section called Blogroll. That’s where I keep a list of my favourite blogs so I can click on the links and go straight to their page. Have a look and see if there’s a blog you might not have come across before – you might find a post there that really interests you.

That’s what happened one day when I was having a coffee and taking a break from work – I thought I’d look at Katie’s Cosy, delicious and see what she was up to. Her latest post was Watermelon and Basil Martini… intrigued, I read on. It sounded great! She had infused some vodka with basil and made a mixer with fresh watermelon juice.

Thing is, I didn’t have any watermelon and I’m sure that the watermelons Katie gets in the States will be much sweeter and fresher than anything we could get here in England… but it left me thinking.

I had lots of basil so I could try infusing the vodka anyway (after all, I made the old favourites Toffee Vodka and a Coffee Liqueur just before Christmas last year) and whatever you do with vodka and an infusion has to be fun….

In my pot on the balcony, high above the rest of the city, I had Sweet Basil and Greek Basil growing   – and as the weather was turning cooler and autumn was on its way, I really should get it used up.

I thought I would try with both kinds of basil to see what it was like.

Katie said she had used 2 cups of basil to 4 cups of vodka

So twice as much vodka as basil was poured into my large storage jar and it was put into the larder to keep it in the dark for a day or two. Two days is the maximum but check it to see how it is doing.

Now, as I didn’t have lovely watermelons, I started to think of what else I would put with the basil vodka when it was ready.

And what came to mind was basil’s perfect partner – tomatoes……

…………………… but not that thick and gloopy tomato juice you make a Bloody Mary with, no, I wanted a pure, clear, almost sweet, essence of tomato juice.

It would be like my favourite salad in a martini glass!

I had some beautiful tomatoes that I knew tasted delicious. I’d read about people making clear tomato juice by straining the tomatoes to get just the juice and none of the pulp. That was what I wanted… just translucently clear, pink, sweet tomato juice.

To make it, I’d need a sieve, some muslin and a jug to catch the strained juices.

Lining the sieve means you keep more of the pulp out of the way and allows the pure juice to drip through.

I chopped the tomatoes roughly and gave them a little squeeze as I put them in the lined sieve.

And watched as the pink juice dripped through.

It really was a beautiful, bright pink.

I squeezed the cloth to get more juice out but what that did was thicken the juice. I’d have to strain it again….

I used a coffee filter paper this time and poured the juice into that.

The juice looked almost clear and I wanted this to be the most delicately coloured drink imagineable.

I got the jar with basil infusing in vodka out of the dark cupboard – it had been in there for 36 hours and, when I checked it, the vodka had been tinted by the basil leaves and it smelt delicious. It had a softly sweet smell of basil – not harsh, just sweet and fresh smelling.

All I had to do to that was pour it out of the jar through a sieve to get the leaves out.

See how pretty that looks!

What I imagined would be the perfect cocktail had to have the perfect glass. I had just the thing. An old, handblown glass with intriguing bobbles on it. It’s been one of my favourite glasses for years, ever since I was given it by an old friend. I have no idea how old the glass is or where it came from originally but I love it.

A measure of the delicately tinted basil vodka was poured over the ice.

The sweet, clear tomato essence was added

And as a finishing touch? Tiny Tomberries (the smallest, sweetest tomatoes there are) and a baby leaf of basil were speared with a cocktail stick

And what was it like?

It was delicious. It was sweet and aromatic with the most subtle flavour of basil – not overwhelming at all.

It was the essence of summer in a cocktail.

I had one… the Bear had one and we agreed this was possibly the most delicious drink there ever was. Every sip was perfect.

I’m going to make this again and again and perhaps when I next serve a tomato and basil salad I will make this and serve it alongside to highlight their pure, sweet and aromatic flavours.

You really have no idea how much this cocktail pleases me… I suppose, all I can say is have a go yourself.

And cheers!

Meatfree Monday – the simplest supper ever – spaghetti with tomato, anchovy, chilli and cream.

I needed to make supper but there was only me to cook for as the Bear had gone out to eat at an incredibly smart restaurant (work, you know… ) and I just couldn’t be bothered to shop. Sometimes, you know, the thought of going food shopping at the end of a working day just defeats me. It’s not that I’m not organised, it’s that while our apartment is beautiful, it doesn’t have a large fridge so it’s not as if I can do a big shop and get everything I need for the week. I have to do little and often.  

I thought first of all that  would just have cheese and crackers but when I got in, I discovered I didn’t even have any cheese, never mind crackers. I would have to see what there was…..

I did find some tomatoes that the Bear had brought back from his Dad’s greenhouse and a head of garlic. The tomatoes were going a bit wrinkly but at least that meant they had ripened.

I’d previously opened a tin of anchovy style sprats (the famous Ikea sweet sprats (essential for Jannson’s temptation, possibly the world’s most succulently decadent comfort food) and had some left over

They had to be used up

And I had some spaghetti.

I had enough for a feast! I set the water to boil and then added the spaghetti.

While the water was heating I chopped the tomatoes and chopped in a dried chilli

Quickly fried them together

Stirred in the remaining anchovies

And then realised that there was the remnants of a pot of cream waiting to be used… would it work?

I often eat chilli, tomato and anchovy over spaghetti, but tonight I felt I needed something a little richer, a little bit more comforting. Cream would help, surely?

I stirred it in……it tasted delicious. Probably beyond delicious. It was a gorgeous mix of sweetness, heat and salt, all softened by the addition of cream which made it into a lovely smoothly rich sauce.

Tossed over the spaghetti it was just what I needed. It was rich and satisfying and, unbelievably, made from scraps.

And all it took was maybe 15 minutes.

Do you know, that was better than anything I could have ordered from that fancy restaurant.

Another Meatfree Monday success!

Toffee and Apple Butter Crumble

When I was at school we studied the English Romantic poet, John Keats. To this day, I can still recite many of his odes and whenever my friend J and I get together, something will trigger something in our heads and we will burst into recitation – either sonnets from Shakespeare or poetry or even psalms and verses from the Bible. It must be hard wired into our brains now and it still makes us laugh that after all these decades, the words our teachers drummed into our heads when we were little schoolgirls, still remain. It seemed so hard at the time to learn everything and now it seems we can’t forget anything! Makes us pretty good at quizzes, of course, and a source of irritation to our husbands as they weren’t taught like us Grammar School girls and they roll their eyes when we go into our synchronised recitation mode at the least provocation or reminder. We can’t help it. It just happens automatically. We must have been terrified of our teachers.

 Keats, in his ode “To Autumn” called this the “season of mists and mellow fruitfulness”  and he was right. The apple trees are bending under the weight of the apples and this morning, the first of the real autumn mists filled the valley below us. What might have seemed boring and irrelevant to our teenaged minds is now appreciated and I found myself reciting the ode as I made coffee for breakfast and gazed out of the window.

Mists certainly… mellow fruitfulness? Yes. We still had such a lot of apples from our brief foraging trip and I needed to use them.

I was going to be cooking a meal that evening for a visitor from South Africa and another colleague. It wasn’t going to be a fancy dinner but it had to be good. I wanted to show what traditional British cooking was like and prove that it is delicious. What better for dessert, I thought, than Apple Crumble? Perfectly British and perfectly delicious.

Last time I made crumble, I made Toffee Apple Crumble and it was delicious – the addition of fudge made an ordinary apple crumble something special. This time, I thought, I would use fudge again but also add the Apple Butter I made at the weekend. That would add in another layer of appley lusciousness to the crumble…..

So, I got in from work and peeled some apples. Normally I use good sized apples and allow one per person. That normally works out about right.

These were my foraged apples – not quite so big as ones from a managed orchard, so I decided 6 would do. Also, I am rather greedy and I was hoping for leftovers the next day.

Peeled, cored and chopped, I put them in a large baking dish and sprinkled the juice of half a lemon over the bits to stop them getting too brown.

A sprinkling of golden granulated sugar over the top would balance things nicely and help make delicious juices (and I do mean, by the way, just a sprinkling. More sweetness will come from the fudge)

The fudge needed to be cut up too…

And the apple butter I made? Look how it has set… it can be cut into slices, just like real butter. Apple butter is just apples cooked slowly until their natural sugars caramelise, which is why it is a deep golden brown, and spices (cinnamon, ginger, nutmeg and cloves) stirred in and cooked with the apples.

I layered some slices over the apple, knowing that when everything baked, the apple butter would melt over the apple pieces and that lovely spiced apple mix would be perfect in the crumble.

Next, the fudge pieces were scattered over the top.

The crumble mix is simplicity itself – 300g of plain flour, 200g of sugar and 175g of butter.

Making the crumble topping is really easy – just rub the mix through your fingers until it resembles breadcrumbs. It doesn’t take long.

Then scatter the crumble mix over the prepared fruit and fudge.

Don’t pack it down, just shake the bowl from side to let the crumbs settle round the fruit, fudge and apple butter.

And then all you have to do is put it in the oven at 180 degrees C/350 degrees F for 40 minutes or so.

Oh, the smell of it as it cooked – there was the sweet buttery smell of the crumble itself and the sharpness of the apples and the spicy mix of cinnamon, nutmeg, cloves and ginger from the apple butter.

And what was it like?

It was lovely. So lovely I forgot to take a picture of it as it came out of the oven. I just dug into it and served it up.

Served with a great dollop of extra thick double cream.

It was eaten and seconds were requested. Our South African friend said she had not wanted to go home without trying a hot English pudding, so that was good. I suppose our traditional hot puddings are famous, and rightly so.

It was a perfect pudding, it really was. Toffee Apple Crumble was excellent but adding Apple Butter as well? That made it truly delicious.

And there are no leftovers.

Apple Butter

This autumn (and I know it is still late summer really, but it is the 1st September and it was misty when I got up and it is just starting to feel autumnal) well, this autumn the apple crops are amazing. Every apple tree seems to be laden with fruit. Friends who drove up to see us, last weekend,  said the roads from Oxfordshire were being pelted with fruit as they passed. So many apples, and all of them so ripe they just fell from the trees with the faintest encouragement or vibration from passing traffic. I often wonder about the roadside apple trees… are they successful seedlings, all grown up from a thrown away apple core as people went past, or are they the remnants of a long ago cottage garden by the road? I think they are, perhaps, from cores as the trees are so tall and straight. Any old apple tree in a garden tends to be gnarled and battered. It’s nice to think of nature triumphing from a discarded core, isn’t it?

But there’s so many of them! And no one is doing anything with them. What a waste! Mind you, it’s thinking of things to do with this huge crop……

Today’s apples, I decided, were going to be made into apple butter.

I’d read about this for years but not really explored what it was. I had a half notion it was apples and butter (which sound rather nice, actually) but when I started searching, I discovered that it was just apples, spices and a little bit of sugar, boiled down and thickened during the long slow cooking to make a preserved apple spread. It spreads, apparently, like butter when it is done, which is how it got its name. Wikipedia explained a bit more, as did Charles, a friend in America, who told me that his father -in- law and the rest of his townsfolk gather to make apple butter in huge quantities in the town square. The smell is amazing, apparently, spreading out from the town square. Historically the idea came from Europe and was taken to America by immigrants and it is mainly in America that it is made now.

Well, it is going to be made in Nottingham today. I have fruit (plenty of fruit) and time to do it. All it takes is apples and spices. Something that we can have on toast, or cook with later in the year when all the apples have either fallen or rotted. Something healthy and tasty. A dairy free spread from free fruit? Sounds good, doesn’t it?

It is simplicity itself. All you have to do is quarter the apples, leaving the skin on and the core in – this will add pectin to the apples and help it set. Only cut out and damaged bits of apple and do remove any spiders or caterpillars that you may  have brought home with you.

There were about 3 lbs of apples in my large pan and I poured in a cup of water to help them cook down. In the long slow cooking that follows the water will evaporate. Some recipes says use a cup of cider vinegar as it adds a tang to the end product but I didn’t have any, so water it was.

The apples started to cook very quickly – maybe a couple of minutes and you could see them soften. It is important to keep stirring so they don’t burn.

After about 15 minutes or so, the apples had reduced to a soft mush, like apple sauce.

One of the things I was given from my aunt’s house was a Mouli food mill which is ideal for this next bit.

As you have cooked the skin, the core and the pips as well as the apple, you need to get the bits out and just have the smooth cooked apple left to transform into the apple butter. I used the finest plate and started to mill the apple puree.

If you haven’t got a  Mouli then you can do this next bit by pushing the fruit through a sieve. The Mouli is quick, though, so it could be a good thing to buy.

You can see how smooth the milled apple is and all the hard bits are left behind.

A beautiful, smooth apple puree.

I tasted the apple and it was sweetly appleish but quite sharp so 1 cup of sugar was added and stirred in.

The next part was to add the spices…. most of the recipes I looked at suggested nutmeg so I added half a teaspoon or so into the mix (thanks, Bear for taking the photo)

And all recipes said to add my favourite spice cinnamon – 1 whole teaspoon.

A pinch of ground cloves (yes, you can buy it ground but I couldn’t find my jar, so I ground up a couple or so of cloves with my trusty pestle and mortar and scooped up the finest bits)  and half a teaspoon of ground ginger were stirred in as well.

And then I started to stir. The heat was turned down to the bare minimum and I stirred.

Then I went for a nap and left the Bear to stir. So he stirred. All the descritptions of apple butter said that it had to be stirred constantly but we managed a stir every few minutes as the pan sat there on the lowest heat.

Anyway, it didn’t burn and we kept stirring. The apartment smelled gorgeous. Apples, cinnamon, cloves and nutmeg  all mixed together is a truly delicious aroma. Even if you don’t want to make it  to eat then you  should make it just for the smell.

The recipes suggested that constant stirring at a slightly higher temperature would have the apple butter ready in a couple of hours.

We did it at a very low temperature for four or so hours… stirring it round until it looked like this

The sugars in the apple had caramelised and the puree had gone a lovely rich and golden brown. When I dragged the spoon through it, it was thick enough to leave a trail through the puree.

When I lifted a spoonfull of it up, it didn’t run off the spoon… so that meant, according to everything I had read, that it was ready.

It didn’t look to me like butter, but there you go, I’d got this far, I’d just have to keep going.

I’d sterilised jars by boiling water in them in the oven and I spooned in the apple butter

It looked brown and still not in the least bit buttery.

By now though, it was getting late so I let it cool and then put it in the fridge overnight.

What a transformation! It had set into a smooth and delicious spread…. yes, it was buttery in texture!

I’d done it!

It tastes delicious and on hot toast it is a perfect breakfast. It can keep in the fridge for three or four weeks (if it last that long) and for months in a properly sealed and sterilised jar.

What I am intrigued with are further recipes that I found – apple butter cakes, cookies or biscuits anyone?

Get out there, collect some apples and start making apple butter!

21 September – Since I posted this, a Canadian friend told me of a quicker way of making apple butter – you can find it on her page – Lorraine, another T.O.B. Cook