Creamed Horseradish Sauce

I always believe that something you can make yourself is probably going to be better than something you buy – well, apart from fancy sugarcraft things. I am far too ham fisted and clumsy to turn out beautifully sculpted flowers, say.  Actually, anything dainty is probably beyond me, now I think about it.

But I can do all sorts of other things…and horseradish sauce is one of those things. You can buy it of course, but then you are at the mercy of the makers… the heat will be determined by them, as will the level of sharpness. Making it yourself means you can tweak it until you get the perfect sauce for you. I like mine creamy and not too hot, so that’s how I make it.

That’s a horseradish root.

My mother has it growing outside the kitchen door, in a brick edged raised bed. You need to keep the plant confined, otherwise it will be romping happily through your garden (and probably your neighbour’s) without so much as a by-your-leave.  Delicious though horseradish sauce is, I don’t think anyone will be eating pints of it everyday, so keep the plant in a decent pot or a raised bed.

Anyway… how about this for simple?

Now, one thing you should be aware of, that grating horseradish can make you eyes water.. it is so strong the fumes can waft up and before you know it, you have tears streaming down your face.

Bute here’s a trick to help avoid it… freeze it!

I clean the root and pop it in the freezer and grate it frozen. That stops the volatile fumes getting in your eyes.

When I am ready to use it, I get it out and peel the outer skin from maybe an inch or so of the end.

Just grate away.

(You might need to wrap the root in a tea towel because it IS frozen solid and I don’t know about you but my fingers get so very cold) Once you have grated an inch or so, wrap the remainder of the root in cling film and put it back in the freezer ready for the next time.

You’ll need to add at least a teaspoon or so of sugar to the grated root – I use golden caster sugar, as it dissolves quickly.

For sharpness, the juice of half a lemon is just perfect.

And to make it perfectly creamy, a tablespoon of double cream is just the thing

And now?  Just stir it round, mixing it all together.

It’s a good idea to do it an hour or so before hand so all the flavours can blend in and settle down to make….

… a beautifully textured sauce.

Just the thing to serve with beautifully roasted rib of beef…..

Parsley mayonnaise

When I made Ham Hock Terrine I thought there was something missing.

In the end, I decided that I needed just a little something to go with it… something both sharp and savoury, something to moisten the bread… that was what I wanted.

And what better than some delicious mayonnaise, made specifically to go with the lovely terrine?

It’s easy enough to do and I often make a bowlful and flavour it to a specific dish. This time I thought I would make it with parsley and add a few chopped gherkins to liven it up a bit and tie in with the ham hock terrine.

All you need are a couple of eggs, some dijon mustard, some salt, some oil (olive oil is very strong so plain vegetable oil should make up the majority of the oil used) You’ll need vinegar – either white wine or cider vinegar would be good in this – some parsley and some gherkins.

First of all, then separate two eggs and put the yolks into a reasonably sized bowl. Add a pinch of salt and a quarter of a teaspoon of mustard… stir them together and then start whisking

Whisk it good and hard (an electric whisk is a godsend if you have one… otherwise, think of it as replacing a work out in the gym).. this is the hardest  bit of the job and to be frank, it isn’t that hard!  After this it is all plain sailing.

When everything is smooth and whisked well, add a drop or two of oil and start again, whisking

And it suddenly starts to come together – look, you can see it thickening.

Now you can add the oil in greater quantities

And it’s off and away… just keep adding more oil until you get the amount you need. Those two egg yolks are all you need to make pints of mayonnaise – if that is what you want. Just add more oil… it all thickens up as you whisk.

It’s not enough just to use oil though – the flavour needs a touch of sharpness to bring the flavours together. Sometimes I use lemon juice but this time I wanted cider vinegar.

Add a teaspoon or so of vinegar – taste it and see if has sharpened everything up. Whisk it round to a smooth and glorious sauciness.

Once you have enough, all you have to do is flavour it the way you want it.

Start chopping the parsley and some gherkins and add them to the mayo

Taste again… the parsley adds a sort of rich, slightly bitter flavour and those little bits of gherkin run through it adding a lovely sweet and sharp bite.

Really, for maybe ten minutes work (and not hard work, either) you can have a delicious, fresh and tasty mayonnaise that goes exactly with whatever you are cooking. 

You’ve got a couple of eggs, haven’t you?  There’s some oil in the cupboard….. go on….

You know you’ll love it.

Celebrating!

Yes, I’m celebrating!

After what seems like many years in the wilderness of temporary work, I have finally got a job!

I am coming up to a BIG birthday and what better present than this?

It seems like the last decade was marked by redundancies, deaths of loved ones and the search for work in a depressed economy… finally, it seems like I am turning the corner. Things have been pretty miserable at times and it seemed as if there were few things to celebrate.

But yesterday I had an interview for a really great job (REALLY great) and yesterday afternoon, I was phoned by the Human Resources department to tell me that I had got the job.

I start work in just over a week’s time, when The Bear and I get back from a weekend away. We were going to celebrate my birthday and now we have an extra thing to be happy about.

They say things come in threes, so who knows what the next good thing is going to be? I shall start the celebrations now ….. I am back in the north and I am just about the pour a drink for myself and one of my most long standing friends… so cheers, everyone!

No cooking tonight, just champagne and cheers!

Ham Hock Terrine

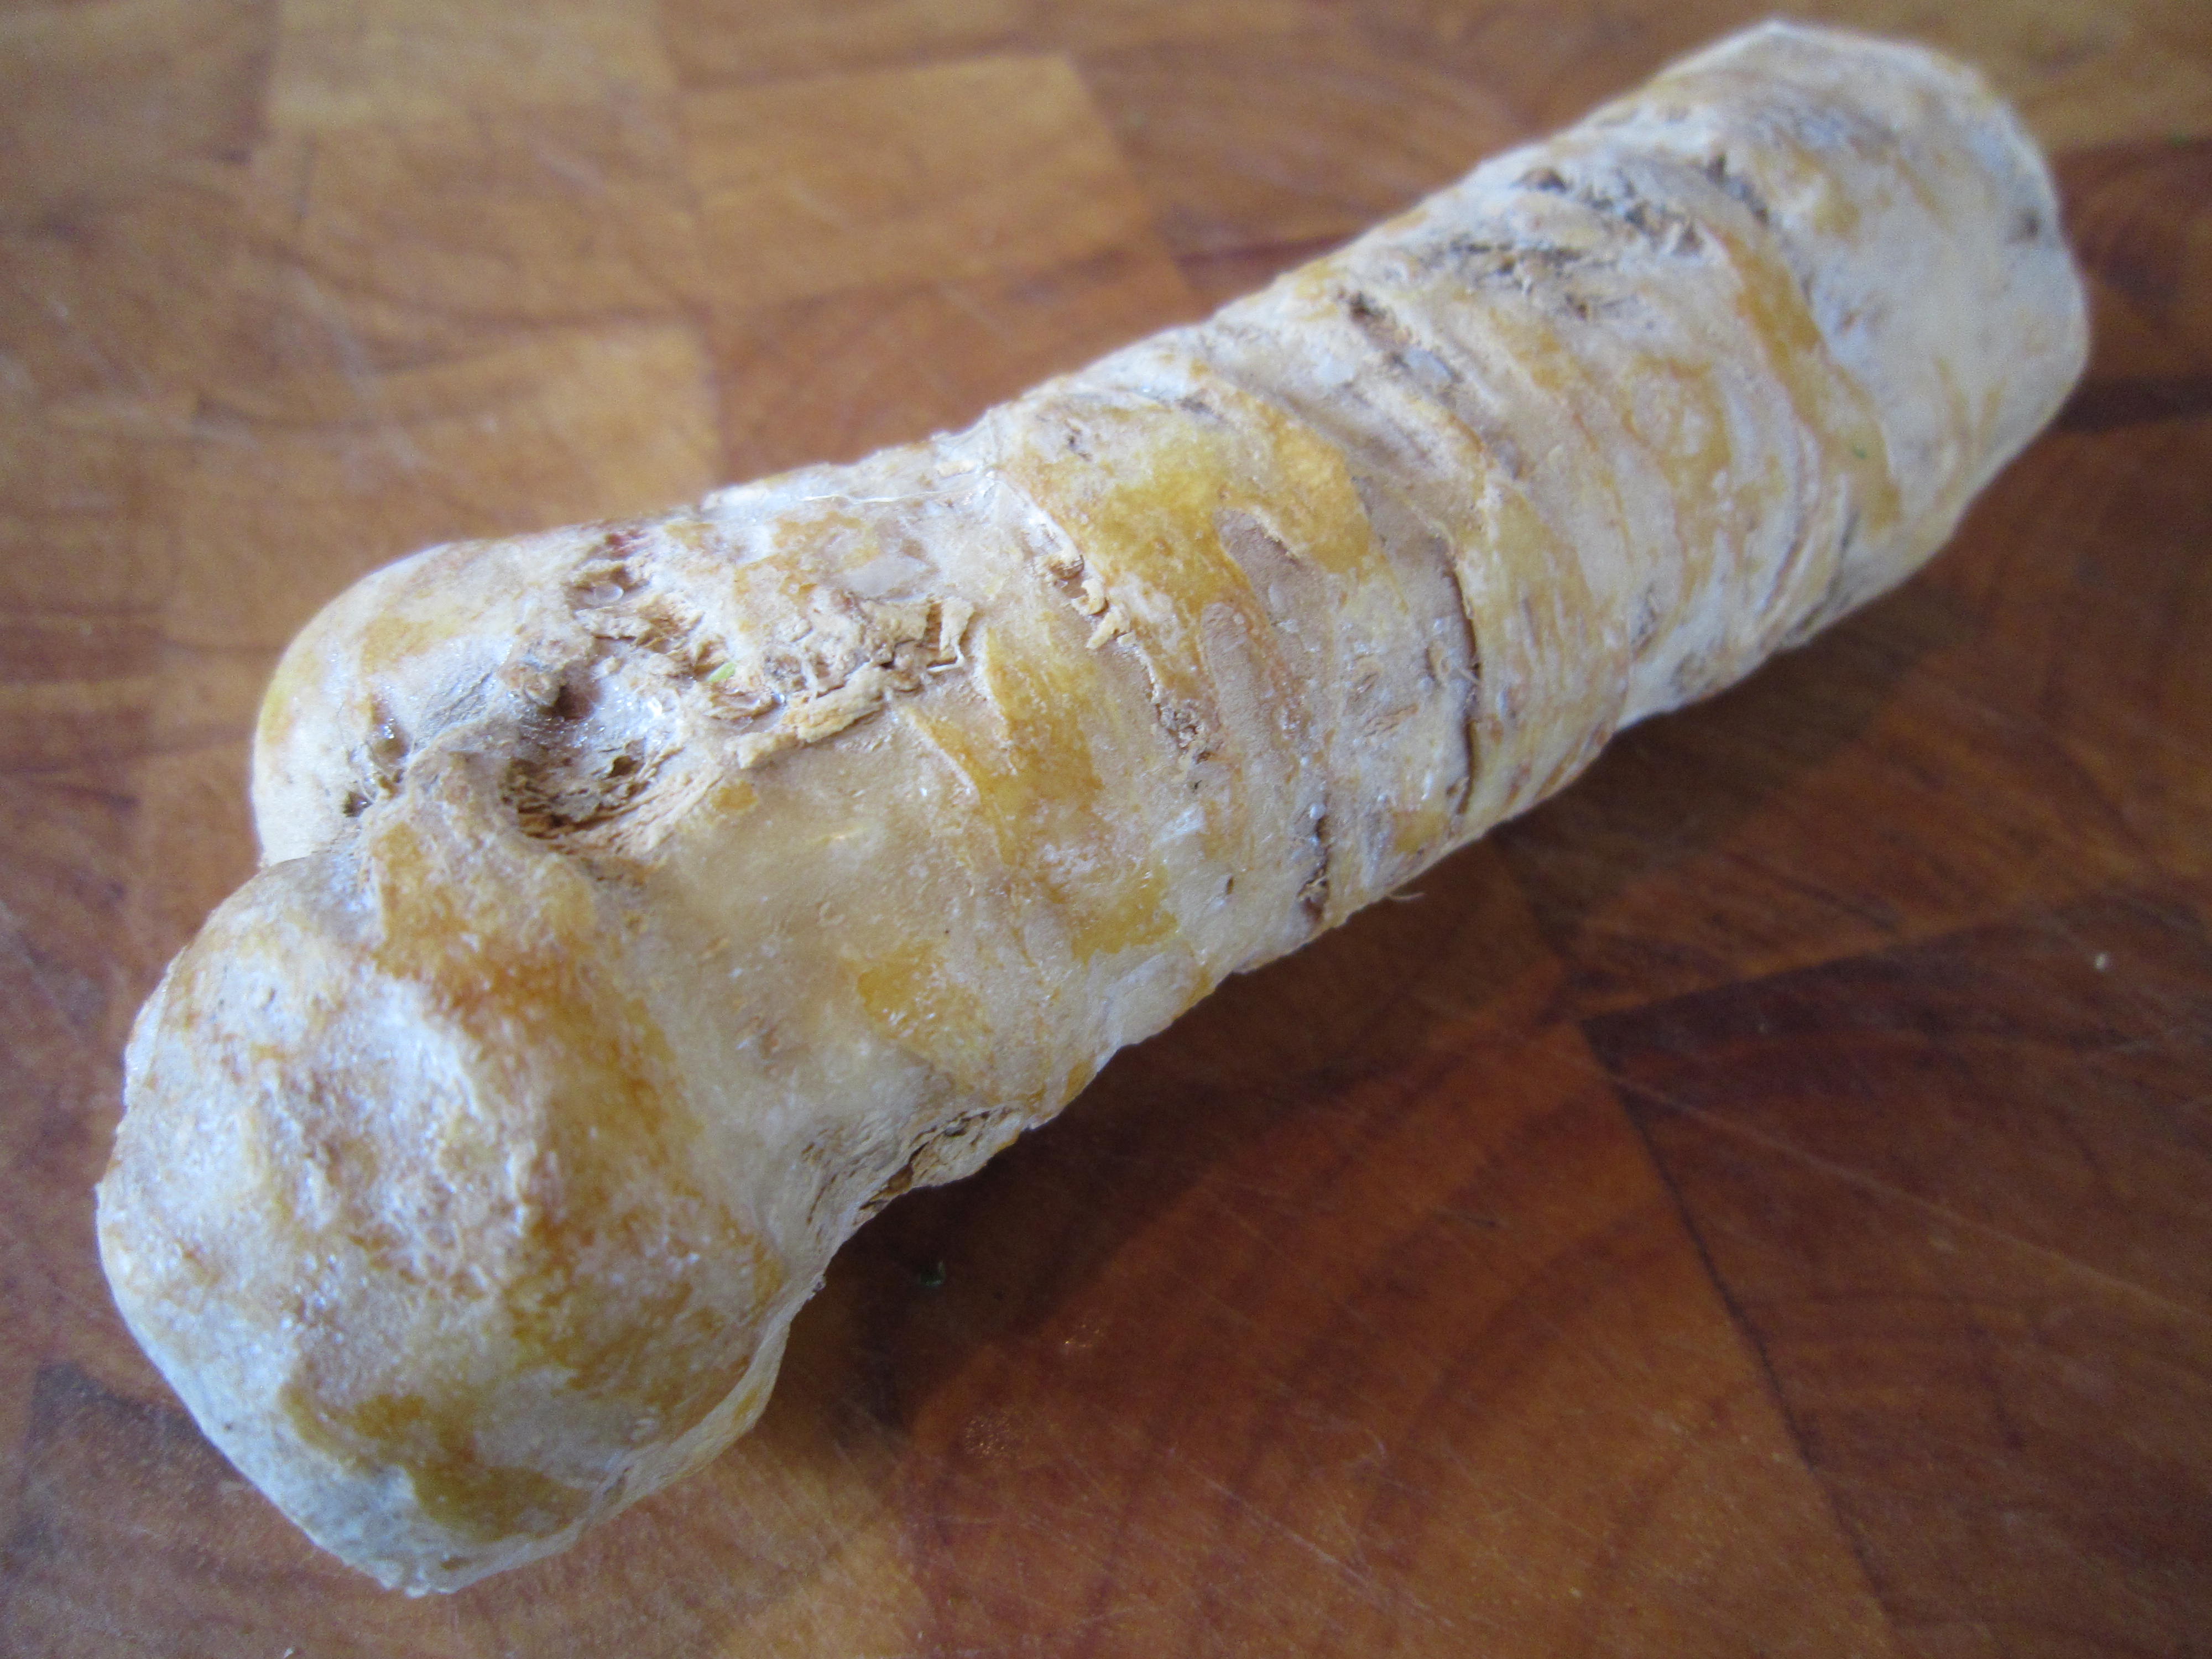
Well then. What’s a girl to do when she claps eyes on one of these?

A little porky trotter.

Well, if she is a cunning and cost concious cook and she also claps eyes on walloping great ham shanks

costing a mere £1.49, well then, the odds are that she starts to think of a delicious ham hock terrine, flecked with parsley and glistening with a soft and tasty jelly, just waiting to be eaten on some lovely No-Knead Bread…. perfect for a lovely light lunch or supper.

All you need are some ham shanks, a trotter (though if you can’t get one, you can use leaf gelatine – easy as anything – and I’ll tell you about that later)

A lovely big bunch of parsley and maybe some gherkins to chop through it later

 and a couple of carrots and an onion for the stock and a scattering of peppercorns

How simple a list of ingredients is that?

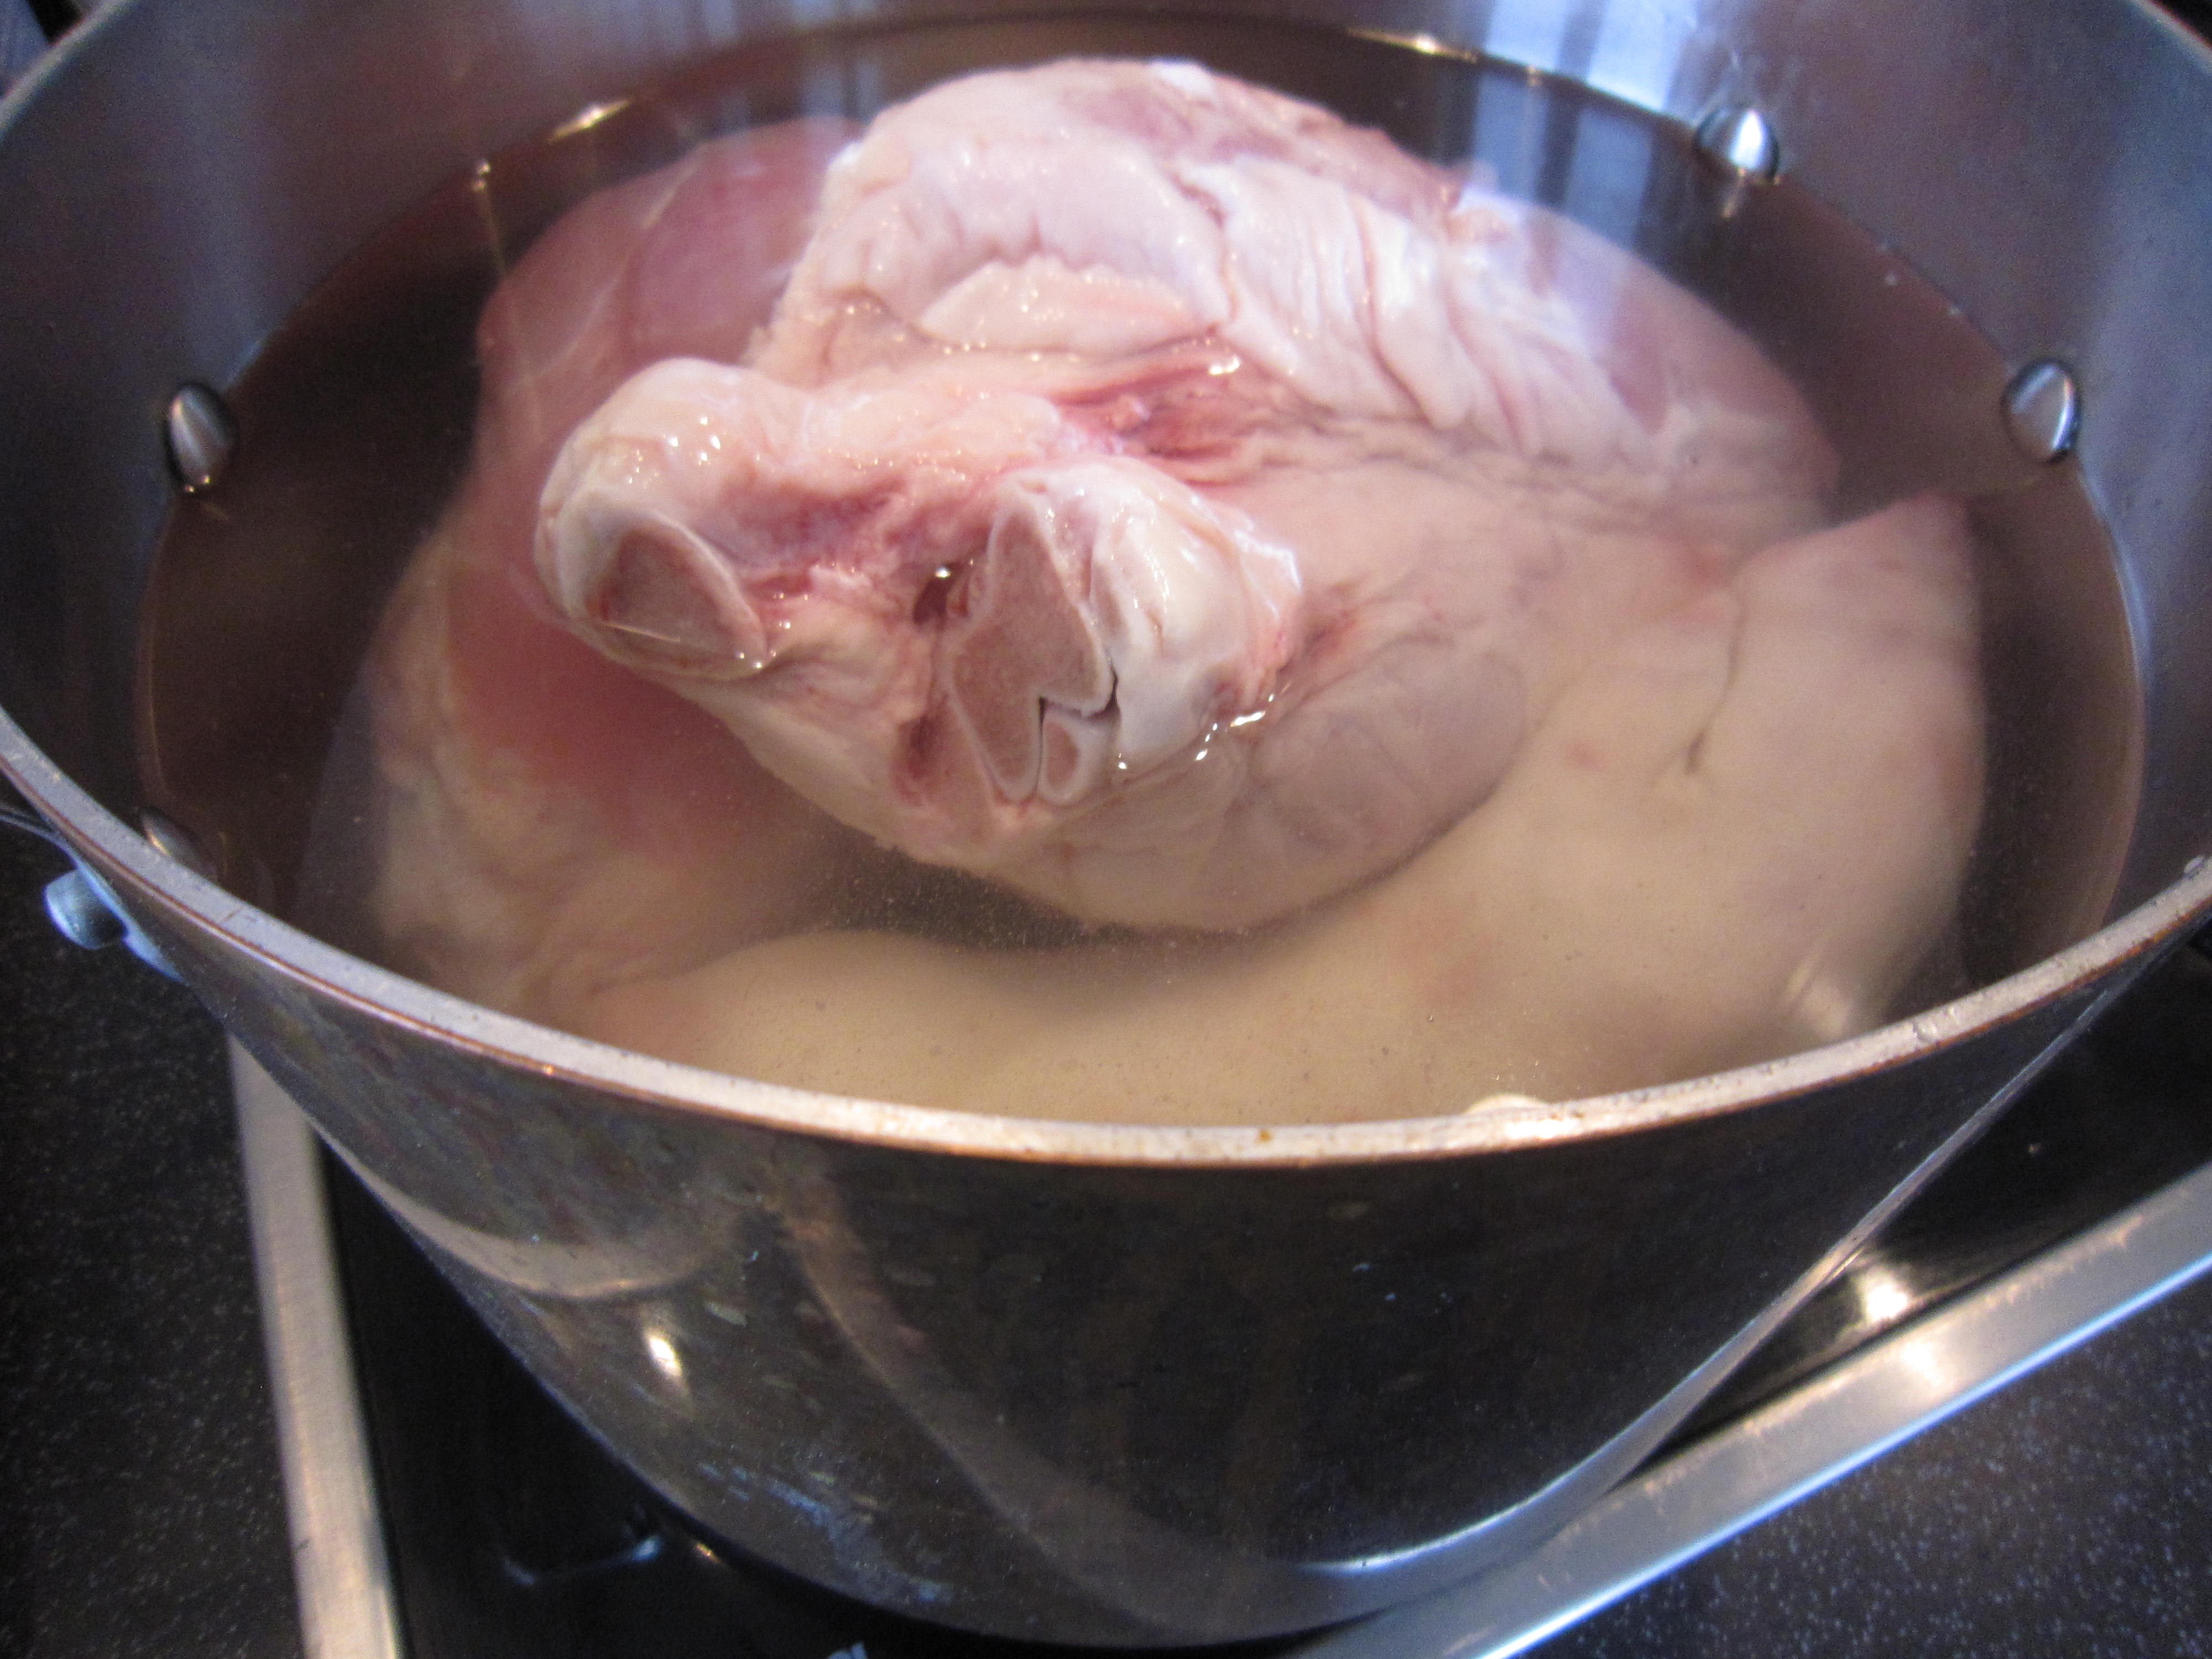
So first of all, rinse off your assorted bits of meat and pop them into the biggest pot you have (and really, don’t let that pig’s trotter worry you or put you off. It’s the traditional way to get a lovely jelly but if you can’t find one, or if you can’t face it, just relax. You can add leaf gelatine later)

You need to bring the pot up to a boil for a few minutes – this loosens all the impurities and brings them to the surface as a dirty foam.

See? Get that scooped off and then empty the water out.

Refill the pan with fresh water and start it boiling again, but now add the halved onion (no need to peel it) and a couple of carrots and a handful of peppercorns

Bring everything to the boil and then turn  the heat right down and let everything simmer away for couple of hours.

Check, occasionally, how soft and tender the meat is.

You are going to tear the meat into shreds for the terrine so you need it all to be cooked to sheer perfect tenderness.

See how soft and tender the meat looks? Just hook the shanks out and put them on a plate to cool.

Take out the trotter too – look at how that is all falling apart… it has almost dissolved, giving up all of the lovely gelatine you will need to set the terrine later. There’s not much meat to pick through there, so don’t worry if you haven’t added a trotter. It really has done its job so you can throw that away now.

Sieve the pan of stock of its vegetables and you are left with a pan of rich and flavoursome stock. This is going to form the jelly that enrobes the ham so you want it to be as tasty as possible.

The next thing to do is to boil it down, removing more of the water and concentrating the stock.

Because the jelly is also going to have parsley running through it, I thought I might as well add the parsley stalks to the final boil down, just giving it an extra depth of flavour.  Let the stock reduce some more then turn off the heat, sieve the parsley stalks out and let the stock cool.

If you haven’t used a pig’s trotter, after you have sieved the stock, get a sheet of leaf gelatine and soften it, first of all, in some cold water. When it is all soft and slippery, add it to the stock and stir it round. It will dissolve almost instantly. Now leave the stock to cool down.

While that is going on and the meat is also cooling down (well, you don’t want to burn your fingers when you are stripping the hocks, do you?) you need to prepare the terrine.

I bought that lovely Le Creuset terrine at Christmas and used it, first of all,  to bake a baguette  in and I swore then that I would get cracking on a terrine. It’s taken me all this time to get around to it.

Anyway, the thing to do is to make a liner and the easiest way to do it, is with good old cling film. Lay out sheets of cling film on the bench so you have three layers and then, after rinsing out the terrine dish with water (so everything  comes out easily later and it is easy to adjust the cling film), lay the film inside the pot

Right then… back to the meat.

By now it will be cool enough to handle and you can start to shred the meat into pieces.

Because it has cooled, the fat will have set  so you can make sure that you can leave that behind as well as the skin and the tendony-gristley bits. (Don’t squirm!)

Two ham shanks will give you a really big plateful of tender, delicious, juicy meat

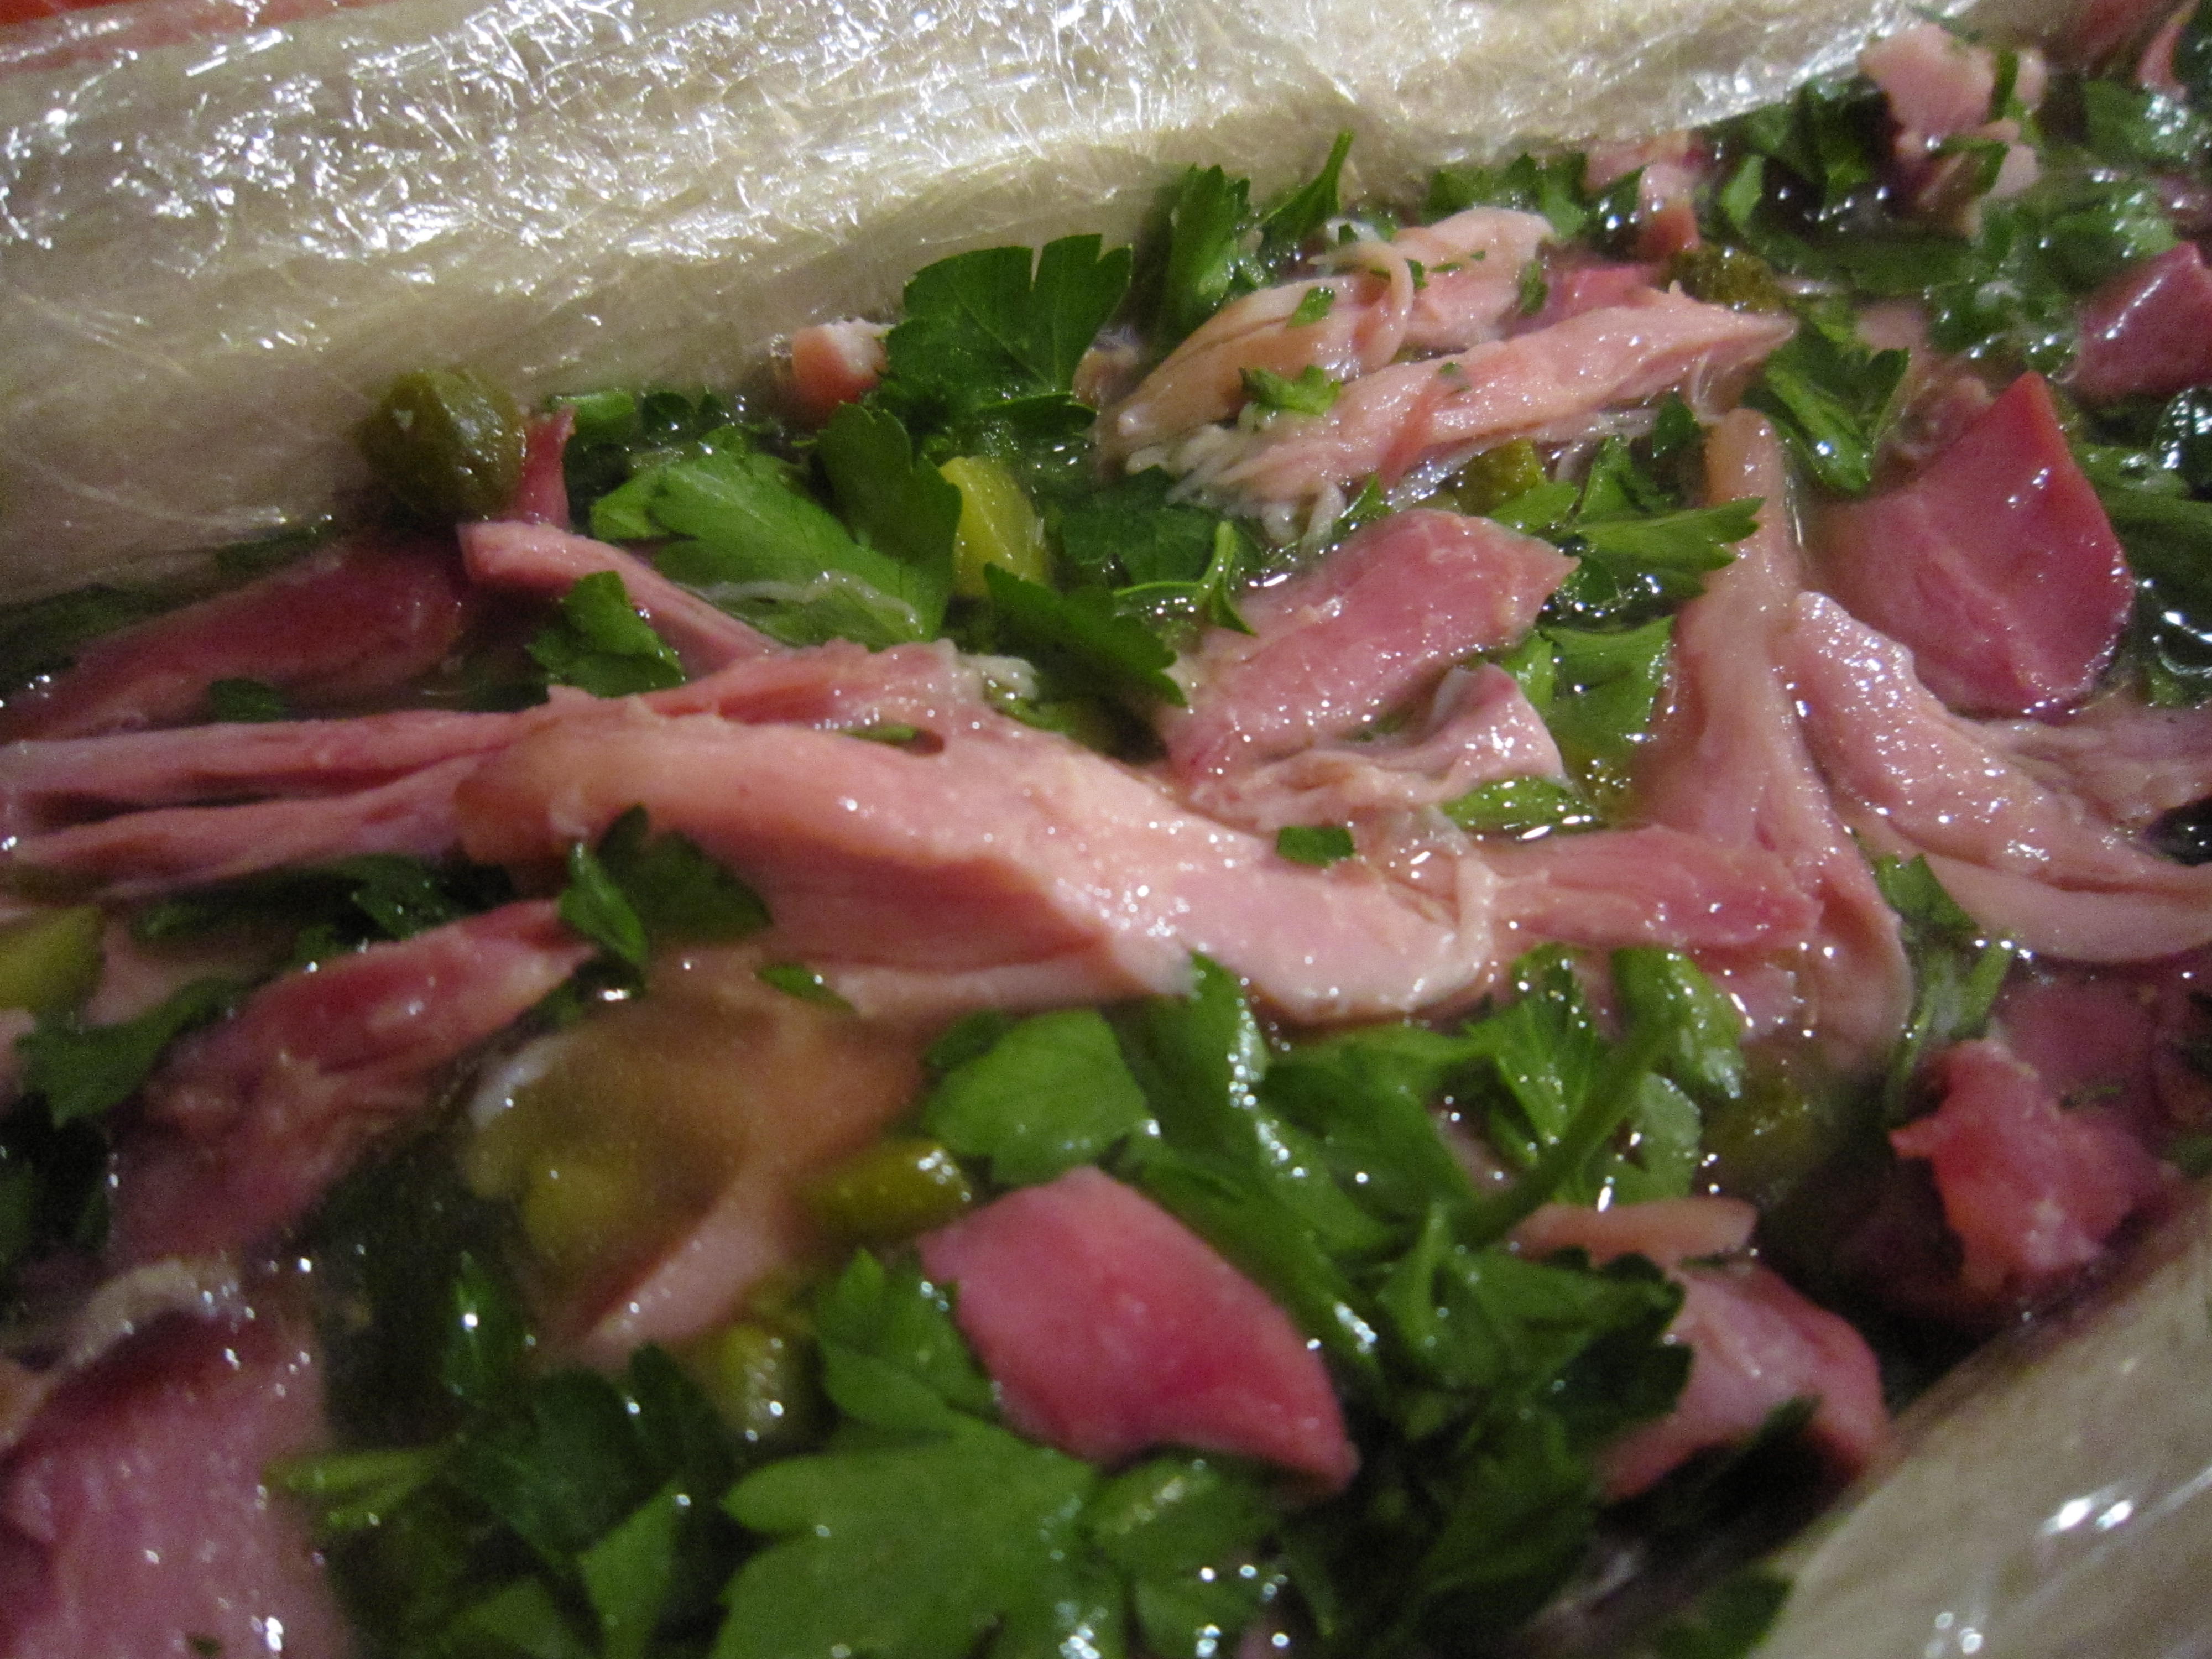
Now, meat alone is very good but you really need something to sharpen it all up and this is where some lovely little gherkins transform this into the perfect dish

Chop them into little cubes so that when they mix with the meat and the parsley and the jelly they give you little bites of sharpness.

And the parsley? You used the stalks to add to the stock, now chop the leaves (and just the leaves, so strip them carefully)

Put the meat, the gherkins and the parsley into a big bowl and mix everything so you have an even distribution of all the ingredients

Now, it’s just a matter of putting everything together.

Pack in the meat and parsley/gherkin mix and then slowly pour in the cooled stock.

I say do it slowly because you need it to seep in and around the meat so everything holds together when it is set. Just pour it in till the stock just covers the meat.

Then fold over the edges of the cling film

See? A lovely neat parcel. And that’s it. It just needs to set now.

Now, you can make a lid to fit, by cutting cardboard and covering it with clingfilm and lying it on top of the meat. This makes it easy to press down on the terrine and helps it set tight… thing is, this was so packed with meat that once I covered the top with cling film  and pressed down lightly, I realised that it was already packed tight.

So all I did was put it in the fridge to set over night…

The next day, planning a lovely light lunch for The Bear and myself, I took out the chilled and now solid terrine.

The cling film made it easy to lift out the terrine

You just get hold of the extra film and lift….. and then pop it onto a plate

How beautiful is that?

The gorgeous pink, juicy meat with leaves of lovely parsley and little nuggets of gherkin all in a lovely, savoury, light jelly….

Just the thing with some lightly toasted bread, some salad leaves and a dab of  parsley mayonnaise.

So, the next time you spot some ham shanks and maybe a pig’s trotter and only about £3.20 in your purse, do you think you might just think of making a delicious terrine? 

The strangest thing I have ever done in a car

… well, I bet THAT got you interested!

Those of you who read this regularly might have noticed that I haven’t been posting as much as usual – that’s a combination of work getting in the way and a few worries at home. I’ve hardly done any cooking at all. My darling aunt is really quite ill, so I have returned to the grim North to see her.

I got up to the most marvellous sunrise and tried to think what it meant.. red sky in the morning?

Was that the bad weather portent.. or was it going to be good weather?  I set off muttering “red sky at night….shepherd’s delight… red sky in the morning…. oh dammit!”

I had a long drive…….

.. and yes, it started to snow… AGAIN!

By the time I was driving up this road, my most favourite road in the world, the road back into my village, it had snowed.

In two hours everything had gone from a normal wintry day, with no snow,  to thick snow

When I went to my mother’s house, what had been clear of snow, two hours previously, was now two inches deep.

I just wish it would all go away.

Anyway, back to the car thing……my aunt hasn’t been eating and as I would do anything for her, I asked what she could manage a mouthful of. She’s stuck in hospital, watching yet more snow whirl past her window  and marvellous though the NHS have been for her, they can’t possibly make dishes to order.

They have to cater for thousands every day and that means making stuff that appeals to the majority. That’s fine, in the main, but she was tired of yoghurts and jelly…. but she could, perhaps, manage a spoonful or so of creme brulee.

So, the devoted niece drove straight to Marks and Spencer and bought two little creme brulees. I would have made it myself but, quite frankly, I didn’t have the time.

That’s the packet, balanced on the dashboard of my car.

They looked delicious…but, and this was the big but… you had to put the sugar on the top and grill it to get the lovely brulee crunchy top.

Now, as I said, the NHS is truly marvellous but they just won’t let you wander into their kitchens and borrow a grill.

I had thought of that and I brought along (being a most resourceful niece – comes of being in the Girl Guides, I reckon) my kitchen blow torch.

They wouldn’t let me fire it up in her room, either. 

Risk of fire and all that.. so….

I sat in the car in the car park and brulee’d the little pot, balanced on my leg,  until it was golden and crunchy.

Was it worth it? Oh yes. My little aunt ate it all up… and the added bonus was that my car smelled divine!

So. Beat that. Of all the things anyone has done in a car, I reckon finishing off a creme brulee is probably the strangest…

Unless, of course, you know different?

Fairtrade Fortnight (22 Feb – 7 March 2010)

A couple of weeks ago I got the following email from a friend I have known for years… years and years.

And I thought you all might like to see what she said, because we are, of course, not only massively interested in delicious cooking but we are all supportive of Fairtrade.

So, read on and see if you can do something. After all, baking is not just for tea-time….

To encourage fairer baking, Tate & Lyle  and cupcake queen and author Lily Vanilli, have developed a trio of delicious and unusual recipes using Fairtrade ingredients, which I am delighted to share with you.  You’ll probably be aware that the Fairtrade mark is the only independent consumer label that ensures farmers in developing countries receive an agreed and stable price for the crops they grow that covers the cost of sustainable production… so it deserves support

 
Two years ago, Tate & Lyle announced plans to move its retail cane sugars range to Fairtrade with no resulting price increase to consumers.  In the first year alone, this switch created a return of  £2 million in Fairtrade premiums for cane farmers.
I hope that you will feel able to support Fairtrade Fortnight  through your blog and encourage “Fair” baking during the run up to Fairtrade Fortnight. Maybe you would also try one of Lily’s recipes with a view to sharing the results with your readers?  What could leave a better taste in one’s mouth than a delicious cake made from fairly traded ingredients?!
Emma
Lily Vanilli’s Fairtrade Bacon and Banana Cakes
 
4 rashers unsmoked organic back bacon
150g ripe Fairtrade bananas (approx 2 small)
60g Fairtrade honey
100g unsalted organic butter (at room temperature)
40g Tate & Lyle Fairtrade caster sugar
140g organic plain flour (sifted)
1/2 tsp baking powder
Pinch of salt
2 large, free-range organic eggs (at room temperature)
Handful Fairtrade Brazil nuts (toasted & chopped)
1/2 tsp grated Fairtrade nutmeg
1/2 tsp Fairtrade ground cinnamon
12 paper cupcake cases


1. Lay rashers of bacon on a foil lined sheet and place in a cold oven with the temperature set to 200c for approx 20 mins or until crispy. Allow to cool

 2. Turn heat down to 180c

 3. Mash bananas with honey in a small bowl and set aside

 4. Sift together all the dry ingredients into a large bowl – flour, sugar, baking powder, salt

 5. Cut butter into small chunks and add to the dry ingredients, blend with an electric mixer on medium speed until evenly incorporated

 6. Add eggs, one at a time, beating after each addition

 7. Mix in the banana/honey mixture, spices and Brazil nuts to taste

 8. Spoon into cupcakes cases, filling almost to the top 

 9. Bake in preheated oven for 15 mins or until a toothpick inserted in the centre comes out clean

 10. Remove and leave to cool in the pans for approx 3 mins – then transfer to a cooling rack and leave to cool completely.

 Frosting:

55g unsalted organic butter (at room temperature)
325g Tate & Lyle Fairtrade icing sugar
1/2 cup (4fl oz) organic double cream
2 tbsp Fairtrade honey

 1. Beat the butter until smooth, then add half of the sugar, the double cream and the honey

 2. Continue beating, slowly adding the rest of the sugar to achieve a smooth, even texture

 3. Ice each cooled cupcake with a thick swirl of frosting and top with strips of cooled bacon and chopped Brazil nuts.

Fairtrade Devil’s Food Ale Cakes
 
115g unsalted organic butter (at room temperature)
45g Divine Fairtrade cocoa
155g Fairtrade ale (Honey Ale)
170g organic plain flour (sifted)
Pinch of salt
2/3 tsp baking soda
225g Tate & Lyle Fairtrade caster sugar
1 large free-range, organic egg (at room temperature)
3 fl oz (3/8 cup) organic buttermilk
12 paper cupcake cases


Preheat the oven to 180c

 1. Bring ale to the boil in a saucepan. Remove from the heat and stir in the cocoa.  Leave to cool until it reaches room temperature

 2. Sift together the flour, salt and baking soda and set aside

 3. Cream the butter and sugar together with an electric mixture until very light and fluffy (about 5 mins)

 4. Add the egg and beat until just incorporated

 5. Beat in the cooled ale/cocoa mixture

 6. Add the sifted dry mixture in three parts, alternating with the buttermilk in two parts – beginning and ending with the dry and beating after each addition

 7. Spoon the batter into a baking tray lined with cupcake cases (2/3 of the way full)

 8. Bake in preheated oven for 15 mins or until a toothpick inserted into the centre comes out clean

 9. Cool briefly in the pans and then transfer to a wire rack until cooled completely.

 Frosting:

1. Boil ale in a saucepan, remove from the heat and stir in the cocoa. Allow to cool completely – transfer to a bowl and place in the fridge if necessary

 2. Beat the butter until smooth

 3. Add the vanilla, ale/cocoa mixture and half the icing sugar and continue to beat. Gradually add all of the sugar – beating continuously until you reach a consistency you like

 4. Spread onto cooled cupcakes and top with shavings of Fairtrade chocolate and Brazil nuts. Or do as I did and just add more chocolate!

Fairtrade Burnt Butter, White Chocolate and Brazil Nut Cookies
 
280g organic plain flour (sifted)
1/2 tsp baking soda
1/2 tsp salt
170g Unsalted organic butter (at room temperature)
220g Tate & Lyle Fairtrade light brown sugar
100g Tate & Lyle Fairtrade granulated sugar
1 large free-range organic egg (at room temperature)
1 free-range, organic egg yolk (at room temperature)
1/2 tsp Fairtrade vanilla essence
Handful Fairtrade white chocolate chunks
Handful Fairtrade Brazil nuts (chopped)
Zest of one Fairtrade lemon


Preheat oven to 150c

 1. Sift together the flour, baking soda and salt

 2. Melt the butter in a saucepan and heat, stirring continuously until brown bits begin to form at the bottom of the pan (approx 5 mins)

 3. Beat the melted butter together with the light brown sugar and granulated sugar until smooth 

 4. Add the egg & egg yolk and beat to incorporate into sugar/butter mixture

5. Set the mixer to a low speed and gradually add the sifted dry ingredients

 6. Add lemon zest, chocolate and Brazil nuts to taste

 7. Roll dough into 2 inch diameter balls and lay on a lined baking sheet, approx 2 inches apart, bake in preheated oven 15 mins or until brown around the edges and soft in the centre.

So what do you think? Fancy a try at any of these? It’s not just for our own enjoyment – well, it is, but think of the greater good – this is your chance to help Fairtrade!

Thanks, Emma!

(Oh, and have something nice for tea!)

Dal. Delicious dal.

It’s obviously the weather for comfort food…the cold and damp and gloom affects everyone’s mood and general levels of happiness.  I am still working as a temp and that is not helping matters either. It’s good that I have work, but how I long for a real job with some sense of security because working week by week means I can’t plan anything. The uncertainty just nags away at me.

Ho hum.

I seem to have been working my way through my favourite comfort food recipes…recipes that can be relied upon to make me feel safe and happy. I was reading one of my friend’s blogs, Anne’s Kitchen, and her take on dal reminded me just how much I love it… and how long it had been since I served dal for supper.

One of my favourite things to eat (and, now, a favourite of The Bear’s, too) is dal. Beautifully soft and fragrant lentils, or split peas, chickpeas or beans, spiced with chillies and assorted spices and served with steamed basmati rice.

 There are hundreds of recipes for dal but this one is one I have developed over time and one that we love.

I travelled round the south of India (surely one of the most beautiful places on earth?) before I met him and ate dal all the time…

and what follows is  an amalgam of all the lovely dals I ate on trains, in cafes,  in railway stations….at  beachside huts

I saw some brilliantly fresh coriander in my local Asian supermarket. It was a sign, I felt, that I had to buy it and go home straightaway and start on dal.

Before you do anything else, you need to get the spice mix right. I love the slight popping effect of the mustard seeds in the finished dish. I start by heating the frying pan with a splash of chilli oil and adding chopped onion to soften slightly before adding heaped teaspoons of kalonji (black onion seeds, or nigella), brown mustard seeds and fenugreek seeds.

They pop slightly as they heat and add a delicious fragrance and flavour to the finished dish.

A teaspoonful each of tumeric and cumin powder add a deep rich smell and taste… and a pinch of asfoetida gives it a pungent, almost garlicky hit

Just put them in and stir them round mixing everything so the ground spices cover everything

I adore coriander and I have that lovely big bunch, so I like to chop the stems and add them at this stage too – layer upon layer of delicious herbs and spices transform a simple dish of lentils into something truly marvellous

I do need to add heat, of course, and I have some fantastic dried chillies

That can bubble away in the dal as it cooks…..

So, to the mix, add a cup full of yellow split peas

And a cup full of lentils.

Two different sizes, you’ll notice, which adds a delicious variation in the finished dal…

Add two cups of water and stir it round….

and add a tin of coconut milk

Look at that lovely rich cream…. stir it round…

and just leave it so simmer away…..it will take about an hour.

While that is chugging away gently, I make the rice, the way I was shown by an Indian friend

I heat some the indispensible chilli oil and throw in 6 cloves. Count them, don’t just thrown in a handful, because at the end, it is a good idea to know how many you are looking for. Cloves are marvellous but biting on one, unexpectedly, suddenly makes you think of the dentists, not of comfort and happiness.

Throw in a cup full of rice and stir it round so it gets a coating of chilli oil and the slight scent of cloves, then add a scant cup and a half of water a decent pinch of salt  and bring it to the boil.

Turn down the heat and let it cook until the water is absorbed.

Now, all you do is take it off the heat and lay a clean teatowel over the top of the pan and put the lid back on

What this does is absorb any extra steam and moisture and your rice turns out beautifully fluffy, with each grain separate and perfect.

Perfect!

All you need now is to serve up the dal….with fresh coriander

Look at those little mustard seeds… the split peas and the lentils…but to make it absolutely perfect and in homage to my love of the south of India, some shavings of raw coconut add the finishing touch

Utter, absolute luxury from the most basic of ingredients.  Utter and absolute comfort food, costing pennies.

What more could I want?  (Well, apart from a job!)

Lolly!

We have a new T.O.B Cook!

Once upon a time I had a good job. A great job. And I had great friends working with me. I still have the friends, it’s just the job that went by the wayside.

One of those friends is Lolly who was always there to sort everything out – she was the one who listened to me trying to run over my phone in my desperate attempt to get shot of the dreadful thing and get another…. she has listened to me shriek in disbelief at the tortures inflicted on me by computers… she has rescued me from all sorts of things and made sure that all was well in my world.

And what did I give her? A potato ricer. It just goes to show what a brilliant person and cook she is that she loved it!

And now the lovely Lolly is reading my blog…..

She decided to make the Blueberry Yoghurt Cake

Doesn’t that make your heart skip a beat?

That truly is one beautiful cake! I don’t think I have seen a more beautiful one.

And she decided to try No Knead Bread….

That’s her bread in progress – and it is a testament to her skill as a baker that as soon as it was ready to eat, her parents and her beloved ate it!

I shall get Lolly to tell you more, but until them, look at her pictures and drool at her cake!  

October 2010

Autumn is here as is the apple crop. We have all been trying to do as much as we can with the huge haul of apples and the lovely Lolly is no exception.

We both love cake baking and Laura and I have been working on delicious cakes using apples. One thing we found on our searches was that apple butter or stewed apples can reduce the need for fat in a cake and anything that can make cake almost a health food is good for us!

  Lolly had emailed me one morning and we were talking about the potential for cake ” I was having a look at your blog and came across the recipe for the Apple Cake that you made with Apple Butter, and some chopped up apple pieces. I have 3 smallish apples left from my bounty, as well as a small Tupperware box of stewed apple and I wondered if you thought it would work if I made it like this….

Peel and core my 3 remaining apples, mix with juice of ½ lemon.

Put 250ml greek yogurt in a bowl and add 200g golden caster sugar, 60 ml veg oil, 2 eggs and the seeds from one of your wonderful vanilla pods and gently mix

In another bowl put 300g plain flour, 1 ½ tsp baking powder, ½ tsp bicarb, and then instead of the apple butter, two heaped dessert spoonfuls of stewed apple and a tsp of cinnamon.

Mix through and add dry ingredients and chopped apple.

 Do you think that this would work, or do you think I should also add a little bit of butter for a bit of fat?”

Look at that! I think you could say that it worked!

Lolly says ”  Well I made it! I think that I put too much of something in, perhaps flour as the cake is a little dense. However, that hasn’t stopped it from being devoured by everyone at work so it must taste alright!!! I also made a small heart shaped one for Giles…!”

I think that is how it should be for a cake that is best eaten with tea or coffee – somehow, light and fluffycakes belong more with afternoon dainty teas. This is the sort of cake that is perfect for a mid morning break, say. Nothing too sticky… nothing too airy, just a perfect slice to have with a hot drink.

Well done, Lolly… and I bet Giles loved his heart shaped cake!

Lamb Henry

Remember the crushed potatoes? That lovely perfect mix of crunchy and soft… savoury, yet almost sweet from the proper cooking of the carbohydrates? Now I think they can stand alone as a dish, and in an emergency, when you need something quickly then that is a great option.

I made them last week in under half an hour, but what I didn’t go through at the time was what I served them with. I made roast lamb.

Now you know that time was of the essence that night, so what I had to do was to cook something really quickly. I think my favourite meat is lamb, so when I found the perfect quick-cook lamb roast I was in seventh heaven.

Lamb Henry is  a cut, like a shank but cut from the shoulder instead. You can cook it slowly, which is what all the recipes I have found suggest, or, do it like we do – cook it hot and fast!

That piece there is more than enough for the two of us – it could easily stretch to three, I think, if I made more vegetables or just increased the potato – and guess what? It cost £2.96.

Now, imagine the pleasure of having a fresh, hot-roasted piece of lamb, mid week, cooked with the minimum of fuss and bother, costing less than a burger from a fast food joint, and ready in less than an hour. You’d be pleased, wouldn’t you?

So, first things first, get the oven on to preheat – 180 degrees – and while that is getting up to temperature start on your potatoes and rub the skin of the little lamb henry with salt.

Straight into the oven with it, where it will stay, undisturbed for 45 – 50 minutes.

(You can pop the potatoes in if you are doing them, but they will need only 20 or so minutes)

That’s it after 45 minutes…..

… and a nice thing to do is to put a spoonful of mint jelly on the top, maybe 5 minutes before the end. Or maybe redcurrant jelly?

It melts over and bastes that little henry…..

Let it rest for five minutes or so and then cut delicious slices of lamb.

Perfect with crushed and roasted potatoes……

Supper cooked from scratch in just under the hour. Each delicious portion costing less than £2. What more can you ask for mid week?

Crushed potatoes

Working full time is, as most of you will know, a pretty tiring business.

Working as a temp in an office is actually not that lucrative, so there’s always a fine line to be drawn between saving money and making things taste good.

This cold, dark winter seems longer than usual and it affects everyone’s mood. We get up in the dark, go to work in the dark and come home in the dark. If it’s not snowing then it’s raining or just bone-chillingly cold. The street lights come on mid afternoon and the freezing fog just hangs about.

I feel permanently exhausted and everything seems so much effort. Even cooking – my great joy – seems to be suffering. I want to come home and do the minimum…. the minimum, that is, until I have to eat it. I want something to cheer me up and make me feel marginally more special than a cold, dark and miserable Thursday warrants.

The answer is, of course, make something that takes the least effort imaginable, in the shortest time, with the loveliest taste.

When your mood is low then the thing to do is to get some potatoes… life always seems better when spuds are involved

The answer, therefore, is….. crushed and roasted (sort of) potatoes.

You’d be happy, I take it, with something that takes less than half an hour to make and serve? Some of those packet meal things take 40 minutes.. so something fresh and easy would be better? Surely?

So, you get some potatoes, peel them and cut them into manageable pieces… put them in a microwavable bowl with a sprinkle of salt and some water.

Put the oven on at 180 degrees.

Cover it with a plate and cook on high power for 6 or 7  minutes. (I say cover it with a plate because that is quicker and more economical than covering it with cling film and then throwing it out. Besides, that’s what I always do)

That’s just enough to mainly cook them but them still to keep their shape. Jab them with a knife to check there’s give in them.

Drain the spuds and put them on an oven tray… and get out your potato masher.

(Funnily enough, when I make mashed potato I won’t use the masher, I always use a potato ricer to make sure the mash is as smooth as can be. The masher is, however, perfect for part crushing the potatoes)

Now, don’t go mad. You aren’t mashing… you are bashing.

The potatoes need to be broken down around the edges… not flat, just bashed about.

Drizzle oil over it… garlic oil is good… as is chilli oil if you want your potatoes to have a bit of a bite … then shove them in the oven on a top shelf for ten minutes or so.

See how the littler bits have gone golden and crispy?

And the bigger bits have crisped up round the outside?

And there you have it… perfect to serve with (as I did) some roast lamb…. or maybe left over sausages, heated through, or maybe some roast chicken.

Sometimes, it is just enough to have a bowl of potatoes.

That really did take just about 30 minutes to make. 

And it really did take the edge off a bad day.